Raspberry Pi project boards pt.1 – Ladder Board
This is the first post in what will be (at least) a three part series. I’m also planning to look at the Quick2Wire board(s) and Gertboard.
The ladder board (sold by Tandy for the bargain price of £5.99) is designed for Gordon at Drogon’s ladder game[1], but can be used for various other purposes – basically anything you can think of that employs 10 LEDs and 4 switches.
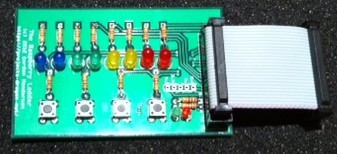 It took each of my kids around half an hour to turn the kit into a working board, and it’s all very straightforward through pin components.
In use
Gordon supplies a test program for the board, which provides an easy way to confirm that everything is working as expected. With both of the boards I’ve tested I’d note that the switch test didn’t work exactly as expected – the green LEDs would stay on rather than only coming on when the corresponding button was pressed.
Once the board is proven to work OK there are various apps that can then be used to do stuff with it:
- Ladder game – a C programme (that must be run using sudo) where the player has to time button presses to complete a complete set of flashing LEDs. My son and I had originally built this using a homemade Pi Cobbler and breadboard, but it’s much better to have a proper board.
- Simon – a BASIC version of the classic sequence memory game
- Anything you can imagine – with C, Python, BASIC or whatever. I don’t know whether anything has been done yet to bind it to Scratch (like the demos I saw of PiFace at a Raspberry Jam event last week), but I’m sure that will come.
I2C issue
I’d also note that this board doesn’t play nicely with I2C (which I’d enabled for work with the Quick2Wire boards), so I had to go back and disable I2C support. It’s hard to blame the board for this, as the underlying issue is the reuse of various general purpose input/output (GPIO) pins as part of the Raspberry Pi design. This is probably one of those cases where it’s useful to be able to boot the Raspberry Pi from different SD cards (though I can also understand that many people will want to have a single card with all of their stuff on).
Conclusion
The ladder board is cheap, easy to use and a lot of fun. It would definitely be my recommendation for a first project board on the Raspberry Pi – particularly for younger or less experienced makers.
Notes
1. Gordon really has been one of the heroes of the early days of Raspberry Pi. His Wiring Pi library provides a great way to work with GPIO, and he’s done a ton of inspirational projects and guides.
Filed under: Raspberry Pi | 3 Comments
Tags: board, GPIO, Ladder, LED, makers, project, Raspberry Pi, Raspi, review, RPi, switch
Subscribe
Recent Comments
Tim Coote on Ross Anderson RIP iain on Skiing in Espace Killy (Val… Chris Swan on Getting more from a British Ga… Murray Cowell on Getting more from a British Ga… JL on AI MacGuffin  Pinboard.in bookmarks
- Commission proposes youth mobility between EU and UK
- DEA fuels moral panic over ADHD meds to justify its failed drug war
- Meta.ai Oh My!
- Looking for AI use-cases — Benedict Evans
- the biggest threat facing your team
- Why has Hugh Grant settled his phone hacking claim against the Sun?
- Open Source Security (OpenSSF) and OpenJS Foundations Issue Alert for Social Engineering Takeovers of Open Source Projects
- AI isn't useless. But is it worth it?
- Pluralistic: The true post-cyberpunk hero is a noir forensic accountant
- Subaru battery drain due to missing 3G network


Must have missed you posting this earler! Thanks! Yes, there was a bug in the early version of the ladderTest.sh script – fixed now, just need to do a git pull on it to fetch the new version.
And you’re right about I2C (& SPI) modules too. No easy solution, although I never have them loaded by default in my systems, but use the gpio load i2c/spi commands when I need them…
Glad you had some fun with it though!
-Gordon