Retro Computing – RC2014
This is the first post in a short series (with perhaps more to follow as I go deeper).
Why?
I came across the RC2104 at OSHCamp 2018 where I got to meet its creator Spencer Owen and make one of his Mini kits with my son. When he put his Full Monty kit on sale for ‘Cyber Monday’ I had two reasons to buy:
- My daughter is doing Computing GCSE, and I thought it would be good for her to put together something where she could see the CPU, ROM, RAM and interfaces (plus she like soldering).
- I wanted to try out the CP/M Upgrade Kit to relive my days of running stuff on an RML380Z in the far corner of the computer lab at my high school.
What is it?
The RC2014 design is very modular. with each module plugging into a simple backplane that has power, data bus, address bus and miscellaneous signals running across it. It’s a step up from building on breadboard or stripboard, but has the same underlying simplicity and elegance.
In the Full Monty kit I got:
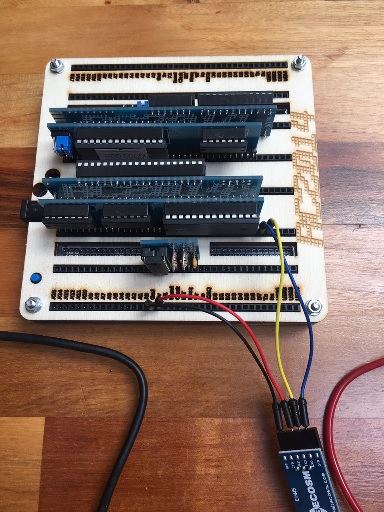
- 8 way backplane – used to connect modules together
- CPU – a Z80
- RAM – a 62256 static RAM (32kb) supported by a couple of 74HCT series TTL chips
- ROM – an AT27C512 one time programmable (OTP) EPROM (64kb) supported by a 74HCT32 and some jumpers so that different chunks can be addressed to select BASIC, CP/M monitor or Small Computer Monitor.
- Clock – a simple 7.3728MHz crystal based clock using a 74HCT04
- Serial -a 68B50 supported by a 74HCT04 with headers for an FTDI cable (and space for a 232Max chip for those wanting RS-232)
The components on each module are more retro inspired than retro authentic, but that helps to keep the complexity down. RAM in the 80s would have used lots more smaller chips, and the same would go for ROM (which would be EPROM rather than EEPROM). 80s designs also tended to stay in lane according to the CPU type and supporting chips for I/O etc. rather than mixing from the different worlds of Intel/Zilog and Motorola/MOS.
Assembly and testing
There are over 600 solder joints, but everything uses easy to work with through pin connectors, so after a few hours of me working on the backplane and my daughter making the modules we were ready to try it out.
It didn’t work first time :(
I then started working my way through the troubleshooting guide[1]… No obvious bad joints. Power was present at all the key points. No shorts on bus lanes. Good continuity along bus lanes.
At this stage I broke out my ancient Telequipment S51E single trace analogue oscilloscope that I saved from a skip at my 6th Form College when they were refreshing to shiny new dual trace scopes. I showed me that there was a clock signal, but didn’t have sufficient bandwidth to display it properly – you can’t look at a 7MHz clock on a 1MHz scope. I ordered a shiny new scope (more on that in another post).
Next up I switched each major chip with my RC2014 Mini – everything still worked on the Mini, and the Full Monty still refused to fire up.
At this stage I reached out to Spencer for some advice, and he suggested that I try each of the modules in my Mini (pulling the chip that was on the module). This let me eliminate the CPU, RAM and ROM from enquiries. I was pretty sure the clock was good (and my new scope arrived in the middle of troubleshooting to confirm that), so attention focused onto the Serial module.
Spencer noted that the only difference between serial on the Mini and the serial module is the resistors – 1k vs 2k2 respectively, so maybe my FTDI connector wasn’t getting along with the slightly weaker signal. I was using an Embecosm EHW5 USB UART that I got at the OSHUG Chiphack FPGA workshop, and that’s served me well for various projects, but Spencer was right – it was my ‘FTDI’ cable, and plugging it directly into the RX/TX lines got me a working terminal.
When my daughter got home that evening she was able to type in a BASIC program and test her creation.
I ordered a cheap FTDI cable from eBay, and when that arrived it worked perfectly with the serial module (even though it appears to have a counterfeit FTDI chip, which I guess is to be expected for low price parts from dubious sources[2]).
Extras
Along with the Full Monty kit I fell for the upsell to get some extra modules:
- Digital I/O – provides 8 bits of input using push switches and 8 bits of output onto LEDs
- Joystick – a derivative of the input side of the Digital I/O board to connect 2 DB9 joysticks (like those that came with the Atari VCS console and most of the 80s home computers)
- Raspberry Pi Serial – connects a Raspberry Pi Zero with terminal software so that the RC2014 can be used with a USB keyboard and HDMI or composite screen rather than using a terminal (usually another PC with terminal emulation)
I made a disastrous error with the I/O board of thinking I knew the colour codes for 2K2 resistors vs 330R that let to a lot of bothersome desoldering and a tiny bit of PCB track repair. This is why we have multimeters, and if we have multimeters we should use them.
I was disappointed to find that the joystick port didn’t work, and this turned out to be due to a fairly fundamental design issue. 80s joysticks hold the pins high for up/down/left/right/fire, and the switches connect to GND to switch them low. The RC2014 module holds the pins low, and switches to 5v to pull them high. On my old Competition pro 5000 the 5v line isn’t even connected. I bodged this by bridging pins 7 & 8 on the DB9 connectors.
My Pi Zero needed the mounting holes drilled out a fraction for the mounting screws to fit through. I’ve not got around to playing with that part yet (as it’s a feature of the Mini that I’ve already explored).
CP/M
Digital Research’s Control Program/Monitor (CP/M) was the ubiquitous operating system for things that were simultaneously grown up and microcomputers prior to the advent of the IBM PC and PC-DOS/MS-DOS. I didn’t see a ton of it in my youth (at least until the Amstrad PCW came along), because it was too high end for home computers (at least for stock systems without a load of pricey expansions) – so it was somewhat aspirational.
The CP/M Upgrade kit comes with:
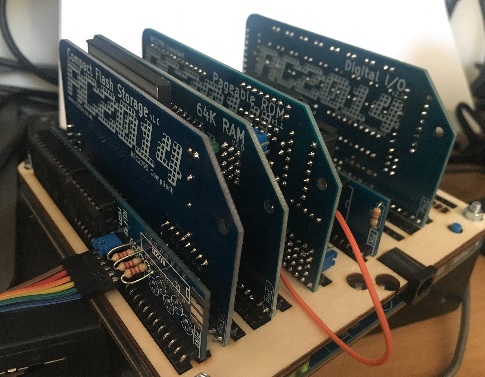
- Pageable ROM – to provide more control over which ROM section is being accessed.
- 64kb RAM – for extra working memory
- Compact Flash – to provide mass storage in place of floppy disks or hard disks. The module comes with a pre formatted 128MB card that has a small selection of essential CP/M utilities on.
As it’s an upgrade it reuses the RAM chip and 74 chips from the RAM & ROM modules, but oddly comes with its own R0001009 ROM (versus the R0000009 ROM that came with the Full Monty kit, where the 1 represents the presence of the ‘CP/M Monitor, for pageable ROM, 64k RAM, 68B50 ACIA, CF Module at 0x10, with origin at 0x0000’ in bank 4).
The additional modules worked first time, and following Spencer’s Simple Guide I found myself at the once familiar A> prompt.
The challenge then shifted to finding something useful or interesting to do with a CP/M machine; but practically the first obstacle was getting some CP/M programs onto my RC2014…
The compact flash card comes with a DOWNLOAD.COM utility on the A: drive, which comes from Grant Searle’s CP/M on Breadboard project and provides a way to copy files through the terminal emulator console. Usually I use PuTTY as my terminal emulator, but throwing bytes down a serial link at 115200bps without any hardware flow control is a recipe for disaster, so I switched to Tera Term and configured it for a 10ms per character delay to slow things down a little. Grant’s archive contains a FilePackage.exe program for Windows that encodes CP/M programs and files to the format used by DOWNLOAD.COM, though I had to register COMDLG32.OCX on Windows 10 as simply having the control in the same directory doesn’t work for VB6 apps running on much newer Windows.
With DOWNLOAD.COM working it was time to plunder the archives for MBASIC and Zork etc. With the equivalent of something like 1600 80s 5.25″ floppy disks’ worth of space to play storage shouldn’t be a worry.
Having got used to multi tasking multi user systems I keep wanting to bring up another terminal whilst it’s busy doing something boring like file copying; but of course CP/M is a single tasking single user system, so it needs a bit of patience. Apparently it’s possible to run Unix on the RC2014, so maybe that’s a project for another day.
Notes
[1] Chelsea Back’s Further Debugging RC2014 and First Programs was also helpful.
[2] For things like FTDI cables the problem these days is finding vendors who don’t have compromised supply chains. At least FTDI have backed away from their scorched earth approach to clones.
Filed under: RC2014, retro | Leave a Comment
Tags: CP/M, CPM, FTDI, RC2014, retro, Z80
Subscribe
Recent Comments
Tim Coote on Ross Anderson RIP iain on Skiing in Espace Killy (Val… Chris Swan on Getting more from a British Ga… Murray Cowell on Getting more from a British Ga… JL on AI MacGuffin  Pinboard.in bookmarks
- Doctrine, Droids, & Dragons: An Impassioned Plea for Unconventional Professional Development
- SARS-CoV-2 BA.1 and BA.2 breakthrough infections boost antibody responses to early Omicron subvariants but not BQ.1.1 or XBB.1.5 - ScienceDirect
- How Many Calories Do You Really Burn on Cardio Machines?
- America’s animal shelters are overwhelmed. Pets – and staff – are at breaking point
- Netflix Secret Codes 2024: Every Movie & Series Category on Netflix
- Pharmaceutical giant Bayer is getting rid of bosses and asking nearly 100,000 workers to ‘self-organize’
- View of The TESCREAL bundle: Eugenics and the promise of utopia through artificial general intelligence
- [no title]
- Inside the Super Nintendo cartridges
- "Randar" is an exploit for Minecraft which uses LLL lattice reduction to crack the internal state of an incorrectly reused java.util.Random


No Responses Yet to “Retro Computing – RC2014”