Improved temperature control for Raspberry Pi sous vide
12May13
I’ve been very happy with the results from my Raspberry Pi controlled water bath for sous vide cooking, but I knew that the control loop could be improved. Past runs show fairly continued oscillation:
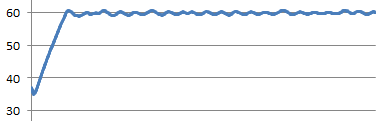
Roast beef run at 60C
I’ve been keeping track of the average power for my control loop, which has been coming out at 22%. So i modified the code to have a bias of 22%, and here’s the result:
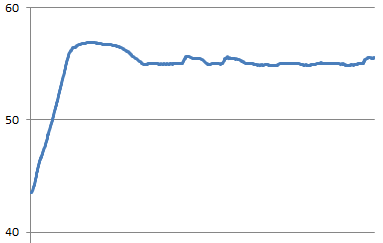
Test run at 55C
Overall much more stable. The occasional hiccups are probably caused by the remote socket failing to receive off commands. There’s a 3C overshoot at the start, which I hope to have fixed by entering the control loop from initial warm up 3C earlier. Here’s the new code (also available at GitHub):
import os
from subprocess import Popen, PIPE, call
from optparse import OptionParser
from time import sleep

def tempdata():
    # Replace 28-000003ae0350 with the address of your DS18B20
    pipe = Popen(["cat","/sys/bus/w1/devices/w1_bus_master1/28-000003ea0350/w1_slave"], stdout=PIPE)
    result = pipe.communicate()[0]
    result_list = result.split("=")
    temp_mC = int(result_list[-1]) # temp in milliCelcius
    return temp_mC

def setup_1wire():
  os.system("sudo modprobe w1-gpio && sudo modprobe w1-therm")

def turn_on():
  os.system("sudo ./strogonanoff_sender.py --channel 4 --button 1 --gpio 0 on")

def turn_off():
  os.system("sudo ./strogonanoff_sender.py --channel 4 --button 1 --gpio 0 off")
#Get command line options
parser = OptionParser()
parser.add_option("-t", "--target", type = int, default = 55)
parser.add_option("-p", "--prop", type = int, default = 6)
parser.add_option("-i", "--integral", type = int, default = 2)
parser.add_option("-b", "--bias", type = int, default = 22)
(options, args) = parser.parse_args()
target = options.target * 1000
print ('Target temp is %d' % (options.target))
P = options.prop
I = options.integral
B = options.bias
# Initialise some variables for the control loop
interror = 0
pwr_cnt=1
pwr_tot=0
# Setup 1Wire for DS18B20
setup_1wire()
# Turn on for initial ramp up
state="on"
turn_on()

temperature=tempdata()
print("Initial temperature ramp up")
while (target - temperature > 6000):
    sleep(15)
    temperature=tempdata()
    print(temperature)

print("Entering control loop")
while True:
    temperature=tempdata()
    print(temperature)
    error = target - temperature
    interror = interror + error
    power = B + ((P * error) + ((I * interror)/100))/100
    print power
    # Make sure that if we should be off then we are
    if (state=="off"):
        turn_off()
    # Long duration pulse width modulation
    for x in range (1, 100):
        if (power > x):
            if (state=="off"):
                state="on"
                print("On")
                turn_on()
        else:
            if (state=="on"):
                state="off"
                print("Off")
                turn_off()
        sleep(1)
Filed under: code, cooking, Raspberry Pi | 10 Comments
Tags: 434MHz, bias, control system, DS18B20, mains, PI, PID, python, Raspberry Pi, remote control, RPi, Sous vide, water bath
Subscribe
Recent Comments
Monki Gras 2026: Wra… on Monki Gras 2026 Chris Swan on Milo cancer diary part 20… Chris Swan on Milo cancer diary part 20… Chris Swan on USB C Charger Reviews Peter on USB C Charger Reviews  Pinboard.in bookmarks
- An error has occurred; the feed is probably down. Try again later.


Good work! That curve looks like it’s almost “critically damped”. When moving the control loop entry point be careful not to end up with it under or over damped. ;-)
Why don’t you use the control loop for the warmup as well?
The control loop isn’t used for warmup in order to avoid building up a massive ‘I’ term.
Thanks fo making this public, I am using it for beer brewing. However, I was wondering if you ever found a solution to the overshoot in the beginning which I always get when heating up. Is “Bias” the “D-Part” of a PID-Regulation? Also I wonder what the consequences of “building up a massive ‘I’ term” are? If I do a regulation over 5 hours, the I part will always become huge…
I’m no expert on PID controllers. In fact I’m surprised at the lack of good quality (self tuning) libraries for this stuff. It worries me that most of the world’s markets are now traded algorithmically using code written by the same bunch of people who can’t reliably keep a crock pot at a steady temperature.
Bias isn’t the same as differential (D). What’s going on here is that by starting at a sensible mid point value for the duty cycle there should be less oscillation that would otherwise happen when building up from zero – overshooting – crashing down etc.
I often run the water bath for more than 5 hours when cooking, but I haven’t had concerns about building up a large I term. As the error can be negative then the interror can fall as well as grow – so over time it should even out to 0. If you look at earlier comments then I was bothered about building up a large I term before entering the control loop, as this can distort the early stages of trying to bring things under control. But if you enter the control loop at around the right temperature, then I should sort itself out over time.
As I understand it, overshooting can be a worse issue for brewing than it is for cooking – so the trick is to take more time and come in low and slow. If you haven’t already checked out the BrewPi project then I can recommend a visit there. I still don’t completely understand why they need an Arduino as well as a Pi (which seems like a hangover from the pre Pi OpenWRT origins), but I guess nobody’s refactored it to just use GPIO (or one of the many GPIO boards with an embedded microcontroller).
Thanks for your quick a detailed reply!
I have even tried to completly remove the initial heat up phase and only use the control loop of your script, for my regulation it didn’t seem to make any difference.
I have also realized that the overshot is only about 0.5 degrees celsius when I heat up 30 Liters of water, I was testing with about 10 liters and the overshoot was about 2 degrees. Since I brew only 20 to 30 liters, I don’t think this overshot is to bad (I have only been brewing for a year, therefore I am no expert). with 20 Liters and a target of about 75 degrees celsius the oscilation is half a degree up and half a degree down. I am pretty happy with that for the first try.
The only change I have made compared to you is making the resolution of the modulation higher. With your 100 second approach the overshot was about 5 degrees. I went down to ten, now the regulation can create much shorter impulses and may react faster. Do you think that makes sense?
I did have contact with the guys from BrewPi. The reason they use an arduino is for stability and reliabilty. It is basically industry standard to have regulations running on a micro controller. So even if the raspberry completly dies the temperature is still regulatet. Another advantage ist that the system is extendable, meaning you may attach multiple arduinos (i.e. brewpot, fridge, second brewpot…).
For my personal needs BrewPi is much to advanced and I can not change it to my needs since it is so complex. For this reason and for fun I am building my own tool.
The duration of the pulse width modulation needs to bear some relationship to the specific heat capacity of the medium under control and the power output of the heating element. If 10s works better for you than 100s then stick with it.
Hi there,
I just cobbled this together with a Pi and a mains relay on the GPIO. The water bath was a rice cooker. Worked great, and I cooked my first sous-vide boiled eggs (nom) and pork steaks. Thanks for posting!
Andrew
Maybe a dumb question, but how did you generate the temperature log graphs? Matplotlib or something else?
Nothing that fancy, I just imported the temperature data into excel and synthesised the time axis.
Thanks, I have your setup completely hooked up and working and I’m going to test it out this weekend.