Securely accessing your home network with Raspberry Pi – Pt. 2
In part 1 I went through setting up an SSH tunnel, and waking up machines on the home network. In this part I’ll run through how to use various protocols and clients to connect to machines on the home network.
SSH tunnels on PuTTY
SSH lets you tunnel many other protocols through it (using a technique known as port forwarding), and PuTTY has a sub menu for configuring this:
Here I’m illustrating tunnels for VNC (to the RPi itself), RDP (to a Windows PC), HTTP (for a NAS or anything else with a web console) and SOCKS (to route web traffic through your home network).
VNC
I touched upon VNC in my guide to using the Raspberry Pi on the iPad, and there’s a more general guide on Designspark. Assuming that you have things working on your home network all that you need to change when using an SSH tunnel is to connect to localhost rather than the IP or name of the RPi itself (NB if you’re running VNC on the machine you’re connecting from then you’ll have to use an alternate port):
RDP
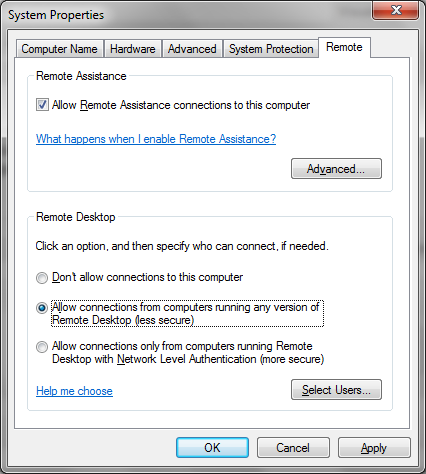
The Remote Desktop Protocol (RDP) was originally used for multi user computing from Windows Servers. Later it was made available for remote admin of servers, and since Windows XP it’s been available on desktops. It’s switched off by default, so the first thing needed is to enable it on the machine you want to connect to remotely (Right click on [My] Computer in the start menu and select properties then Remote Settings):
Since you might have RDP enabled on the machine you’re connecting from I’ve chosen to use a different port (4489) rather than the default (3389). To connect run ‘mstsc’:
Web interfaces
Many devices on the home network can be accessed through a browser, and if you set up a tunnel as illustrated above all that’s needed is to browse to localhost:port (though be careful with proxy configuration if you’re using a proxy or if you tunnel web traffic as described below).
Web traffic
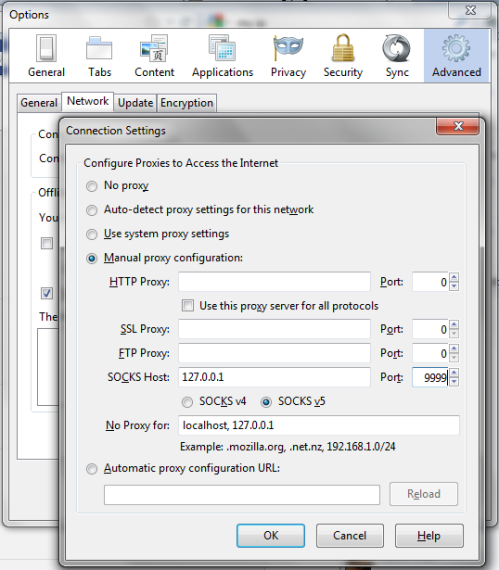
There are times when you might want to appear to the Internet as coming from your home network rather than whatever network you’re on. You can tunnel your web traffic through the Raspberry Pi by using a Dynamic port (also illustrated above) as a SOCKS proxy e.g. with FireFox:
Anything else
Pretty much any protocol can be sent down an SSH tunnel, including SSH itself (so you can run tunnels through tunnels if you like). The only limits are your patience and ingenuity.
Before leaving
It’s one thing to wake machines up remotely, but it’s not always obvious how to send them back to sleep/hibernate – the right options don’t appear in the start menu. The rick is to click on the menu bar (usually at the bottom of the screen) then hit Alt-F4, which will then bring up a menu that includes sleep and hibernate (if they’re enabled).
Conclusion
In this two parter I’ve covered setting up SSH to your Raspberry Pi at home then using it to wake up other machines on the network. I’ve then run through how to tunnel various remote access protocols through SSH so that you can take control of machines remotely.
Filed under: howto, Raspberry Pi, security | Leave a Comment
Tags: howto, http, Putty, Raspberry Pi, Raspi, RDP, remote access, router, RPi, SOCKS, SSH, tunnel, VNC, vpn, wakeonlan


No Responses Yet to “Securely accessing your home network with Raspberry Pi – Pt. 2”