Retro Computing – Gigatron
I’ve had a bit of a binge on this topic over the past few weeks, putting together some kits that I bought ages ago. My RC2014 came first, and then this, a Gigatron.
Why?
Ken Boak did a lightning talk on his Gigatron at OSHCamp 2018, and it sounded super interesting.
What is it?
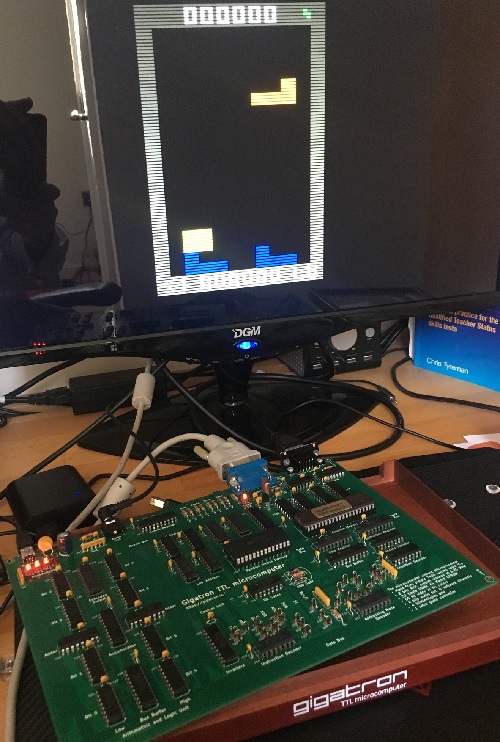
A computer without a microprocessor, that runs entirely on 74 series Transistor Transistor Logic (TTL) chips plus a 32KB static RAM, a 1Mb EPROM (arranged as 64K x 16 bits) and a bunch of diodes.
Despite the simplicity of the hardware it’s capable of driving a VGA monitor (albeit at quarter resolution) along with sound.
It’s the computer that could have been made with late 70s components, but wasn’t, because the trade off between hardware simplicity and software complexity needed to program such a thing wasn’t really manageable back then[1].
It uses a Harvard architecture, that separates program code (in the EPROM) from data (in RAM) rather than the Von Neumann architecture that we generally take for granted.
It is therefore deeply weird for anybody (like me) who grew up with 80s 8 bit ‘micros’. But it’s rather satisfying to play Tetris on something you put together in an afternoon; and it’s a journey of discovery to figure out how on earth that actually works. Co-creator Walter Belgers does a great job of explaining it in his Hackerhotel 2018 presentation.
Assembly and testing
The Gigatron kit comes with a really nice spiral bound handbook that explains everything from basic soldering through to step by step assembly guide.
It took me about 4hrs to put it together, including a bunch of time wasted on an upside down 74HCT161 in the Program Counter[2].
It fired up almost first time. I didn’t have a spare 74HCT161 to replace the one I cut away, so I went with surface mounting it to the top of the through holes, then putting a blob of solder at each spot on the bottom. That didn’t quite work, but after I poked through a short piece of offcut wire into each hole the board started up properly and I got the ‘cylon’ on the blinkenlight LEDs.
When fully complete I found VGA, sound and input all working as expected, meaning I could start using the build in apps. Unfortunately it wasn’t stable when I put it in the enclosure with rubber feet holding up the PCB, which is why it’s pictured out of the (rather nice) supplied case in the photo above. I think it’s fixed now (after a little more work on the program counter joints), though I still suspect a possible (and intermittent) PCB track break around U5.
Extras
My Gigatron came with a ‘Pluggy McPlugface’ input adaptor that lets a PS/2 keyboard be used for BASIC etc., but I’ve not got around to digging out an old keyboard to try it yet.
What’s next?
I’d like to have a go a writing (or at least adapting) a program written in Gigatron Control Language (GCL).
Try it yourself in the online emulator
If you want to see what the Gigatron looks like in action without building one yourself then check out the emulator.
Notes
[1] I guess the metaprogrammers in the LISP community might have had the tools at hand to do something like this, but they didn’t.
[2] It was the third chip that I put in, and I couldn’t believe my own carelessness. I used to be fairly handy at desolding ICs, but I now realise that back then I used a clumsy old 30w soldering iron that was pretty good at delivering heat to many pins at once. What I should have done was just cut off the chip and pulled the pins, and that’s what I did in the end, but not before lots of solder sucking and wrenching.
Filed under: Gigatron, retro | Leave a Comment
Tags: Gigatron, Harvard, retro, TTL
Subscribe
Recent Comments
Monki Gras 2026: Wra… on Monki Gras 2026 Chris Swan on Milo cancer diary part 20… Chris Swan on Milo cancer diary part 20… Chris Swan on USB C Charger Reviews Peter on USB C Charger Reviews  Pinboard.in bookmarks
- Minimal SSH primer
- The Flat Curve Society
- Your Container Is Not a Sandbox: The State of MicroVM Isolation in 2026
- sideprojectslab/PD-64: A USB-PD switching PSU replacement for the C64 that also delivers galvanically insulated AC voltage
- Deepfakes are everywhere. The godfather of digital forensics is fighting back
- Tempest vs Tempest | The Making and Remaking of Atari's Iconic Video Game
- RISE RISC-V Runners: free, native RISC-V CI on GitHub
- The web is bearable with RSS
- House of Lords Digital & Communications Committee - AI, copyright & the creative industries
- CI/CD for Context in Agentic Coding: Same Pipeline, Different Rules


No Responses Yet to “Retro Computing – Gigatron”