The announcement of Rocket by CoreOS was perceived by many to be a direct challenge to Docker, particularly as it came on the eve of DockerCon Europe and threatened to overshadow news coming out at the event. Docker, Inc. CEO Ben Golub was quick to fire back with his ‘initial thoughts on the Rocket announcement’. This piece isn’t about the politics of ecosystems and VC funded startups, which I’ll leave to Colin Humphreys (and note an excellent response from Docker Founder and CTO Solomon Hykes). It also isn’t about managing open source community, which I’ll leave to Matt Asay. Here I want to look at systemd, which lies at the heart of the technical arguments.
Filed under: Docker, The New Stack | Leave a Comment
Tags: CoreOS, Docker, init, Linux, Rocket, systend
At their re:invent 2014 show Amazon launched AWS Key Management Service (KMS), “a managed service that makes it easy for you to create and control the encryption keys used to encrypt your data, and uses Hardware Security Modules (HSMs) to protect the security of your keys”. At launch the service supported EBS, S3 and Redshift. Additional support for Elastic Transcoder was added in late November.
Filed under: cloud, InfoQ news, security | 2 Comments
Tags: amazon, aws, cloud, encryption, HSM, KMS, security
Grove Starter Kit for Arduino
When I first saw the LinkIt ONE at Mediatek’s stand at the Web Summit it was being shown of with a bunch of neat modular peripherals. The person on the stand had no idea about them, and couldn’t explain why the board had its own connectors for these modules. It didn’t take much sleuthing to discover that the modular system was Seeed Studio’s Grove system[1], and I ordered myself a Grove Starter Kit (for Arduino[2])

The kit comes with a bunch of sensors and actuators. It’s much like what can be found in an Arduino starter kit like the ARDX, but the key is that everything is connected together with the same 4 wire leads rather than having to plug individual components and wires into breadboard.

The simplicity of connection makes prototyping much quicker and easier, so I think the Grove kit does a good job of making Arduino development more interesting and accessible. I’m also pleased to say that the hardware is backed up by decent libraries and demos (licensed with LGPL).
Notes
[1] Mediatek partnered with Seeed to create and distribute the LinkIt ONE.
[2] They also do starter kits for the LinkIt ONE, TI Launchpad and a variety of other dev boards.
Filed under: Arduino | Leave a Comment
Tags: arduino, Grove, LinkIt ONE, Seeed Studios
LinkIt ONE – first impressions
TL;DR – The LinkIt ONE is an awesome Arduino, with a ton of great integrated peripherals, but I fear there’s too much of a gap between Arduino style development and building the next generation of connected things – though hopefully that gets covered by the forthcoming Eclipse based SDK.
Introduction
I was at the Web Summit in Dublin a month ago, and one of the key themes that stood out for me was cellular connectivity for devices. I saw a ton of things that were taking advantage of low end, low cost and low power data services – mainly 1G/2G stuff like SMS and GPRS (not power hungry high bandwidth 3G). The coolest thing I saw at the event was the Brewbot (which doesn’t [yet] have any cellular), but not far away was a stand showing off Mediatek’s LinkIt ONE.
The LinkIt ONE development board is an open source, high performance board for prototyping Wearables and IoT devices

The board
The board has the familiar Arduino form factor, and can be programmed from the Arduino IDE, so it ends up feeling like an Arduino bolted on to a mobile phone. It comes with antennae for cellular (SMS/GPRS), bluetooth/wifi and GPS. There’s also a LiPoly battery in the box meaning that you can straight away make projects that could be put in a tupperware box, left in a field and send data back to base – all for $79 from Seeed Studios (who Mediatek partnered with for distribution).

The system on chip (SoC) used by the LinkIt ONE is Mediatek’s MT2502A. It isn’t actually a cellphone SoC, and (according to the pdf documentation) is intended for wearables.
Installation
After a brief fight with the Mediatek registration wall I found the SDK on github. I then moved on to a fight with Windows 8 to install the drivers[1]. With a fresh install of the IDE in place it was easy to get the blinking LED ‘hello world’ demo going.
Huge memory
One thing that stands out straight away is that the capacity of the LinkIt ONE is huge compared to a more typical ATmega328 based Arduino like the Uno. There’s little risk of running out of memory – my simple projects never reported more that 0% usage!
I build a pager
The project I ended up putting together at the ThingMonk hack day was a pager. It receives SMS messages and displays them on a dot matrix screen. I used a Grove LCD RGB Backlit display, which is part of the excellent Grove Starter Kit (something I’ll write more about another day), so I was able to make the display change colour to red/green/blue/white according to the first letter of the received message.
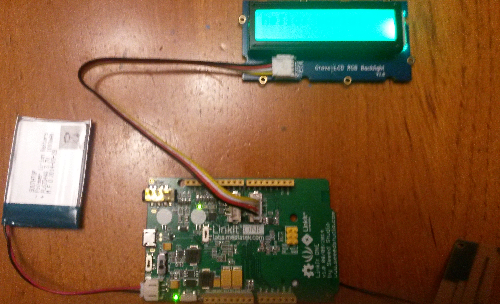
The code is on GitHub, and makes use of the Seeed Studios Grove LCD RGB libraries.
Great but…
The Arduino form factor and development environment have a very easy on ramp for quick and simple development, but I fear it wouldn’t be long before I’d feel held back by its limitations and want to do something more native. I also wonder how I could take the next step and turn something I developed with this board into a (mass produced) product. Mediatek obviously want to sell more SoCs, but this approach means that I don’t get close enough to the SoC to do much with it. I’d like the SDK better if it also had libraries, demos etc. for C (and maybe a real time OS).
It’s relatively simple to take a project developed on a regular Arduino and move it to an ATmega328 kit (like a Shrimp), and it’s then another easy step to port things onto an ATtiny or similar. That progression is presently missing in the Mediatek environment.
Update 5 Dec 2014 – maybe MediaTek have updated their site, or maybe I just wasn’t playing close enough attention in my rush to get started, but I see a promise of ‘an Eclipse version planned for later this year’, which I think will be pretty much exactly what I’m looking for.

The LinkIt OS is based on an RTOS kernel. On top of this kernel is a set of drivers, middleware, and protocol stacks that expose the features of the chipsets to a Framework.
I can hear the open source zealots bleating from here about proprietary binary blobs, but embedded development sadly remains about a decade behind the mainstream. If the APIs are as easy to consume as the Arduino examples then I’ll be pretty happy.
Conclusion
I’m looking forward to doing more projects with the LinkIt ONE. It’s the best Arduino clone I’ve ever tried, and seems amazing value for money compared to buying a whole bunch of shields for a regular Arduino. Sadly there seems to be a gap between the Arduino style of development and unleashing the full capabilities of the hardware, but hopefully the Eclipse SDK fixes that.
Note
[1] The SDK claims to support Windows 8, but you need to jump through hoops to disable enforcement of driver signing to get the drivers installed. This is sadly all too typical even though Windows 8 has now been out for 2 years.
Filed under: Arduino, mobile, review, technology | 2 Comments
Tags: arduino, drivers, Grove, IDE, LinkIt, Mediatek, ONE, pager, SDK, Seeed Studios, Thingmonk
Node-RED on WRTnode
TL;DR – it runs – now I need to put together some GPIO nodes.
Updated 5 Dec 2014 – In my original post Node-RED was so slow it was unusable. Using Michal Vondráček’s node-ws package fixed that.
Background
The WRTnode website features a screenshot of Node-RED, so I thought it would be fun to make it come true.
Node.js on WRTnode
My first hurdle was to get Node.js running on the WRTnode. Node has previously been run on OpenWRT, but that implementation was old and specifically targeted to a big endian MIPS architecture. Luckily Michal Vondráček published a working WRTnode implementation of Node.js the day before the ThinkMonk hack day.
Installation
I next struggled with installation, as ‘npm install –production’ was first running out of memory and then complaining about a lack of filesystem locks. Thankfully Node-RED creator Nick O’Leary was on hand to point out that I could simply copy an installed Node-RED from another system (like a VM on my laptop).
It runs
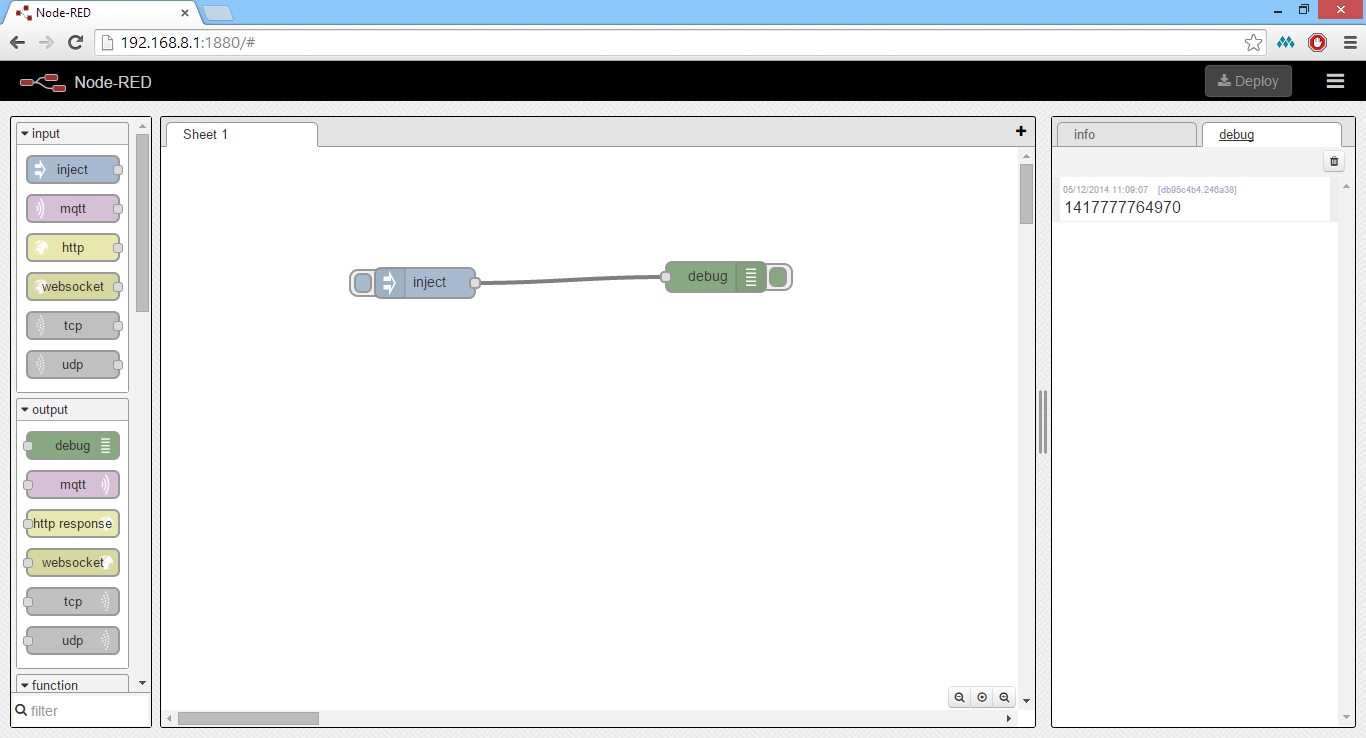
With Node.js installed (mostly onto a USB stick) and Node-RED also copied onto the USB stick I was able to start Node-RED, see it coming up on port 1880 and browse to it.

Having installed Michal’s node-ws and deleted the ws package from the Node-RED node_modules directory everything works:
Todo
I now need to get the GPIO mapped so that I can get Node-RED to blink some lights etc.
Too slow
Sadly running interpreted JavaScript on a low end MIPS CPU doesn’t result in a development environment that anybody would want to use. After half an hour or so of waiting I didn’t even see the tool palette load. I squashed any ideas of moving on to GPIO mapping for the WRTnode.
Can it be made to work?
Possibly – more of the code needs to be compiled to native MIPS. I don’t really know whether this is an issue that can only be addressed in the core V8 runtime, or whether some smart cross compilation of modules might help. Since Nick told me that most of the modules are now pure JavaScript, implying that the clever optimisation has moved from the edge to the core.
Filed under: WRTnode | 1 Comment
Tags: javascript, node, Node-RED, node.js, OpenWRT, WRTnode
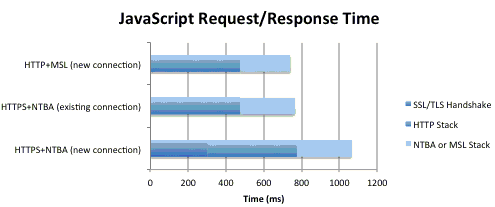
Netflix have announced the release of the Message Security Layer protocol (MSL), which they describe as ‘A Modern Take on Securing Communication’. The project is available on github under the Apache 2.0 license, with implementations in Java and JavaScript. The high level goals of the protocol are to improve performance, be cross language, flexible and extensible, standards compatible and offer automatic error recovery.
continue reading the full story at InfoQ
Filed under: InfoQ news, security | Leave a Comment
Tags: MSL, Netflix, open source, PKI, SSL, tls
OpenWRT on TP-Link WR-703N
The TP-Link WR-703N is a nice, hackable pocket WiFi router. I’ve seen them put to some interesting purposes, but I didn’t own one until yesterday when the kind folk at QCon Shanghai gave me one. I’m not a fan of factory TP-Link firmware at the best of times, but more so when it defaults to Chinese, so it was time for another OpenWRT install (like I’ve done in the past with my TL-WR2543ND and TL-WR841N [1]).

First read the official OpenWRT Wiki article. The point of this post is to cover stuff that’s not presently covered in the Wiki.
I downloaded the stable Barrier Breaker release 14.07, r42625 factory update image and blundered through the Chinese language web UI to upload the new firmware and flash it.
By default the OpenWRT image comes up with no WiFi, and the ethernet port configured as LAN. This makes perfect sense from a security perspective, but not much sense for this particular device.
Turning on WiFi
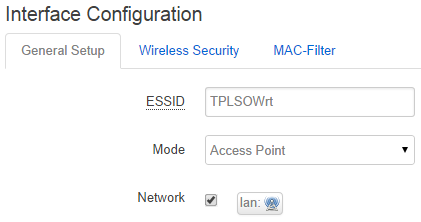
Having connected to the ethernet port from my laptop I was able to access the web UI (and SSH). From there the WiFi can be set up by clicking on Network > WiFi.
Enable WiFi:
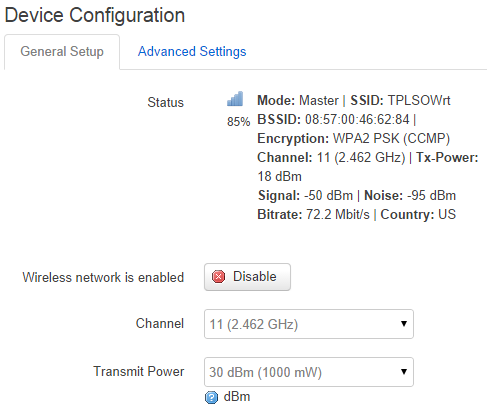
Provide a name for the network and make it part of the LAN:
Then turn on security and provide a key:
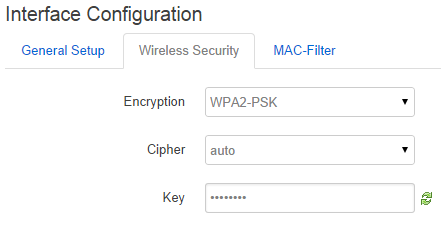
At this stage it’s time to connect to the WiFi interface – using the SSID and security key that were just configured. Unplug the ethernet cable to confirm that connectivity is still OK.
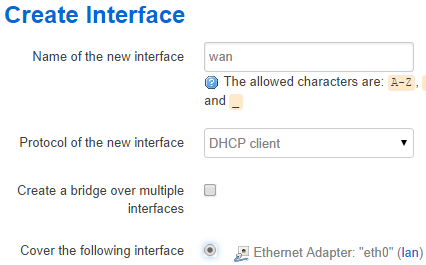
Ethernet == WAN
Next go to Network > Interfaces and Add new interface…
At this point the ethernet port (eth0) is on both the lan and wan, which isn’t good, so go back to the lan interface and edit out the eth0:
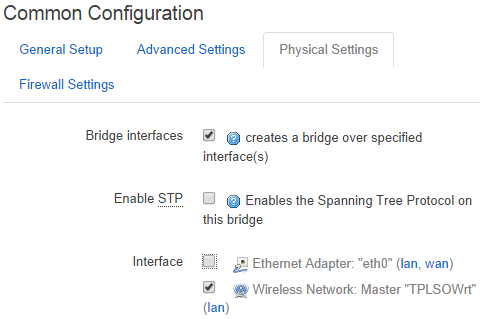
It should now be OK to plug the ethernet into a hotel outlet, your home network or whatever else you’re trying to WiFi enable with the mini router.
WiFi bridging (not working)
One of the things I love about WRTNode is the ability for it to route on from another WiFi access point, so with hotel WiFi you can sign in many devices but only need one registration. I’m told that it should be possible with the TL-WR703N, but I haven’t figured out how to do it. Putting in a similar block of config to what I use on WRTNode doesn’t seem to have the desired effect of creating an apcli0 device:
config wifi-iface
    ....
    option ApCliEnable '1'
    option ApCliSsid 'theSSID'
    option ApCliAuthMode 'WPA2PSK'
    option ApCliEncrypType 'AES'
    option ApCliPassWord 'theWiFiKey'
Note
[1] Both of these routers support the Barrier Breaker release 14.07, r42625 firmware, though the relevant Wiki articles haven’t been updated to reflect that.
Filed under: howto, networking | 2 Comments
Tags: ethernet, lan, OpenWRT, TL-WR703N, TP-Link, wan, wifi, WR703N
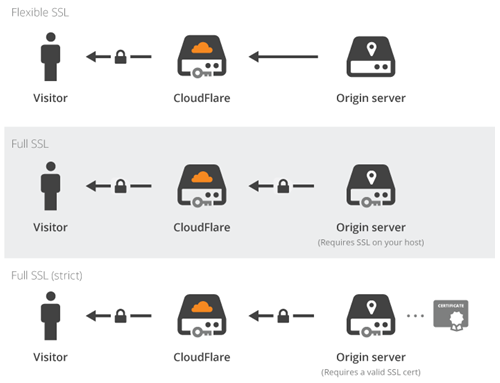
CloudFlare have made SSL available to all free subscribers to its content delivery network (CDN) with Universal SSL. The move addresses both cost and complexity issues that have previously confronted web site and application owners wanting to deploy SSL. CloudFlare takes care of issuing a certificate at no cost to the end user, and enabling SSL becomes a selection from a dropdown menu.
continue reading the full story at InfoQ
Filed under: InfoQ news, security | Leave a Comment
Tags: CA, CDN, certificate, CloudFlare, security, SSL, tls, web

