Securely accessing your home network with Raspberry Pi – Pt. 1
In this post I’m going to cover setting up a network tunnel and waking up other computers on the home network.
Why use a Raspberry Pi?
A tunnel needs two ends, so at home this means leaving at least one machine switched on – keeping the electricity meter turning. One of the great things about the Raspberry Pi is its low power consumption. At 3.5W it will cost less than £3 to leave it on all year.
Overview
There are numerous types of virtual private network (VPN) using a variety of protocols such as IPSEC, L2TP, PPTP and SSL. Most home broadband routers support one flavour of these, but can be very fiddly to configure (both on the router and the client). This howto will cover use of secure shell (SSH). When two computers are connected using SSH it’s possible to tunnel a variety of other connections through that tunnel, allowing all sorts of things to be accomplished.
SSH server config
I’ll assume you’re using the Debian “squeeze” build, though these instructions should be similar for other distributions.
The OpenSSH server is included in the build, but not set to start by default. To fix that:
sudo mv /boot/boot_enable_ssh.rc /boot/boot.rc
Then reboot.
Keys please
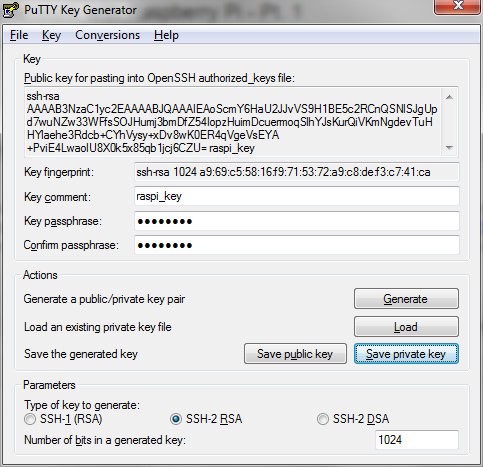
It’s possible to use SSH with a username and password, but this approach is susceptible to password sniffing and brute force attacks[1]. It’s more secure to use SSH keys. I’m going to use the PuTTY client later, so I’ll use its companion key generation tool PuTTYgen. When you launch the tool it will ask you to wiggle the mouse to generate randomness, and once that’s done it’s time to name the keys:
Save the private key somewhere safe. You’ll need it later on the machine that you want to connect from remotely.
The public key needs to go into ~/.ssh/authorized_keys on the Raspberry Pi:
cd ~
mkdir .ssh
chmod 700 .ssh
echo [paste public key text here] >> .ssh/authorized_keys
chmod 600 .ssh/authorized_keys
Port forwarding – home router
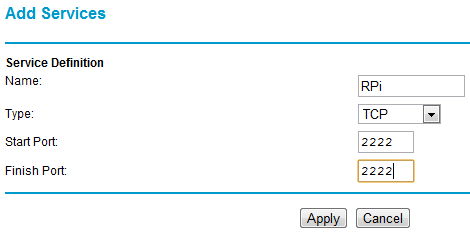
To get to your RPi remotely requires a network port to be forwarded from the home router to the Pi. Details of configuring this vary from one router type to another. The illustrations that follow are for a Netgear DG834. With this particular router the first step is to configure a service:
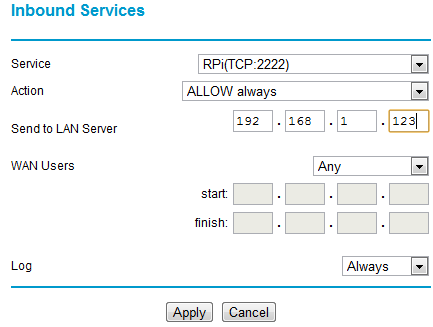
I’ve used port 2222 (SSH usually runs on port 22, but I’m using something different as its less likely to be found by the multitude of bots out there prodding our ports). Any port between 1024 and 65535 should be OK – pick something that’s easy for you to remember. The next step with my router is to configure the firewall to use the service:
What this is doing is forwarding all incoming traffic on port 2222 to the IP address of the RPi (example here is 192.168.1.123).
Once the forwarding is set up add the port into the SSH daemon config on the RPi and restart SSH:
sudo sh -c "echo 'Port 2222' >> /etc/ssh/sshd_config"
sudo service ssh restart
Connecting remotely
All the pieces are in place now for you to connect remotely. The easiest way to try this will be with a machine connected to a MiFi or smartphone with hotspot mode (or use a friendly neighbour’s WiFi) – if there is troubleshooting to be done then you don’t wanting to be running backwards and forwards to your friendly local coffee shop (unless the coffee is REALLY good).
First configure PuTTY (or the SSH client you’re using) to use the private key you made earlier:
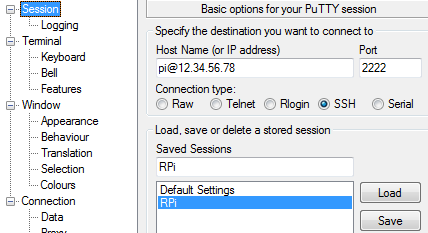
Next configure a session with the right IP address (google for ‘my ip’ when at home) and port, then save it for reuse later:
All being well you can now connect.
Waking up another machine
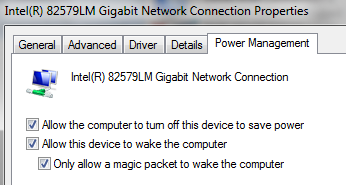
The Debian squeeze build for the wakeonlan tool, but for it to work you need to have the machine configured to wake up and know its hardware (MAC) address. Wake on LAN is configured in the control panel for network adaptors in the Configure panel for a given adaptor’s properties:
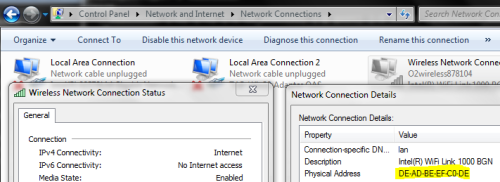
The MAC address can be found using ‘ipconfig /all‘ from the command line, or in the status panel for a live network connection.
I could now wake up the machine illustrated above using this command from the RPi:
wakeonlan DEADBEEFC0DE
It’s hard to remember MAC addresses, so it’s probably best to put that line into a little wake_machine.sh script that can be run in the future.
Conclusion
The part has covered setting up SSH and waking up a machine remotely. In the next part I’ll go through how to configure SSH tunnels to access machines remotely (including the Raspberry Pi desktop) and web services on your home network.
Filed under: howto, Raspberry Pi, security | 9 Comments
Tags: howto, Putty, Raspberry Pi, Raspi, remote access, router, RPi, SSH, tunnel, vpn, wakeonlan

Hi, Thank you for your efforts in detailing these tutorials, very impressive. I am trying to use the ssh for remote control on the new Raspbian and your first command “sudo mv /boot/boot_enable_ssh.rc /boot/boot.rc” brings up an error something like “no such file or directory”. Is there a solution for Raspbian. Cheers Don….
When you first start Raspbian it brings up a menu where you can enable SSH, so that’s probably the easiest way. You can bring up that menu again with sudo raspi-config
Hi, got sshd working now. I assume that the key is generated on my windows machine, how do I transfer the key to the pi. I tried a paste to notepad and then usb’d it accross to the pi but its not copied it correctly ??
You can generate the keys on either machine, but either way you need a way to copy one of the keys over. My normal practice is to generate the keys on the Windows side using PuTTYgen, which let’s you copy the key public into the clipboard. I then log onto the machine where I want to use that key and do the following:
mkdir ~/.ssh
vi ~/.ssh/authorized_keys
hit A to insert then press both mouse buttons to paste in the key then with Esc : w q Enter to leave insert mode, write the file and quit vi
chmod 700 ~/.ssh
chmod 600 ~/.ssh/authorized_keys
Obviously there are a gazillion other ways to achieve the same, but this is what works for me. Once you have the key in place try using it, and if it’s OK then it’s time to turn off password based login by editing /etc/ssh/sshd_config
Hi,
I am trying to do this setup. do I do the copy-paste of the key exactly how it is in the window? I can’t seem to get it to work, but I also noticed that if I save the public key to a file, it adds a few extra lines not in the copy window ,and is also missing that first ssh-rsa line.
Copy-paste is what I usually do to get the public key from PuttyGen to ~/.ssh/authorized_keys
There are a lot of things which remain hazy. 1 Did you need 2 x Raspberry Pi to do this. 2. Is you Raspberry PI on the LAN – If so what is the point since its your PC that you need access too. 3. You mention “all sorts of traffic” can go through SSH – Tunnelling…What Traffic? 4. What I really need it a way to extent my LAN over the internet so that my Pi on the other side of the earth shows up as a device on my home LAN…can this be done?