Last night we celebrated the 10th anniversary of CloudCamp London by celebrating the 40th anniversary of the Hitch-Hikers Guide to The Galaxy (HHGTG). It was a lot of fun – probably the best CloudCamp ever.

I can’t say that I was there from the beginning, as I sadly missed the first CloudCamp London due to other commitments. I have been a regular attendee since the second CloudCamp, and at some stage along the way it seems that I’ve been pulled into the circle of Chris Purrington, Simon Wardley and Joe Baguley to be treated as one of the organisers. The truth is that Chris Purrington has always been the real organiser, and Simon, Joe and I just get to fool around front of house to some degree. I should also shout out to Alexis Richardson, who was one of the original CloudCamp London instigators, but at some stage found better uses for his time (and developed a profound dislike for pizza).
CloudCamp has been amazing. Simon taught us all about mapping. Kuan Hon taught us all about General Data Protection Regulation (GDPR) long before it was cool. It was where I got to meet Werner Vogels for the first time (when he just casually walked in with some of my colleagues). It’s where I first met Joe Weinman and many others who’ve ended up leading the way in our industry. It’s been and I hope will continue to be a vibrant community of people making stuff happen in cloud and the broader IT industry. Meetups have exploded onto the scene in the past ten years giving people lots of choice on how they can spend their after work time, so it’s great that the CloudCamp London community has held together, kept showing up, kept asking interesting questions, and kept on having fun.
Simon asked us to vote last night to rename CloudCamp to ServerlessCamp, as (in his view at least) that’s the future. With one exception we all chose to keep the broader brand that represents the broad church of views and interests in the community.
Here’s my presentation from last night, which in line with the theme was a celebration of Douglas Adams’s genius:
In keeping with the theme I wore my dressing gown and made sure to have a towel:

It’s been a great first decade for CloudCamp London – here’s to the next one.
Filed under: cloud, presentation | Leave a Comment
Tags: cloud, cloudcamp, community, HHGTG
Gemini first impressions
TL;DR
The Planet Computers Gemini is a 6″ Android (and Linux) clamshell device with a keyboard by the same designer who did the Psion Series 5. The keyboard enables on the move productivity with things like SSH that just isn’t possible with just a touch screen.
Background
I was lucky enough to hear about the Gemini very shortly after its crowd funding launch on IndieGoGo, and placed order 35 for the WiFi+LTE version.
Unboxing
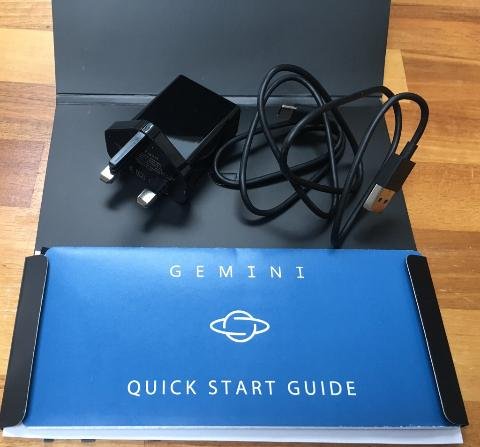
The box is pretty nice, though (not shown) mine had split on one corner in transit. Everything seemed fine inside though.

The keyboardy welcome message is neat (even if it’s superfluous).

It’s supplied with a charger and USB A-C cable that has to be plugged into the left hand side to provide power. Looking at the charger specs I’d expect it to be quicker than a standard 5v USB charger.
The device itself came shrouded in a cover where the adhesive was just a little too sticky. Look very closely and it’s possible to see some spots on the screen (protector?) where some specs of dust appear to be trapped.

Setup was easy, and in line with other Android devices I’ve got for myself and family members over the last few years. It just worked out of the box.
The keyboard
I’m using the Gemini to write this. It works best when placed on a flat surface, but it’s workable when held.
As per Andrew Orlowski’s review at The Register the main issue is the space bar, which needs to be hit dead centre to work properly. I’m also just a tiny bit thrown off by the seemingly too high placement of the full stop on its key, but even as I type this I get the urge to go faster, and the whole thing has a lot more speed and accuracy than even the best virtual keyboards I’ve used. The addition on buzz feedback to the natural mechanical feedback is also very helpful in letting me know when I’ve hit a key properly.
The use of the function key to provide three things on many buttons works well, and my only complaint there might be that @ deserves better than to be a function rather than a shift.
One crucial thing is the availability of cursor keys, which makes precise navigation of text work in a way that just isn’t possible with just a touch screen. It’s also worth mentioning how naturally the interplay been touch actions and keyboard actions is. I’ve had touch enabled Windows laptops for years, and approximately never use the touch screens, but they have Trackpoints and Trackpads that move a mouse pointer around; Android is of course more naturally designed for touch.
Apps in landscape
It’s clear that whilst Android devices have pivoted between portrait and landscape since forever nobody tests their app in landscape. Buttons are often half obscured at the bottom of the screen (Feedly) or selection areas get in the way of vital output (Authy). Even when things do work landscape is often just an inefficient use of screen real estate, which would be why people don’t use/test it.
It works fine in WordPress though :)
It’s great for SSH
I’ve used Connectbot with my Android devices for some time, pairing it up with Hackers Keyboard, but the Gemini keyboard is a world better for driving a command line interface. This feels like what the Gemini was born to do.

Linux
I’ve not yet had the chance to try any of the supported Linux distros, and Android offers almost everything I want. I’d expect Linux to be useful for security testing and coding whilst offline, but that’s more of a break glass in case of emergency thing, and I’d be surprised if it became a daily drive thing for me.
I haven’t even tried to use it as a phone
The Gemini can be used as a phone, but that’s not what I bought it for, and the SIM I have in it has a data only plan.
Size
I noted with some frustration that the Gemini is just fractionally too long for the in flight device restrictions that were imposed on some routes (and threatened for many more) last year. It’s a shame, because in a pinch I think I could get through a week or two with just the Gemini (and no laptop) in order to avoid checking bags with devices in.
More prosaically it does (kind of) fit in a jeans pocket, though not comfortably, and not with the other phone(s) I’m still obliged to cart around. It’s more of a jacket pocket thing, so in day to day use I’m more likely to substitute it for my (now somewhat venerable) Nexus 7 (2013) tablet than my Android phone (and in practice I can see myself using the Gemini for productivity stuff whilst watching TV/movies/Netflix on the Nexus).
Performance
I haven’t noticed performance, which means it’s (more than) good enough. @PJBenedicto asked on Twitter ‘How’s the operating temperature after prolonged use?’ and that’s also something I’ve not noticed – it runs cool (though I haven’t been watching movies on it – yet).
Conclusion
I had high expectations of the Gemini and it hasn’t disappointed. It’s great to have something so small with a useful keyboard, and I can see it transforming some aspects of my on the move productivity.
Updates
3 Mar 2018 – I think I’ve now found the first thing that Planet Computers messed up badly and will have to spend some time fixing on with future hardware – noise isolation on the headphone port. Shortly after pressing publish on this post I downloaded some Netflix episodes and tried watching, and the noise isolation on the headphone port is just awful. It’s not really noticeable when watching something, but with the headphones plugged in with nothing playing you can listen to the Gemini crunching numbers as you move around the UI, and that’s not a good thing.
Filed under: Gemini, review | 2 Comments
Tags: android, Gemini, keyboard, Planet Computing, review
DXC Bionix
Today’s a big day as we’ve unveiled our first sub-brand at DXC Technology — DXC Bionix™, our new digital generation services delivery model that provides a data driven approach to intelligent automation. DXC Bionix includes three elements:
- Analytics and AI
- Lean methodology
- Automation
Bringing these elements together enables us to achieve greater insight, speed and efficiency across our global delivery ecosystem.
We’ve been deploying Bionix at scale and seeing some great results, and the time has come for us to share our approach directly with clients and partners as more of our offerings become Bionix enabled.
Our results from Bionix, as noted in the press release, include:
- 50-80% reduction in time spent on operations
- 25% reduction in testing costs; 50% defect reduction; 60% reduction in testing time
- Reduction in average applications deployment time from 180 minutes to 15 minutes
- 65% reduction in business process transaction time with assisted Robotic Process Automation (RPA)
- 71% of incidents auto-resolved or auto-diagnosed without human intervention
- 82% percent elimination of issues through rules-based filtering and alert correlation
At the heart of Bionix is design for operations, where we feed back the lessons learned from improvements in our existing operational environment into the design of our offerings. These “Powered by Bionix” offerings will be turnkey on Day 1 and integrated into our ongoing operation environment, Platform DXC. Platform DXC provides the foundations for Bionix with services for intelligence, orchestration and automation that allow us to quickly build and deliver partner-engineered, at-scale, repeatable offerings and solutions that help drive client digital transformations.
As a proof of concept for Platform DXC, we re-engineered a solution deployment that yielded big results:
- Lead time reduced from 1500 hours to 2 hours
- Work reduced from 660 hours to less than an hour
- From 8 teams to 1 team
- Meaning 7 hand offs reduced to zero
The numbers speak for themselves and demonstrate the power of shifting from an organisational model that scales with labour to one that’s designed and built on a scalable operating platform.
Our Bionix approach was first introduced in May 2017 internally as “Bionics”, which I wrote about in this primer. We’ve come a long way since then, and I look forward to sharing more about the culture change that enabled us to go from concept to minimal viable product (MVP) with Platform DXC in just 230 days.
Filed under: DXC | 1 Comment
Tags: analytics, automation, Bionix, lean, PDXC
Bionix – a primer
This is pretty much a repost of the original Bionics – a primer, but we decided to call it Bionix (with an X).
TL;DR
Greater automation is the future for the IT industry, and we’ve called DXC’s automation programme ‘Bionix’. It’s about being data driven with a flexible tool kit, rather than being all in on a particular vendor or product. To understand what we’re trying to achieve with Bionix (besides reading the rest of this post) I recommend reading The DevOps Handbook, and to get the foundation skills needed to contribute please run through the Infrastructure as Code Boot Camp [DXC only link].
Introduction
‘Bionix’ is the name that we’ve given to DXC Technology’s automation programme that brings together CSC’s ‘Operational Data Mining’ (ODM) and HPE ES’s ‘Project Lambroghini’. This post is written for DXC employees, and some of the links will go behind our federated identity platform, but it’s presented here on a public platform in the interest of ‘outside in'[1] communication that’s inclusive to customers and partners (and anybody else who’s interested in what we’re doing). What I’ll present here is part reading list, and part overview, with the aim of explaining the engineering and cultural foundations to Bionix, and where it’s headed.
Not a vendor choice, not a monoculture
The automation programme I found on joining CSC can best be described as strategy by vendor selection, and as I look across the industry it’s a pretty common anti-pattern[2]. That’s not how we ended up doing things at CSC, and it’s not how we will be working at DXC. Bionix is not a label we’re applying to somebody else’s automation product, or a selection of products that we’ve lashed together. It’s also not about choosing something as a ‘standard’ and then inflicting it on every part of the organisation.
Data driven
Bionix uses data to identify operational constraints, and then further uses data to tell us what to do about those constraints through a cycle of collection, analysis, modelling, hypothesis forming and experimentation. The technology behind Bionix is firstly the implementation of data analysis streams[3] and secondly a tool bag of automation tools and techniques that can be deployed to resolve constraints. I say tools and techniques because many operational problems can’t be fixed purely by throwing technology at them; it’s generally necessary to take an holistic approach across people, process and tools.
Scaleable
The constraints that we find are rarely unique to a given customer (or industry, or region) so one of the advantages we get from the scope and scale of DXC is the ability to redo experiments in other parts of the organisation without starting from scratch. We can pattern match to previous situations and what we learned, and move forward more quickly.
Design for operations
Data driven approaches are fine for improving the existing estate, but what about new stuff? The key here is to take what we’ve learned from the existing estate and make sure those lessons are incorporated into anything new we add (because there’s little that’s more frustrating and expensive than repeating a previous mistake just so that you can repeat the remedy). That’s why we work with our offering families to ensure that so far as possible what we get from them is turnkey on day 1 and integrated into the overall ‘Platform DXC’ service management environment for ongoing operations (day 2+). Of course this all takes a large amount of day 0 effort.
Required reading
What the IT industry presently calls ‘DevOps’ is largely the practices emerging from software as a service (SaaS) and software based services companies that have designed for operations (e.g. Netflix, Uber, Yelp, Amazon etc.). They in turn generally aren’t doing anything that would be surprising to those optimising manufacturing from Deming‘s use Statistical Process Control onwards.
Theory of constraints lies at the heart of the Bionix approach, and that was introduced in Goldratt‘s The Goal, which was recast as an IT story in Gene Kim (et al’s) The Phoenix Project. I’d suggest starting with Kim’s later work in the more prescriptive DevOps Handbook, which is very much a practitioner’s guide (and work back to the earlier stuff if you find it inspiring[4]).
The DevOps handbook does a great job of explaining (with case study references) how to use the ‘3 DevOps ways’ of flow, feedback and continuous learning by experimentation[5].

Next after the DevOps Handbook is Site Reliability Engineering ‘How Google Runs Production Systems’ aka The SRE Book. It does just what it says on the jacket, and explains how Google runs systems at scale, which has brought the concepts and practices of Site Reliability Engineering (SRE) to many other organisations.
Learning the basics of software engineering
The shift to automated operations versus the old ways of eyes on glass, hand on keyboards means that we need to write more code[6]; so that means getting ops people familiar with the practices of software engineering. To that end we have the Infrastructure as Code Boot Camp, which provides introductory material on collaborative source code management (with GitHub), config management (with Ansible) and continuous integration/continuous delivery (CI/CD) (with Jenkins). More material will come to provide greater breadth and depth on those topics, but if you can’t wait check out some of the public Katacoda courses.
Call to action
Read The DevOps Handbook to understand the context, and do the Infrastructure as Code Boot Camp to get foundation skills. You’ll then be ready to start contributing; there’s plenty more reading and learning to do afterwards to level up as a more advanced contributor.
Notes
[1] My first ‘outside in’ project here was the DXC Blogs series, where I republished a number of (edited) posts that had previously been internal (as explained in the intro). I’ll refer to some of those past posts specifically.
[2] I’ve been a huge fan of understanding anti-patterns since reading Bruce Tate’s ‘Bitter Java‘. Anti-patterns are just so much less numerous than patterns, and if you can avoid hurting yourself by falling down well understood holes it’s generally pretty easy to reach the intended destination.
[3] It’s crucial to make the differentiation here between streams and lakes. Streams are about working with data now in the present, whilst lakes are about trawling through past data. Lakes and streams both have their uses, and of course we can stream data into a lake, but much of what we’re doing needs to have action in the moment, hence the emphasis on streams.
[4] If you want to go even further back then check out Ian Miell’s Five Books I Advise Every DevOps Engineer to Read
[5] More on this at 3 Ways to Make DXC Better
[6] Code is super important, but it’s of little use if we can’t share and collaborate with it, which is why I encourage you to Write code. Not too much. Mostly docs.
Filed under: DXC | 1 Comment
Tags: Bionix, DevOps, SRE
Skiing in Austria (Skiwelt)
I missed out on skiing last season as my daughter went with her school to Pila, so this was my first time back on the slopes since skiing in Andorra.
Why Austria
As with Andorra it was my neighbour John’s suggestion, and I went with it as it’s generally more fun to ski (and socialise) in a group.
Getting there
We flew to Munich Airport (MUC) and picked up a hire car for the 1½hr drive to the hotel. I got the car sorted whilst John collected the bags, so we were out of there in good time. Sunday evening traffic coming out of Austria was awful, but going in we were fine apart from the need to stop along the way for a €9 ‘Vignette‘ toll sticker to allow us onto the Austrian motorways (because for some insane bureaucratic reason the rental car place wasn’t able to provide this).
I paid a little extra to get an estate car (to fit in our skis) and was generally pretty pleased with the Renault Megane Estate. Apple CarPlay was great for music and navigation from our iPhones, but the heater/blower controls were a mystery that none of us figured out. In retrospect it was a mistake to not get a ski box for one of the cars in our party as then we’d have all been able to fit into a single car rather than going around in convoy.
Accomodation
John’s original target was Westendorf, but everything was booked out. In fact pretty much everything in the whole area was booked out. The combination of UK and German school holidays likely didn’t help, but I get the feeling that people return to the same hotels year after year making the supply of accommodation pretty tight unless you book well in advance (and this was looking in October – 4 months before we went).
We ended up in the Gasthof Fuchswirt in Kelschau, which was great. Friendly service, huge rooms and good hearty traditional Austrian dishes for dinner every night – highly recommended. The breakfast was great too.
Equipment
Although Kelschau is part of the Skiwelt area it’s a bit of a small island, and there’s not much infrastructure beyond the 3 (somewhat ancient) lifts. Looking online at the options I chose Sport Verleih Fuchs in Itter via Skiset as they had better (and cheaper) gear than the corresponding place in Westendorf.
My choice of ‘Excellence’ skis got me a nice pair of Fischer Pro Mtn 80. They weren’t quite as amazing as the Lecroix Mach Carbon skis I had last time, but still performed very well. The ‘Sensation’ skis got my daughter some Volkl RTM 7.4, which she liked a lot.

Once we were kitted out with boots, skis, poles and helmets it was a matter of popping to the kiosk over the road to get a pass for the Skiwelt area, then into the telecabin to get up onto the slopes.
The other kit thing that I should mention is my Xnowmate boots. I’d ordered these prior to my last Andorra trip, but they didn’t arrive in time, so this was my first chance to try them out. They exceeded all expectations – comfortable, lightweight, warm, dry, and more comfortable. I wore them as chalet slippers in the hotel, I wore them to drive to the piste, I wore them to get to the first run of the day (rather than clomping around in ski boots) and they were just great.

The skiing
From Wikipedia:
The SkiWelt is Austria’s largest interconnected ski area. It has 90 Cable car lifts and Ski lifts, 280 Kilometers (173 Miles) of Ski Pistes, and 77 Ski Huts. The member villages are: Brixen im Thale, Ellmau, Going, Hopfgarten, Itter, Kelchsau, Scheffau, Söll and Westendorf.
That’s a lot of skiing for a single week (5 days once we’d factored in travel there and back), but we had a crack at it anyway.

Day 1 – since we’d picked up our gear at Itter that’s where we started out from. It was snowing, so conditions weren’t great, so we didn’t cover a huge amount of ground, and generally got our ski legs back.
Day 2 – we headed over to Westendorf and pretty much skied out that part of the map. It was fantastic, with the run down 16a that took us to Brixen im Thale for lunch idyllically empty of other skiers. We also loved the 120 run on the other side of the mountain. If there was a part of the area I’d hurry back to it’s this bit.
Day 3 – we parked in Hopfgarten and headed to join a friend of mine who was starting out from Ellmau, but fluffed the transition at the top of lift 22 and ended up taking a detour via Söll that was pleasant but time consuming. The lesson for the next day was to exit the lift on foot to the right and hike up past the restaurant.
Day 4 – parking again in Hopfgarten we struck out for (and made it to) Going on the other side of the resort. Starting the day with the 2c black run wasn’t too bad – we’d skied it the day before and it’s not really that steep or narrow. I suspect that many of the black runs in the area don’t really deserve the rating, but the signposts do a good job of scaring people away. We were also amused by the ‘purple’ runs, where blues suddenly turn into reds, not that it was a problem for anybody in the group. The only really challenging black we found were the sections of 80 down into Ellmau where the piste follows the line of the lift with one particularly interesting steep/icy section. That lift back out of Ellmau is notable for its modernity and comfort :) Though when we got to the top it had started snowing for our return journey.
Day 5 – we’d always planned to tick off Kelchsau on our final day, but the rain/wet snow made conditions pretty miserable so we called it a wrap and took our skis back after a run down from the top (rather than the better weather plan of a bit more skiing in Itter/Söll).
I have to say that the piste map (and corresponding app that held it) weren’t the greatest, and neither were the piste posts. It took too much trial and error to get around, and more time spent poring over the map in evenings that could have been better spent on apres ski.
Conclusion
I’d go back just to do Westendorf again, but we barely touched Going or Söll and there’s stuff around Brixen in Thale we didn’t get near, so I could easily spend a second week in Skiwelt without getting bored of it.
Filed under: review, travel | Leave a Comment
Tags: Austria, boots, Brixen im Thale, Ellmau, Going, Hopfgarten, Itter, Kelchsau, Söll, Scheffau, skiing, skis, Skiwelt, Tirol, Westendorf
Headsets (mini review)
I jumped into a thread on DXC Workplace[1] on the topic of headsets (for use with Skype [for Business]), which made me realise that it’s an important topic that I’ve not covered here before.
Even a cheap headset is better than no headset
The point made by the original author was that many people are using the built in mic/speaker on their laptops, and this is generally terrible for everybody else on the call (and maybe them too).
My headsets
Jabra 930 – this is my main desktop headset that I use for Skype from my home office. It’s wireless, and works anywhere in my house. It’s also comfortable, and the battery lasts all day long. The mute button is easy to operate, and it gives a comforting background ‘your on mute’ beep-bop every so often. I have InfoQ’s Wes Reisz to thank for the recommendation.
Jabra Pro 9470 – this is the headset that CSC provided me with when I joined. Although it’s supposedly an upgrade on the 930 I’ve never got along with it. It’s also useless with a laptop as it ends up chaining the laptop to wherever the base station is sucking power from.
Plantronics C310 – I bought this to use in the office (instead of the 9470 which languishes in its box), and because it’s wired I can wander around with my laptop with the headset connected (no base station to worry about). I like the inline mute control button on the cable; and it’s lightweight and comfortable (and cheap).
Plantronics DA40 USB adaptor + H91 headset – this is the type of headset that I used to have on my office desk phone in early 00s and I bought one for home on eBay. It now lives in my travel bag, and the DA40 lets me use it with my laptop. I also carry a bottom cable that lets me attach it to office phones as that’s sometimes handy. If I was buying new now the DA80 has a mute button on it, but DA40s are plentiful on eBay (just watch out for frayed cables on used ones) and older voice tube headsets are the best for quality and comfort.
Some observations
Everything above is monaural over the ear. I don’t like stereo for phone calls (though it can help in really noisy places) and I don’t like stuff hanging off my ears (too uncomfortable when doing hours of back to back calls).
Wireless headsets are great for desktops, because the base station (and its power cord) can stay with the desktop itself. Wired headsets are better for laptops, as you can wander around with the headset attached to the laptop without any base station worries.
PC Bluetooth is (still) way too complex and fragile for this stuff, and companies still seem to have security worries about it (which is likely why my corporate laptop doesn’t have it).
Integration with Skype/Skype for Business is very good with both Jabra and Plantronics software. Webex generally works OK too. I’ve found the experience to be highly variable with other web conferencing tools (whether browser based or with their own apps), and lots of stuff seems to fall at the first hurdle by ignoring settings for default communication device.
My perfect headset
The Jabra 930 is almost perfect, and the one thing I’d change would be a visual indication of mute status (e.g. a tiny LED at the end of the mic boom – we can then argue about whether red or green signifies mute or talk).
A quick diversion to phone headsets
I’ve yet to find a phone headset that I’m really happy with. In a pinch I use my Koss SparkPlugs with my phone, and they’re great for listening, but worse than the built in mic for talking (catching too much background noise).
By the way who decided that the button on the headset cord should be for hangup rather than mute (and doubly who decided that wasn’t even a configurable option)? On a typical call I might be on/off mute dozens of times, and the UX people decide to make me fiddle around with a touch screen to do that; obviously I only get to hang up once per call – the balance of effort is obvious here.
Note
[1] Previously known as Facebook@Work, which I like a lot – in the same way that I liked Facebook itself before the whole advertising fueled surveillance capitalism thing ruined it.
Filed under: review | Leave a Comment
Tags: headset, Jabra, Plantronics, review, skype
TL;DR
The WiFi coverage in my house wasn’t as good as I’d like it to be, and I’ve heard lots of good stuff about Ubiquiti UniFi gear, so I’ve installed one of their Lite Access Points, and it seems to be working well.
Background
I first came across Ubiquiti kit as part of the bizarre ‘NAT in the hat‘ connectivity for a Spanish Airbnb place I stayed at, but it was Troy Hunt’s write up that really caught my attention. More recently Jess Frazelle blogged about UniFing her apartment network, and I saw positive reports from a colleague at work.
My home is nowhere near as large as Troy’s, but there are places where the WiFi signal isn’t reliable enough, and adding lots of cheap routers as additional access points hasn’t really worked (and in some cases just made the network even more fragile and unreliable). A particularly troublesome spot has been the lounge sofa, because there’s a huge radiator behind it blocking the line of sight to my primary Draytek router[1].
The hardware
I got the basic UniFi UAP-AC-LITE Access Point as its capabilities seemed to be sufficient.

Getting a network cable to an appropriate ceiling mounting point looked like being a potentially messy nightmare, and although the device is small and pretty enough it’s better to not see it at all, so it’s tucked away in the void between my office floor and the first floor ceiling (essentially one slice of plaster board and some rock wool away from where I would have ceiling mounted it)[2].
The software
Jess Frazelle uses this stuff, so of course the management software can be run in a Docker container. I found this UniFi Controller image on Docker Hub that’s maintained by Jacob Alberty, so that’s a bunch of yak shaving avoided. Here’s the command line that I use to run it (as a Gist):
sudo docker run --rm --init -d -p 8080:8080 -p 8443:8443 -p 3478:3478/udp -p 10001:10001/udp -e TZ='Europe/London' -e RUNAS_UID0=false -e UNIFI_UID=1000 -e UNIFI_GID=1000 -v ~/unifi:/unifi --name unifi jacobalberty/unifi:stable
It took me a while to figure out that I needed an HTTPS URL for my docker_vm:8443, but with that sorted out I was all set.

I’ve not gone all in (and I’m not likely to)
With just an access point the UniFi Controller has many features that I can’t make use of because they depend on having a UniFi Security Gateway (USG) and UniFi switches.
I’d be sorely tempted by USG if they did a version with a VDSL modem, but I’m not keen on pressing my old BT modem back into service, and even less keen on double NAT with my Draytek.
The switches are a different matter. UniFi switches come at a significant premium for their manageability and (in most cases) Power Over Ethernet (POE) capabilities. The only POE thing that I have is the UniFi access point, and that came with a POE injector[3]. As my home network has 6 switches totalling 69 ports in use I estimate that I wouldn’t get much change from £1000 if I wanted to switch my switches. I’d reconsider if I could get 8 and 16 port non POE switches at something like £50 and £100 respectively (which would still be £450 on new switches).
Conclusion
Subjective WiFi performance (especially from the lounge sofa) seems much improved, so the UniFi access point seems to be doing the trick. I’m missing out on tons of UniFi features by not going all in and buying the USG and UniFi switches, but on the other hand I’d rather just be using my network rather than playing with it.
Notes
[1] Something that didn’t cross my mind until after putting in the UniFi AP was that I could remount the router antennae using some RP-SMA extension cables. Since I still run the guest and devices networks from the Draytek (to associate them with the appropriate VLANs that aren’t my home network) I’m going to give that a try too.
[2] I know the signal (especially 5GHz) will suffer some attenuation going through an extra layer of plasterboard, but there’s nowhere in the house that a device is going to be used that does have a clear line of site to somewhere I could reasonably place the access point, so it was going to be attenuated anyway.
[3] I was pleasantly surprised that the access point came with the POE injector to provide power as one wouldn’t be needed in an ideal UniFi installation using their switches. No doubt the people doing professional installations of UniFi kit end up with giant piles of surplus injectors, which then find their way to eBay.
Filed under: Docker, networking, review | 1 Comment
Tags: Access Point, AP, POE, review, router, switch, Ubiquiti, UniFi, USG, wifi
TL;DR
The UP2 is a rebadged Drayton LP822, which means that it can operate in 1, 5/2 or 7 day modes, set with a jumper on the back. So if yours is set to 1 day (like mine was) then you can get loads more flexibility by changing that jumper.
Background
My central heating was installed with a Potterton EP2002 timer, but when that failed it was replaced with a British Gas UP2 (under the maintenance policy that I’ve had since moving into my house). One of the things that I liked about the EP2002 was its ability to have different timings at the weekend. I asked the engineer if the new timer he was putting in could do that, and his answer was that it couldn’t. If only he’d bothered to read the manual (which incidentally he didn’t leave me with). Fast forward almost a decade and I’ve had enough of getting up at the weekend and having to run downstairs to press the ‘advance’ button for heating and/or hot water, so I started looking for alternatives.

This thread pointed out that the UP2 is a rebadged Drayton Lifestyle timer, though it seems that guesses on the model aren’t quite on target, and are based on how the UP2 has been jumpered. I was on the verge of buying an LP722 when I stumbled on this eBay listing for an UP2 with the vital comment ‘Change type by pins at rear’.
An easy change
Firstly I turned off the heating system at its isolation switch. The UP2 is held onto its backplate with a couple of screws, and can be removed by loosening them and lifting it out and up. I could then get to the jumpers on the back:

Here’s a closer look at the three jumpers:

The top and bottom jumpers should be left alone. The top switches between Linked (hot water and central heating on the same timer) and Independent (hot water and central heating on separate timers). The bottom switches between Pumped and Gravity.
The switch I needed to change was the middle one. It was set to 1 which has the same 24hr timers every day. The other option is 7 which can then be configured to give different timers for each day of the week. If the jumper is left off altogether then it will offer 5/2 mode with different timers for weekdays and weekends, but there’s little point to that as 7 day programming starts with 5/2 and is then further customised for individual days (should you wish).
For full details take a look at the manual for the LP822 (pdf)
After setting the switch to 7 I put the timer back onto its mounting plate and tightened the screws to hold it in place. On powering the system back up I found that it remembered the time and my previous 24h settings, but I was then able to customise the weekend timings using 5/2 mode. I’ve not bothered to customise specific days because I don’t need that.
Conclusion
I’m a bit annoyed that I’ve put up with my timer being on the wrong settings for so long, but pleased that I ultimately found an easy fix (and that I didn’t have to buy a new timer).
Further adventures
I’d like to have more sophisticated control of my heating system, but I’m wary of cloud based services such as those behind Nest, Hive etc. So I’d like to do something Raspberry Pi based, likely starting with the thermostat. If I end up doing that I might return to this video of dismantling the UP2.
Filed under: howto | 8 Comments
Tags: British Gas, central heating, Drayton, hot water, LP822, manual, timer, UP2
This is a follow up to ‘Meltdown and Spectre: What They Are and How to Deal with Them‘ taking a deeper look at: the characteristics of the vulnerability and potential attacks, why its necessary to patch cloud virtual machines even though the cloud service providers have already applied patches, the nature of the performance impact and how it’s affecting real world applications, the need for threat modelling, the role of anti virus, how hardware is affected, and what’s likely to change in the long term.
Continue reading the full story at InfoQ.


Filed under: InfoQ news, security | Leave a Comment
Tags: Meltdown, Spectre
How Not to Sell Bitcoins
This post is the dark mirror of Tim Bray’s How to Sell Bitcoins, and explains how I accumulated some Bitcoin in the first place, then utterly failed to cash out before the (latest) bubble burst.
Background
I might have seen Bitcoin in my peripheral vision earlier, but by the time I started paying any real attention mining was hurtling into ASICs (so I’d missed the days when mining was practical on CPUs then GPUs then FPGAs[1]). At the tail end of 2013 I bought a couple of Bitfury ASIC boards to learn about mining.
Mistake #1 – ASIC Mining was a mugs game. If I’d just spent the money on buying some Bitcoin I’d have something more than 10x the Bitcoin I earned by mining. It didn’t take long for it to become clear that the people fabbing the ASICs were mining the heck out of them before selling them to end users. Quite often this was part of a pre pay scam, where prospective miners paid for ASICs in advance, the fabbers then made the ASICs, mined, drove up complexity, and when the ASICs were economically wrung out they’d finally be delivered to those who funded them.
Paranoid but not paranoid enough
Bitcoin was already becoming the chosen currency of Internet scammers as I started dabbling, so it was obvious that malware would start looking for any unprotected wallets. I therefore chose a very strong password to the private key in my wallet, and furthermore decided not to put it into my password manager on the basis that anything that compromised my wallet might also get into my password manager. This was fine whilst I was frequently using my wallet and exercising the neurons that held the password. It wasn’t great years later – I’d forgotten the password to my wallet.
Mistake #2 – if you’re worried about information security then backstop with physical security. I should have written down my private key password and put it in a safe place (maybe an actual safe).
This story would end there if I hadn’t taken the precaution of backing up my wallet’s private key with a different password – one I could actually remember. The problem I hit then was that the pass phrase had spaces in it, and the wallet software was quite happy using it for exports, but not so much for imports. I had to write a script that was very careful at separator handling to extract my key.
Mistake #3 – I hadn’t tested by backup. In part this was because I didn’t want to create a greater vulnerability surface by creating another wallet, and a silly assumption that the software wouldn’t let me use spaces in the export if they couldn’t be used again for import.
Paying the right transaction fees
With my private key in hand, and a freshly created Coinbase account I was all set. All I had to do was transfer the Bitcoin from my existing wallet and make a sale – simple…[2]
It was clear that the Multibit wallet I’d been using was hopelessly outdated, so a little research took me to Electrum. I even found a HowTo video showing the process of exporting from Multibit to Electrum. This totally didn’t work for me.
Mistake #4 – I should have paid more attention to the options. The version of Electrum shown in the video didn’t have an opening option import a key, it showed using a standard wallet then importing a key to it, which totally didn’t work for me. Had I tried the opening option I’d have been all set, but instead I gave up on Electrum.
When I’d been learning my way around Bitcoin four years ago transaction fees weren’t really a thing. The blocks being added to the blockchain weren’t full, so miners were happy to add transactions without fees. That all changed over the past year, and as the recent bubble has driven transaction volume against the Bitcoin scaling problem it’s become necessary to pay higher fees to get transactions confirmed.
Mistake #5 – I should have researched fees more carefully. A quick Google revealed that fees had spiked, but I didn’t have a good measure of how large (in bytes) my transaction would be so I ended up low balling the transaction fee and sending it into transaction purgatory.
Transactions don’t time out
Bitcoin myth has it that a transaction with too low a fee will be timed out of the mempool after about three days and returned to your wallet. At the time of writing my transaction has been bouncing around for over two weeks. Every time it looks like it’s about to expire it pops up again. I may be going a little conspiracy theorist here, but it feels like ‘Once is happenstance. Twice is coincidence. The third time it’s enemy action‘, and I suspect that the mining community is deliberately keeping the transaction backlog high in order to keep mining fees high.
Mistake #6 – I thought that my transaction would gracefully fail if I got the fee wrong. But instead my Bitcoin are lost in space and time.
Transaction accelerators don’t work
Something new to the Bitcoin scene are transaction accelerators – sites that claim to be able to move your pending transaction into an upcoming block for confirmation. I tried submitting to ViaBTC a few times, but they only take 100 transactions an hour and my timing was never right. The first time I tried ConfirmTX it said my transaction would be accelerated (it wasn’t). I tried again and paid $5 in Bitcoin Cash (BCH) and once again nothing happened, so I suspect reports of it working likely coincide with transactions that would have gone through anyway. PushTX wants hundreds of dollars, so I’m not chancing that.
Mistake #7 – accelerators don’t seem to work, and may also be unhelpful in getting my transaction to expire from the mempool.
The end? Not really
This story hasn’t reached its end. After weeks of hunting for keys and waiting for a transaction to complete I’m still not in a position to actually try selling my Bitcoin. My fingers are crossed that the transaction pools will be quiet over the holiday period and maybe 2018 will bring the chance for me to sell.
Updates
27 Dec 2017
I found this Reddit comment saying that a change was made so that transactions would expire from the mempool after 14 days rather than 3. On checking my wallet (which I’d been keeping closed to prevent it rebroadcasting) I found that the hung transaction had indeed expired and I was able to try again with a higher fee.
5 Jan 2018
Following Adrian Mouat’s suggestion on Twitter I sent my BTC to Coinfloor, waited for the New Year to sell and transferred out my GBP. It took a couple of days for the money to land in my UK bank account, and Coinfloor charged its stated £10. So ultimately this was a (very frustrating) learning experience, but I got what I wanted.
Notes
[1] When I say ‘ASIC’ in a pub conversation I see the eye glaze thing for anybody that’s not spent time at the border of electronics and computing. The point here is that there was a mining arms race as the mining complexity went up and people found more specialist ways of turning electricity into hashing. At the birth of Bitcoin it was possible to mine with CPUs, but then people figured out it could be done with GPUs, and ultimately ASICs (after a brief diversion to FPGAs). Of course each time more efficient hashing came on the scene it drove the complexity up, making any previous approach hopelessly slow and inefficient.
[2] Since I’ve not got my Bitcoin as far as Coinbase I can’t (yet) comment on the ease of selling and cashing out, but I know there was some friction and expense ahead with SEPA payments etc. (as Coinbase doesn’t transact in GBP or connect directly into the UK banking system).
Filed under: Bitcoin | 4 Comments
Tags: Bitcoin, fees, mining

