Banking on Ubuntu
TL;DR
Banking CIOs may know about Ubuntu, and be vaguely aware of Canonical, but I’d be surprised if many could explain the difference in commerials versus Red Hat. Meanwhile engineering teams are content to stick with what they have in a combination of clinging to the past and seeking some mythical homogeneity. OpenStack might give Canonical the break out opportunity it’s been waiting for, but it’s a risky bet given the parlous state of that project (and some smart recent game play by Red Hat).
Background
It’s coming up on a year since I left the world of banking to join CohesiveFT, but I took a trip back to my old world to attend a banking CTO conference last week. One of the speakers was Mark Shuttleworth from Canonical, which got me thinking about (the lack of) adoption of Ubuntu in financial services.
My personal experience of Ubuntu
I switched to Ubuntu myself about 5 years ago. I’d been a relatively early adopter of Red Hat back in 1996, but when it came to doing stuff in the cloud everybody was using Ubuntu, and I could see why – it was easy and it worked. These days I reach for the latest Ubuntu LTS as first choice whenever I need a Linux box or VM. Ubuntu is also the basis of what we do at CohesiveFT.
It was a little later, when I got to know Simon Wardley (who worked for Canonical at the time), that I learned of Canonical’s different approach to monetising Linux and related open source. This seemed like a way to deal with the myth of software support. It’s also a (somewhat) scale free approach, decoupling support costs from the size of deployments.
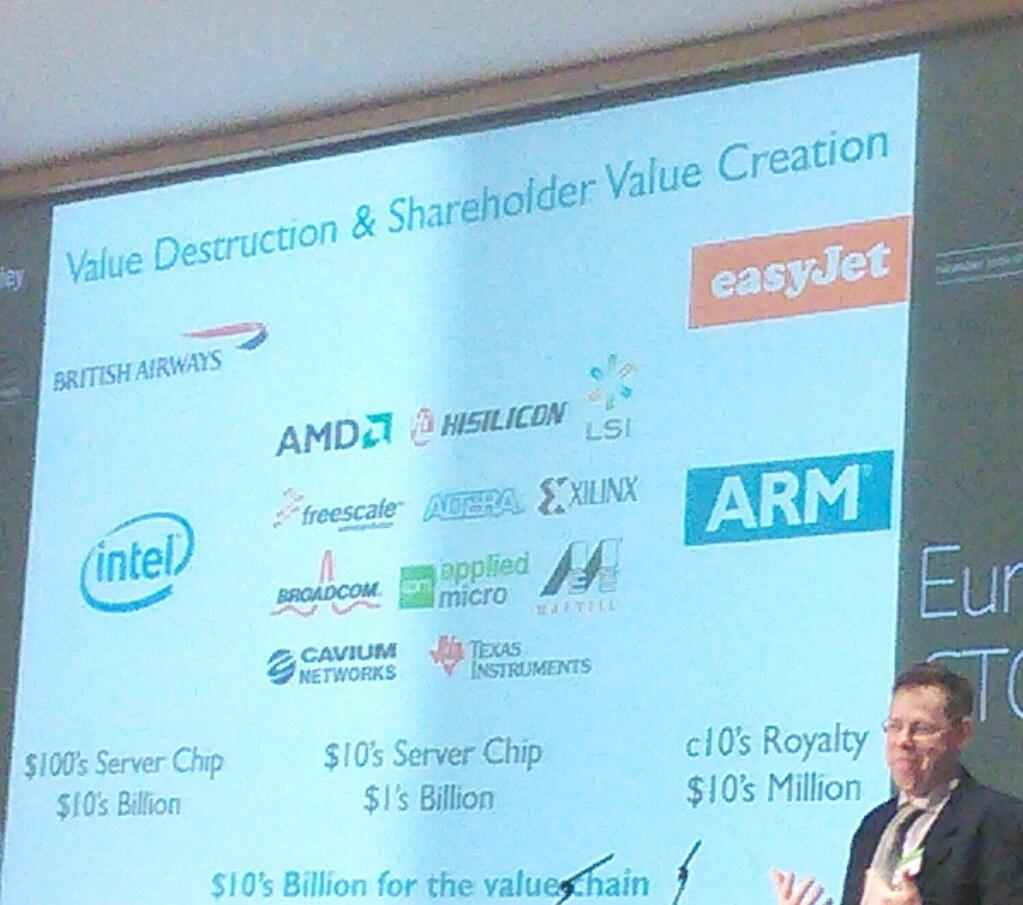
What Canonical are doing fits into what I’ve previously labelled ‘Internet Alchemy’ – a disruptive move that turns somebody else’s pile of gold into their pile of nickels. In their recent book ‘The Second Machine Age‘ Andrew McAfee and Erik Brynjolfsson refer to this as analogue dolars turning into digital pennies – it’s not a perfect analogy for disruption of one generation of IT for another, but it fits. At the same event ARM’s CTO Mike Muller made similar observations. The key point is how much value gets put back into consumer surplus:
Linux at banks
Linux started to find its way onto unofficial boxes under desks around 2000 (I had one), and found its way onto production systems a few years later. x86 hardware became too compelling from a performance/price point of view, but many teams didn’t want Windows. Red Hat stepped into the void, and soon afterwards Enterprise Linux (EL) came along to be a slower moving target for adoption and support. It’s telling that Red Hat essentially owns the words ‘Enterprise Linux’.
Banks push systems harder than many other users, and I’ve seen Linux pushed to breaking point a number of times (with the thing that was breaking usually some I/O driver). That’s when support becomes crucial – especially when things are already in production. Red Hat cornered that support in two ways – firstly they signed up all of the banks adopting Linux as customers, and secondly they worked with all of the software vendors preferred by those banks to have RHEL as part of their official support matrix. There are essentially three reasons why banks pay for RHEL licenses:
- Support of the OS itself
- Near ubiquity of ISV support for the platform
- Open source indemnity
The top down sell
Linux was a reasonably easy top down sell because the hardware was so much cheaper than RISC based servers (even if they were bundled with their proprietary Unix flavours).
Today’s tech savvy CIO [1] will have heard of Ubuntu. They may even use it for personal stuff. They might just be aware of Canonical as the commercial vehicle behind Ubuntu, but it’s unlikely that they know the difference of approach versus Red Hat.
The top down problem is one of ignorance, and often a lack of access to deal with that ignorance.
Long term Canonical might be able to pull off a domino run – once one CIO adopts the others in the club follow. It’s likely to start with OpenStack environments running in house apps (that don’t get caught in the ISV support matrix).
The bottom up sell
The banks still have Unix (rather than Linux) engineering teams – in part because there’s a whole ton of proprietary Unix still in production. These guys create internal distros – taking stuff out that might be risky in the production environment, and putting stuff in that’s part of the enterprise operation scene (monitoring, security agents etc.). This becomes problematic with support, because ISVs claim that the banks aren’t really running RHEL when things go wrong.
A typical part of the *nix environment is that systems get pushed from golden sources on a frequent (daily) basis. Operations teams have gotten out of the business of managing snowflakes – but that’s been swapped for piste bashing, every slope is different, and they need to be groomed every day before start of play.
In his talk Mark frequently referred to Solaris as a label for the old world. The trouble is that early internal Linux builds were made to look like SunOS, because the Unix guys had stuck with that when Solaris came along. It’s only in recent years that a combination of skills issues (the new kids just didn’t grok SunOS) and ISV issues (where’s /opt?) have forced a refresh of builds to look something like a contemporary Linux.
The SunOS era guys are still in charge. They resisted Solaris when that came along. They resisted RHEL when that came along. Care to guess what they think of Ununtu? These aren’t the people writing white papers about how a switch to Canonical could save the company a ton of money.
Oneness
One thing that banking CIOs and Unix engineers can usually agree on is a fanatical zeal to have just one of everything. One type of hardware running one operating system using one sort of database etc.
Of course that’s not how things work out in real life. Corner cases creep in, exceptions are made, and heterogeneity takes hold. And this is what makes everything so expensive.
Two flavours of Linux == twice the engineering and support costs. Simple!
Even if Canonical Ubuntu is free then it’s not worth the effort to adopt it because RHEL will still be needed for all of the ISV stuff that depends on it.
Or so the story goes… I’ve been guilty myself in the past on this one – sticking with a proprietary full fat application server stack rather than embracing Tomcat for low end stuff. It did actually make economic sense for a while, but circumstances changed and it took too long to re-evaluate and reposition.
Does OpenStack change the game?
Maybe.
If OpenStack gets its act together[2] and really is the Linux of cloud then it’s exactly the opportunity that Canonical need – the driver of that re-evaluation and repositioning.
The Canonical support model of OpenStack is straightforward and seems both reasonable and fair (though I am left wondering why Mark has this stuff in his slides, but I can’t find it on the web to link to here?[3]).
It’s clear though that Red Hat aren’t being idle in the space. Their recent move with CentOS means that they have a free at the point of consumption route to market for their own flavour of OpenStack, with a licensed version there for those who feel the need to pay for support.
Notes
[1] Banking CIOs aren’t all technically illiterate – though that can be a problem. Many CIOs come from a software dev leadership background, but it’s (sadly too) fashionable to concentrate ‘on the business’ and ‘be a manager rather than a technologist’. The present trend in technology companies of having strongly technical (rather than sales) leadership hasn’t yet crossed over to financial services. The hard part is that technical skills get washed out – three years off the coal face might as well be a lifetime, as the industry and state of the art moves on.
[2] Right now that seems like a big if. Simon Wardley has the issues covered in The trouble with OpenStack, and I wrote myself recently about some of the quality issues and infighting amongst contributors.
[3] Perhaps part of Canonical’s problem with obscurity is that there’s no transparency on what they do charge for their services.
Filed under: technology | 1 Comment
Tags: banking, Canonical, cloud, EL, Linux, OpenStack, Red Hat, RHEL, Ubuntu
Update (13 Mar 2014) – this presentation is also available on YouTube
I did a presentation at the open source hardware users group (OSHUG) last night. Click to the second slide to get the TL;DR version:
With more time I’d like to get some quantitative material on the memory footprint of various cipher suites and key lengths in embedded environments (and also get a better measure of where hardware support can be used to help out).
The bottom line here is that low end hobbyist boards (like any 8bit Atmel based Arduinos) can’t really handle security protocols. This makes me worry that the Internet of Things is going to grow up without security in the first place, and then security bolted on afterwards.
All is not lost though. Systems with much better compute power and the ability to support a full secured stack aren’t any more expensive (at least in £ if not power) – a Raspberry Pi or Beaglebone Black typically costs less than an Arduino with network. Also Arduino is growing up… versions with much better ARM processors (and even Linux) are coming to market. So there’s still cause to be optimistic that *this time* security does get built in.
Filed under: Arduino, BeagleBone, presentation, Raspberry Pi, security | 1 Comment
Tags: arduino, ARM, BeagleBone, encryption, IPSEC, keys, Raspberry Pi, RPi, security, SSH, SSL, tls
Boot2Docker on Hyper-V
Boot2Docker is a minimal (27MB) Linux image for running Docker. I started using it yesterday whilst investigating Docker on Mac OS X.
It’s designed to work with VirtualBox, and comes with a script to control the lifecycle of the Boot2Docker VM inside of VirtualBox. There’s no reason however why it shouldn’t be used with other types of virtualisation. As I have a Hyper-V server to hand I thought I’d give it a go on that.
Getting started
I downloaded the latest ISO (v0.54 at the time of writing). Created a new VM with 1GB RAM and a legacy network adaptor [1], and attached the boot2docker.iso file as a DVD drive. This booted up fine, and I could do Docker stuff.
Need persistence
There’s not much point to doing Docker stuff unless you can keep it around. So I needed a persistent disk.
I created a new dynamic VHD called b2d_base.vhd and attached it to the VM on the IDE controller. After starting up again I ran through the following commands:
sudo fdisk /dev/sda
n
e
<enter for default start>
<enter for deafult end>
n
l
<enter for default start>
<enter for deafult end>
w
sudo mkfs.ext4 -L boot2docker-data /dev/sda5
I then shut down the VM, removed b2d_base.vhd and created a new differencing VHD b2d1.vhd based on b2d_base.vhd and attached that to the IDE controller (so if I choose to make more VMs like this I don’t need to bother with the partitioning, formatting and labelling again).
Trying it out
I booted up again and ran:
docker run -d -p 1880:1880 cpswan/node-red-0.5.0t
Once that completed I could then browse to the NodeRed IDE on http://vm_ip:1880 :)
A quick look at my b2d1.vhd showed that it had grown to 914MB – so the persistence on a differencing disk was working.
Note
[1] First time around I used a regular network adaptor, but boot2docker doesn’t have the drivers for that. With a lot more effort I could probably build my own boot2docker with a customised kernel and the right module. For the time being I’ll live with slightly worse network performance.
Filed under: Docker, howto | 6 Comments
Tags: boot2docker, Docker, Docker.io, persistence, VHD
I had some fun last year putting CohesiveFT’s VNS3 cloud networking solution onto Raspberry Pi. It gave us something to demo on at trade shows, and we could also give away Pis as part of promotions. The Pis were like geek catnip.
I’ll be using Pis again for Cloud Expo Europe later this month, but we’ve recently added Docker to VNS3, and that won’t run on a Pi. I needed something with an x86 processor, but it would be good to have something (nearly) as portable as the Pi. The Intel NUC looked like a good place to start, but sadly the low end (Celeron and i3) ones lack an ethernet port. NUCs with ethernet turn out to be a bit pricey (and I didn’t need the power of the i5 NUC I bought myself), which is why I turned to the very similar Gigabyte Brix range.

Brix vs NUC
The Brix and NUC are very similar. Both come without RAM or SSD, and can take up to 16GB and an mSATA device of your choice. Both also come with little mounting plates for the Vesa holes on the back of some monitors (if they’re not already used by the monitor stand).
+WiFi – the NUC comes with an empty miniPCIe socket for WiFi, though the antenna cables are there and ready. The Brix comes with a WiFi card installed.
+Power cable – a slightly bigger box meant room for the ‘cloverleaf’ cable missing from the NUC.
-USB sockets – the NUC has 2 USB2 on the back and a USB3 up front (plus internal headers for more if using a different case). The Brix only has one USB2 at the front and another one at the back.
-DisplayPort – the NUC range comes with a variety of display outputs. Mine has two DisplayPort and one HDMI (which is something of overkill for such a small machine, but I guess people doing bespoke display applications might need 3 screens). The Brix has one of each flavour.

The power button is on the right (the NUC’s is on the left), and there’s no HDD activity light. The chrome edging makes the Brix case more attractive.
Performance
I’m running Ubuntu on the Brix rather than Windows, so it’s quite possible that a leaner OS is making up for a weaker CPU. Whatever’s going on it feels plenty fast enough.
Sadly I’ve not been able to run Geekbench, so no hard numbers other than the Passmark score of 1731.
Hardware wise I’ve put in a single 8GB stick of RAM (so there’s a spare slot if I’d like to upgrade later) and a 120GB mSATA SSD (both from Crucial).
Cost
The barebones kit was £145.99, RAM was £55.17 and the SSD was £62.69 giving a total cost of £263.85.
Installation
Ubuntu 12.04 Server went on from USB without any issues (and really quickly). Sadly I hit problems with KVM, which stopped me from getting the config I desired.
Switching to Ubuntu 14.04 Desktop (daily build) was painless, and means that I now have KVM running the handful of VMs I’d like to have for demos.
I had to go into the BIOS to enable Virtualisation support (which I also had to do on the NUC and on my new Dell Server). It totally beats me why machines still ship with this disabled by default.
Noise
The Brix has a fan like the NUC, but seems to run it far less frequently. There’s a little burst of activity when first starting up, and it comes on when pushing the CPUs hard (e.g. with a VM installation) but it’s otherwise nearly silent (and discernibly quieter than the NUC).
Conclusion
I think the Brix will make an excellent trade show demo machine, and it would probably also be a decent home lab server for somebody playing with virtualisation. I wonder if we’ll see a an OpenStackBrix take on the EucaNUC?
Filed under: review, technology | 1 Comment
Tags: Brix, GB-XM14-1037, Gigabyte, KVM, NUC, RAM, review, SFF, ssd, Ubuntu
Review – Intel NUC DC53427HYE
I’ve been using a Lenovo X201 Tablet in a docking station as my main machine for about 3 years now. 8GB RAM hasn’t been enough for a while, which is why I got 16GB for my X230 laptop, and I’ve been having issues with the CPU running out of steam when using Skype and Google Hangouts.
I first came across Intel’s Next Unit of Computing (NUC) at Intel’s Developer Forum (IDF) in San Francisco in 2012. At the time I was a little dismissive of it in comparison to the Raspberry Pi for applications like streaming media, where it’s just too expensive (and larger than it needs to be). I did however feel that it would be a good basis for a small, quiet and frugal desktop machine.
Joe Baguley brought my attention to Alex Galbraith’s London VMUG presentation ‘Intel NUC Nanolab‘, which had me look at the NUC again. Alex also has a comparison table, and he concludes with the recommendation:
As regards this latest batch of models, I personally still think the sweet spot is with the Intel Core i5-3427U DC53427HYE 2nd Gen model, which includes vPro for remote access, and will turbo to a handsome 2.8GHz
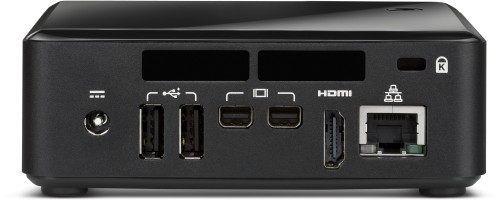
Built in sound might have tipped me towards the newer i5-4250 model, but they’re not actually available, which is why I ended up getting an i5-3427 one (for £260 on eBay). The i5 version also had the gigabit ethernet and DisplayPort connectors that I wanted.
Making it complete
The NUC comes bare bones, so I popped in 16GB of RAM and a 480GB mSATA drive (both from Crucial). I moved a Windows 8 license over from an old Microserver, and jumped straight to 8.1 on install. A USB2 hub and a cheap USB sound adaptor from eBay finished things off (sadly my Dell 27″ monitor doesn’t seem to do sound over Displayport).
Installation
Windows 8.1 had no problem with drivers, and I got glorious 2560×1440 as soon as I plugged it in with DisplayPort. A visit to the Intel driver site got some more recent stuff for things like ACHI. Even the cheap USB sound card just worked :)
Performance
It’s subjectively very fast, though I might still be in the new machine honeymoon period. Sadly I can’t get Windows Experience Index numbers as WEI was ditched with the 8.1 release. Boot up speed is particularly good.
Less subjectively it clocks a Geekbench of 4815, which beats my same generation i5-3320M powered laptop at 4065[1].
Some noise
It’s quiet, but not quite silent. I would still notice the fan on the laptop, and I still notice the fan on the NUC. It’s nowhere near annoying or even distracting, but it’s there. I may have to splash out on the Akasa Newton V fanless case, which would also bring a couple of extra USB2 ports up front.

Update (13 Mar 2013): So I didn’t last very long. I ordered the silent case from CCL a few days after writing this, and I’ve been enjoying a silent working environment ever since.
Power peril
The NUC has received a bit of criticism for not having a mains cable for it’s power supply unit – it needs a C5 ‘cloverleaf’ (aka Mickey Mouse) lead. That wasn’t a problem, as it’s the sort of thing I do have lying around.
The peril comes from a lack of battery backup. Having used laptops for the last few years I’ve survived the all too frequent cuts and brownouts in my area, so it’s a rude shock to be back on the unreliable mains grid (especially when plumbers decide to do safety tests that trip my residual current detector – apparently it’s ‘too sensitive’).
I’m awaiting delivery of an IEC-C5 cable so I can run the NUC off my UPS.
Conclusion
I’m very happy with the NUC. It looks pretty on my desk, and offers up good performance without using loads of power and without making loads of noise. I may yet splash out on the silent case to get quiet PC nirvana. Apart from that I should be happy until I need something that can drive a 4K monitor (once they’ve sorted out all of the issues with driving those screens).
Note
[1] It’s a total mystery to me why a 35W CPU is beaten by a 17W CPU, but I’m left wishing that my laptop could use those watts better.
Filed under: review, technology | 3 Comments
Tags: benchmark, DC53427HYE, displayport, i5, i5-3427U, Intel, NUC, RAM, ssd
Review – Dell PowerEdge T110 II
It’s almost 3 years since I got my HP Microserver – time for a change. 8GB wasn’t enough RAM for all the VMs I want to run, and even with an unofficial upgrade to 16GB I was running out of room. The NL40 processor was starting to show some strain too. The time had come for something with 32GB RAM, which meant getting a real server.

Ridiculously cheap
I just missed out on getting my server for £219.95+VAT (£263.94). Procrastination got in the way, and when I did go to order they were out of stock. They’re now back at ServersPlus for £249.95+VAT (£299.94) – and that’s the version with a proper server CPU (a Xeon E3-1220 v2) rather than some weedy Pentium or i3 meant for a regular desktop.
I know it’s possible to get PCs for even less than £300 these days, but a proper server from a brand name vendor that’s nicely put together seems like a bargain[1].
Fill her up
A server with 4GB RAM and a 500GB hard disk is approximately useless[2]. I had a couple of 3TB spindles to transplant, a freshly shucked 4TB drive that cost me £124.99[3] and ordered 32GB RAM (£307.18) from Crucial and a 240GB Transcend SSD that was on sale from eBuyer for £99.99. My server was no longer ridiculously cheap, but for less than £1000 I had a machine that would be fast and have lots of everything.
Performance
Given a choice it would have been nice to pay a small premium for the E3-1230 v2, which with a CPU Mark score of 8890 seems much faster than the 6503 of E3-1220 v2 – a difference that just doesn’t make sense on paper for a 0.2GHz clock speed differential (and no other notable differences in cache etc.).
Running Geekbench turned in a multi-core score of 8573 – the new house champion by a good margin – just what I hoped for with a full fat CPU in a big box.
Subjective performance is great, even when running a load of VMs. The only let down is DivX Converter transcoding, which seems to thrash the CPUs without going very much faster than it did on the HP Microserver.
Network transfer rates are substantially better than I was seeing with the HP Microserver (Iperf is clocking around 400Mbps over a less than perfect 30m cable run – I was previously seeing 150Mbps).
Build
The case is solid but not too heavy. Opening is achieved with a simple single latch, and everything is very tidy inside.

It comes with 4 slide in 3.5″ disk trays, which are great (and often a premium item for other brand servers). Using a 2.5″ SSD on an Intel mounting plate made cable routing a slight stretch, but otherwise it’s a very neat arrangement. There’s a 5th SATA port internally, which I guess is there for an optical drive, but I’ve routed it to a removable HDD caddy. There’s also an eSATA port (but no eSATA power).
There are 2 USB2 ports on the front, 4 around the back and another couple on the motherboard. There’s also gigabit ethernet, VGA, and a proper old 9 pin serial port[4].
The server is quiet in operation, and seems to run nice and cool. The power supply is rated at 305W, but I’d guess it’s not slurping anything like that – fingers crossed that my electricity bill doesn’t leap up now that I’ve given up on the Microserver.
Conclusion
The new server has given me the processing power, storage and VM space that I need now, with a good deal of headroom for future needs. At less than £1000 for such a high spec I’m very happy, particularly given the strong performance and good build quality.
Notes
[1] I’m left wondering why these don’t get bought as the basis for cheap workstations?
[2] A 4/500GB configuration might just about do for a basic office server these days, but I wish it was possible to buy (on Dell’s web site) a minimal config with no RAM/disk.
[3] Supply chain insanity (and varying warranty offerings) mean it’s cheaper to get external disks and remove the disk from its shell than it is to just but the disk naked.
[4] I thought that this might be useful for my old APC UPS until I discovered that serial UPS support disappeared in Windows 2008.
Filed under: review, technology | 8 Comments
Tags: benchmark, build, Dell, E3-1220, E3-1220v2, performance, RAM, review, ssd, T110, T110 II, VMs
Multi tier apps in Docker.io
Docker provides the means to link containers, which comes in two parts:
- Outside the container (on the docker command line) a ‘-link name:ref’ is used to create a link to a named container.
- Inside the container environment variables REF_… are populated with IP addresses and ports.
Having linked containers together it’s then necessary to have a little plumbing inside the containers to get the contents of those environment variables to the right place.
My example application
A while ago a saw a demo of Apcera, which used a little ToDo list application as a means to show off the capabilities of the platform. I thought a similar demo would be useful for CohesiveFT’s VNS3[1], and I found a suitable basis with theponti‘s sinatra-ToDoMVC app. My version of the app has been modified to use MySQL as a back end, and I also add Nginx as a front end to make a 3 tier demo.
If you want to just dive in
I’ve put my app into github, and it’s available as a trusted build from my page on the Docker public index. To just run it up start each tier in turn:
# first create the directory for persistent data:
sudo mkdir -p /data/mysql

# start the database
sudo docker run -d -p 3306:3306 -name todomvc_db \
-v /data/mysql:/var/lib/mysql cpswan/todomvc.mysql

# start the app server
sudo docker run -d -p 4567:4567 -name todomvc_app \
-link todomvc_db:db cpswan/todomvc.sinatra

# start the web server
sudo docker run -d -p 443:443 -name todomvc_ssl \
-link todomvc_app:app cpswan/todomvc.ssl
The database
The MySQL database is the base dependency, so nothing happening here in terms of linking. I’ve adapted Ben Schwartz’s scripts for creating a MySQL Docker container to add in the creation of the ToDoMVC database.
The only other noteworthy thing happening here is the externalisation of the MySQL database storage back to the host machine using the -v flag.
The app server
This is linked back to the database with ‘-link todomvc_db:db’. Inside the container this gives various environment variables starting DB_. The appropriate one is parsed into the database URL within the Sinatra application using the following couple of lines of Ruby:
dburl = 'mysql://root:pa55Word@' + ENV['DB_PORT_3306_TCP_ADDR'] + '/todomvc'
DataMapper.setup(:default, dburl)
Note that the Dockerfile for the app server is grabbing the Ruby code straight from the docker branch of my fork of the sinatra-ToDoMVC application. If you want to see that database URL in context then take a look at the source for app.rb. The credentials being used here are what was set back in the database start script.
The web server
This is linked back to the app server with ‘-link todomvc_app:app’. Inside the container this gives various environment variables starting APP_. As Nginx can’t do anything useful with those variables it’s necessary to parse them into nginx.conf before starting the server, which is what the start_nginx.sh script is there to do:
#!/bin/bash
cd /etc/nginx
cp nginx.conf.template nginx.conf
eval "echo \"`cat upstream.template`\"" >> nginx.conf
service nginx start
The nginx.conf has been split into two templates. For the bulk of it (nginx.conf.template) there’s no need to environment substitution, in fact doing so will strip out env variables that need to be there. Only the upstream section is required so that:
upstream appserver {
    server $APP_PORT_4567_TCP_ADDR:$APP_PORT_4567_TCP_PORT;
  }
}
Gets turned into something like:
upstream appserver {
    server 172.17.0.62:4567;
  }
}
The trailing brace is there to complete the unfinished http section from the main nginx.conf.template.
That’s it :)
Browsing to https://docker_host/todos should get the todo list up.
Note
[1] For my demo with VNS3 I spread the tiers of the app across multiple clouds – almost the exact opposite of what’s happening here with all three tiers on the same host. In that case VNS3 provides the linking mechanism via a cloud overlay network – so there’s no need to tinker with the application config to make it aware of it’s environment – hard coded IPs are fine (even if they’re generally a config antipattern).
Filed under: code, Docker, howto | 3 Comments
Tags: address, app server, database, Docker, Docker.io, Dockerfile, enviornment, link, linking, MySQL, Nginx, port, Ruby, Sinatra, SSL, ToDoMVC, web server
Ubuntu images on Docker.io
When trying to install node.js into the default official Ubuntu image on Docker the other day I hit a dependency issue. Node.js needs rlwrap[1], and rlwrap is in the universe repository, which it turns out isn’t part of /etc/apt/sources.list for the 12.04 image:
deb http://archive.ubuntu.com/ubuntu precise main
Things worked using the ubuntu:quantal (== ununtu:12.10) image because that has an expanded sources.list that includes universe and multiverse – a much larger selection of available packages:
deb http://archive.ubuntu.com/ubuntu quantal main universe
multiverse
It’s a total mystery to me why that difference should be there.
This specific issue can be fixed with a one line addition to the Dockerfile that adds the universe repository[2]:
RUN sed -i s/main/'main universe'/ /etc/apt/sources.list
I took a look at the stackbrew/ubuntu images, which it turns out have a much more complete and consistent set of sources.list (for all 4 versions that are presently available: 12.04, 12.10, 13.04 and 13.10):
deb http://archive.ubuntu.com/ubuntu version main universe
deb http://archive.ubuntu.com/ubuntu version-updates main
universe
deb http://archive.ubuntu.com/ubuntu version-security main
universe
Unfortunately this causes bad things to happen if you run ‘apt-get update && apt-get upgrade -y’:
dpkg: dependency problems prevent configuration of
initramfs-tools:
 initramfs-tools depends on udev (>= 147~-5); however:
 Package udev is not configured yet.
dpkg: error processing initramfs-tools (--configure):
 dependency problems - leaving unconfigured
There’s really no need for initramfs stuff within a container – so the broader sources.list is causing the container to attempt to do unnatural things.
Conclusion
Dependency management in the current crop of Ubuntu images at hand for Docker.io is a bit of a mess at the moment. It’s not hard to straighten things out, but things that superficially look like they’re doing the right thing can come with unintended consequences that don’t fit well with the containerised approach.
Notes
[1] Here’s the error message:
Some packages could not be installed. This may mean that
you have requested an impossible situation or if you are
using the unstable distribution that some required
packages have not yet been created or been moved out of
Incoming.
The following information may help to resolve the
situation:
The following packages have unmet dependencies:
 nodejs : Depends: rlwrap but it is not installable
[2] Make sure there’s an ‘apt-get update’ afterwards
Filed under: Docker | Leave a Comment
Tags: 12.04, 12.10, Docker, Docker.io, Dockerfile, main, node, node.js, precise, quantal, rlwrap, sed, sources.list, Ubuntu, universe
Node-RED on Docker
Docker is going into the next release of CohesiveFT’s VNS3 cloud networking appliance as a substrate for application network services such as proxy, reverse proxy, load balancing, content caching and intrusion detection. I’ve been spending some time getting familiar with how Docker does things.
Since I’ve also been spending some time on Node-RED recently I thought I’d bring the two activities together as a demo application.
Following in the footsteps of the SSH example I was able to use Oskar Hane’s guide to creating a Node.js Docker.io image and then add in Node-RED[1]. This gave me something that I could run, but not something that was particularly repeatable or malleable.
Having read through Troy Howard’s excellent Where are my Docker images stored? I then set about encoding the steps I’d followed into a Dockerfile:
FROM ubuntu:quantal

RUN apt-get update
RUN apt-get upgrade -y
RUN apt-get install python-software-properties python g++ make -y
RUN apt-get install software-properties-common wget unzip -y
RUN add-apt-repository ppa:chris-lea/node.js -y
RUN apt-get update
RUN apt-get install nodejs -y
RUN wget https://github.com/node-red/node-red/archive/0.5.0.zip
RUN unzip 0.5.0.zip -d /opt
RUN cd /opt/node-red-0.5.0 && npm install --production
RUN rm 0.5.0.zip
I broke my normal habit of only using Ubuntu LTS builds here as for some peculiar reason rlwrap, which is needed for Node.js, doesn’t seem to install properly on the Ubuntu 12.04 Docker image.
The nice thing about the way the Dockerfile works is that when things break you don’t have to repeat the preceding steps. Docker just uses its image cache. This makes testing much less painful than in other environments as the cost of making mistakes becomes pretty minimal. This is the key to the power of Docker, and particularly the Dockerfile – the incremental friction between hacking away at the command line and developing a DevOps script has become tiny. It really makes it easy to create something that’s repeatable rather than something that’s disposable.
I also found out that context isn’t preserved from one run command to the next, which is why lines 11 and 12 are like that rather than a more (interactively) natural:
cd /opt
unzip ../0.5.0.zip
cd node-red-0.5.0
npm install --production
Once the Dockerfile built correctly with:
sudo docker build -t cpswan/node-red-0.5.0 .
I could then launch an instance with:
sudo docker run -d -p 1880:1880 cpswan/node-red-0.5.0 \
/usr/bin/node /opt/node-red-0.5.0/red.js
and bring it up in my browser by navigating to http://host_ip:1880
I’ve uploaded the resulting image cpswan/node-red-0.5.0 to the public index if you just want to run it rather than making it.
Note
[1] Perhaps this wasn’t the Docker way to do things. Searching the Docker public image repository turns up an image christened ‘dun‘ Docker, Ubuntu, Node (though it is a few point releases behind on node.js).
Filed under: code, CohesiveFT, Docker | 2 Comments
Tags: Docker, Docker.io, Dockerfile, image, index, node, Node-RED, node.js, repository
OpenWRT on TP-Link TL-WR2543ND
If you want to dive straight into install instructions then head over to the TP-Link TL-WR2543ND article on the OpenWRT Wiki.

Why?
When my son smashed the screen on my iPad 2 I think he also damaged the WiFi antenna. I had to be just about be sitting on top of a 2.4Ghz hotspot to get any 802.11g/n signal. 5GHz seemed OK though, so rather than getting the iPad repaired again I thought it would be easier/cheaper to get an access point that supported 802.11a.
I didn’t really want a router, but standalone dual band access points don’t seem to be a thing, so I went for the TL-WR2543ND as it was pretty cheap on Amazon (£40.77 when I got it, now £37.99 on Amazon.co.uk [1]).
When the router arrived it was a bit of a disappointment. Firstly I thought that dual band would mean both bands at once (it doesn’t), and secondly there was no obvious way to get it working nicely on my usual home network subnet. I had to treat the home network as the WAN, and then have another subnet for devices connected to the router.
Having done some other upgrades to the home network I wanted a 5 port gigabit switch in the lounge, and it would be handy to have the 5Ghz access point there too. I just needed some way to liberate the WAN port on the router, and there was no way to do that with stock firmware.
OpenWRT
OpenWRT is an open source firmware platform for routers. I’ve previously used in on an older TP-Link device that I had in the lounge, and installation onto the TL-WR2543ND was a breeze.
Using the web interface from a laptop connected to one of the wired LAN ports I ran through initial configuration:
- Enabled SSH, disabled password login and installed a key
- Set up WiFi
- Removed dnsmasq to avoid clashes with the DHCP/DNS elsewhere on the network
- Gave the LAN interface a static IP on my usual subnet
Almost there…
I now had a router with a 4 port switch and 5GHz WiFi, but I needed that extra port. At this point I tried bridging the LAN (eth0.1) and WAN (eth0.2) interfaces. I thought I had it working (stuff plugged into the WAN port was pingable from elsewhere on the network), but on power cycling no traffic passed on the switch, and I couldn’t connect to the web or SSH interfaces.
Disaster :(
Recovery
Now the stuff about serial port recovery from the install instructions came into its own. I’d stupidly locked myself out of the device, and I needed a way back in. Luckily it was pretty easy to solder a few header pins into the right place, and the FTDI adaptor that I got for my Nanode let me connect a serial terminal. I was back into the Linux shell[2], and a bit of hacking at /etc/config/network to remove the bridge had me back in over the network.
What actually worked
Having got myself back in (and made a backup of a working network config in case I messed it up again) I tried unsuccessfully to make bridging work. Even when I managed to do this in a way that didn’t lock me out of the router it seemed to cause ARP floods. I was doing the software equivalent of plugging a cable into two ports of the same device.
The correct approach was to disable VLAN functionality in the Network->Switch menu (I also deleted VLAN 2 and set port 0 to untagged on VLAN 1).
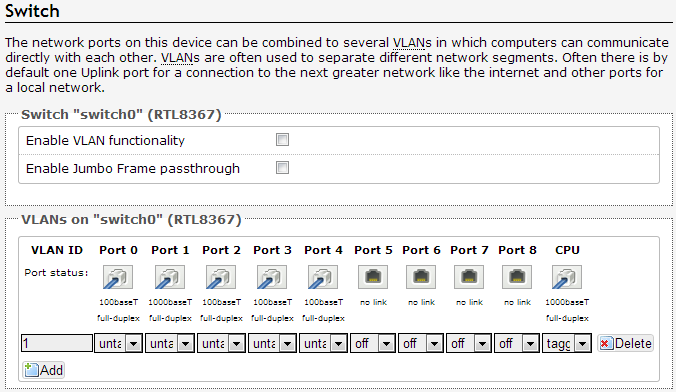
This does the trick because the WAN port is/was just a different VLAN on the same switch as the LAN ports, so if I want them all to work together then naturally I just treat them as part of the same VLAN (by not having any distinct VLANs at all).
Conclusion
I’ve now got what I want – a 5 port switch with attached 5GHz access point, rather than what I bought – a dual band WiFi router. Less is more.
Notes:
[1] I was going to put in an Amazon.com link for US readers, but it seems to have been discontinued.
[2] There was no need to reinstall the firmware
Filed under: howto, technology | 2 Comments
Tags: 2.4GHz, 5GHz, 802.11a, firmware, gigabit, OpenWRT, router, serial, switch, TL-WR2543ND, TP-Link


