Raspberry Pi sous vide water bath
Temperature control for a sous vide water bath is a popular application for hobbyist microcontroller kits, with lots of well documented projects out there. My favourite is the Sous Vader – if only for the attention to detail in the decal on the box.
I’ve been planning my own for a little while, and got some DS18B20 temperature probes a little while ago. The long Easter weekend break finally brought me some time to progress the project.
Danger – High Voltage
I have an old slow cooker that’s perfectly good for doing pot roast. It’s been falling to bits for some time, and I’ve patched it up with a Sugru sample I got at Monkigras. I had thoughts of hacking it directly (and perhaps even building in a Raspberry Pi), but common sense took hold and I decided on a route that didn’t involve directly manipulating mains electricity.
To turn the slow cooker on and off I got hold of a radio controlled mains socket from Maplin – they’re available without the controller (which I didn’t need) for £7.99.

I found a library to control the remote socket on github – Raspberry Strogonanoff (thanks Duncan McGregor, and a clever choice of project name). This uses a Sparkfun 434MHz RF Link Transmitter (which as suggested by Duncan I got from Protopic).
Getting Raspberry Strogonanoff working was the easier part of the whole set up. Having looked at the socket to establish that it was set to channel 4 button 1 I simply ran this line to turn it on:
sudo ./strogonanoff_sender.py --channel 4 --button 1 --gpio 0 on
and this to turn it off again:
sudo ./strogonanoff_sender.py --channel 4 --button 1 --gpio 0 off
Getting control
A water bath is a good example of a control system. The water and pot collectively have quite a high specific heat capacity, and there’s quite a bit of latency between turning off power and the rise in temperature stopping. The standard way of dealing with this is to use a PID Controller (see this explanation for a BBQ application for something more straightforward than the Wikipedia article). The Sous Vader seems to have worked with just a PI controller (effectively D=0), so I tried that first. There is a python implementation of a PID controller, which I didn’t spend the time to integrate.
Tuning the control loop
This is the tricky and time consuming part. In theory there should be a nice library out there that figures out correct settings for P, I and D based on observed data, but in practice it seems that most people resort to manual tuning.
The hardware
I started out with things on a breadboard using my usual home made Pi Cobbler, but as I want to use this in the kitchen I’ve created a more permanent setup using a Ciseco Slice of Pi, which at £3.90 is a very inexpensive small project board. I used one of the header strips in the Slice of Pi kit as a place to plug in the 434MHz transceiver and the temperature probes (so it would be easy to use parts in other projects). It was then simply a case of soldering some connecting wires to the appropriate power (5v for the transceiver and 3.3v for the DS18B20), GPIO (0 for the transceiver and 7 for the DS18B20) and GND:
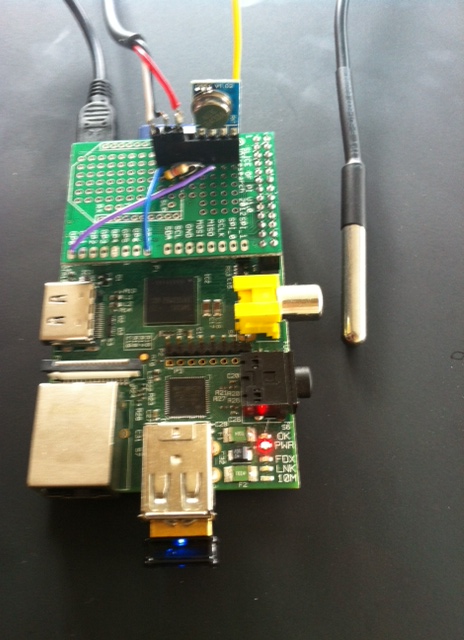 The system pictured above has an Edimax WiFi dongle so that I can control and monitor the whole thing when it’s in the kitchen.
The software
Update 14 Apr 2013 – the code (slightly improved over what’s below) is now available on GitHub along with (hopefully comprehensive) installation instructions.
It’s not especially pretty, but seems to be doing the job:
import os
from subprocess import Popen, PIPE, call
from optparse import OptionParser
from time import sleep

def tempdata():
    # Replace 28-000003ae0350 with the address of your DS18B20
    pipe = Popen(["cat","/sys/bus/w1/devices/w1_bus_master1/28-000003ea0350/w1_slave"], stdout=PIPE)
    result = pipe.communicate()[0]
    result_list = result.split("=")
    temp_mC = int(result_list[-1]) # temp in milliCelcius
    return temp_mC

def setup_1wire():
  os.system("sudo modprobe w1-gpio && sudo modprobe w1-therm")

def turn_on():
  os.system("sudo ./strogonanoff_sender.py --channel 4 --button 1 --gpio 0 on")

def turn_off():
  os.system("sudo ./strogonanoff_sender.py --channel 4 --button 1 --gpio 0 off")
#Get command line options
parser = OptionParser()
parser.add_option("-t", "--target", type = int, default = 55)
parser.add_option("-p", "--prop", type = int, default = 8)
parser.add_option("-i", "--integral", type = int, default = 2)
(options, args) = parser.parse_args()
target = options.target * 1000
print ('Target temp is %d' % (options.target))
P = options.prop
I = options.integral
# Initialise some variables for the control loop
interror = 0
pwr_cnt=1
pwr_tot=0
# Setup 1Wire for DS18B20
setup_1wire()
# Turn on for initial ramp up
state="on"
turn_on()

temperature=tempdata()
print("Initial temperature ramp up")
while (target - temperature > 3000):
    sleep(15)
    temperature=tempdata()
    print(temperature)

print("Entering control loop")
while True:
    temperature=tempdata()
    print(temperature)
    error = target - temperature
    interror = interror + error
    power = ((P * error) + ((I * interror)/100))/100
    print power
    if (power > 0):
        pwr_tot = pwr_tot + power
    pwr_ave = pwr_tot / pwr_cnt
    pwr_cnt = pwr_cnt + 1
    print pwr_ave
    # Long duration pulse width modulation
    for x in range (1, 100):
        if (power > x):
            if (state=="off"):
                state="on"
                print("On")
                turn_on()
        else:
            if (state=="on"):
                state="off"
                print("Off")
                turn_off()
        sleep(1)
Conclusion
I’ve not had the chance to use the water bath for cooking yet, but I’m very much looking forward to trying out a few steaks and maybe some Sunday roasts. I’ll report back on the results.
Filed under: code, making, Raspberry Pi | 24 Comments
Tags: 434MHz, control system, DS18B20, mains, PI, PID, python, Raspberry Pi, remote control, RPi, Sous vide, water bath
Subscribe
Recent Comments
Monki Gras 2026: Wra… on Monki Gras 2026 Chris Swan on Milo cancer diary part 20… Chris Swan on Milo cancer diary part 20… Chris Swan on USB C Charger Reviews Peter on USB C Charger Reviews  Pinboard.in bookmarks
- RISE RISC-V Runners: free, native RISC-V CI on GitHub
- The web is bearable with RSS
- House of Lords Digital & Communications Committee - AI, copyright & the creative industries
- CI/CD for Context in Agentic Coding: Same Pipeline, Different Rules
- Google Has a Secret Reference Desk. Here's How to Use It.
- How to OpenClaw your Raspberry Pi
- 15+ years later, Microsoft morged my diagram
- AWS adds nested virtualization option for handful for EC2 instances
- the problem isn’t OpenClaw. it’s the architecture.
- I let AI fix my printer


I have had quite a lot of success using a deep fat frier (square, stainless type) as a sous vide.
I use the same temp probe as yourself, and use the Raspi to monitor the temp and turn off/on the frier as needed.
I am part way through doing a little write up, I’ll post the link when finished…
Daz
I guess anything that can hold liquid and heat it up makes a good base.
How are you getting on with accuracy of temperature control (overshoot and oscillation prevention)?
I’m looking forward to seeing the write up (and any code).
Hi Chris,
What happens if the script crashes while heating? Is there any provision made for switching off the heater if the script is not running?
Thanks,
Ian
I’ve not done anything about fault conditions like that (and to be honest I’m more worried about power failure taking the whole thing down versus the script mysteriously crashing). The worst case here is that the heater gets stuck on, which will likely ruin the food, but is the normal mode of operation for the slow cooker – so not actually dangerous.
I do normally run a separate script to log the temperature every 15s, so I can see from that if something has gone awry. I also use those logs to graph the temperature against time afterwards.
Thanks for the response Chris. I guess your slow cooker has built in sensors which will cut the power without boiling dry. I am not using a slow cooker and have built a water bath with kettle elements which could have the potential to boil dry… In this kind of failure scenario I don’t care that much about the food being ruined obviously!
My slow cooker isn’t that fancy, but the heating element is pretty weedy compared to the specific heat capacity, so it’s designed to go for hours without the prospect of boiling dry. A kettle element is going to be around 10-12x more powerful so unless you’re using LOTS more water you’ll need shorter pulses of on time and I agree that runaway control becomes a greater concern – I’d be tempted to put in some sort of thermal circuit breaker.
Yeah I’m on the case already, it’s a 40L water bath with 2 kettle elements. I’d rather not have a script being responsible for maintaining safety so I am going to wire in a float switch too.
Thanks for your responses Chris, and I hope you don’t mind me stealing some of your script code :)
Hi Chris, how do I increase the cycle rate inside the control loop?
The control loop is presently 100s long, which is set by two lines in the code:
This makes the loop go around 100 times.
This makes each iteration take one second.
Before you start fiddling with that it’s worth considering some of the underlying basics:
1. How quickly does the temperature rise when the heater is on?
2. How quickly does the temperature fall when the heater is off?
3. How much delay is there between a state change (heater on/off) and an observable change in temperature?
I must confess that I haven’t been very scientific about this stuff myself (even though I now have the data at hand from a number of runs).
The other concept that I’ve seen used elsewhere (but yet to incorporate into my own code) is the use of bias. I’ve been logging the average on/off when in use, which comes out pretty consistently at 22%. This tells me that I can maintain a given temperature by having a 22% duty cycle (22s on : 78s off), so I should probably make 22% the natural level and make the control loop go a little up or down from that.
It’s also worth remembering that almost every control system is a natural oscilator waiting to be set off. It really scares me that we have people writing algorithmic trading systems that manipulate the world’s markets when there isn’t a known good way of accurately controlling the temperature of a crock pot.
If you haven’t already read the discussion on tuning control loops in the Sous Vader post then it’s well worth a look. It’s also a good illustration of the point that loop frequency doesn’t help much with the fundamental dynamics. As Craig directly controls a triac his loop frequency is effectively 60Hz versus mine which is 0.01Hz, but in both cases the oscillation frequency of the overall system is much lower. The crucial point here is that changing things faster (even 6000 times faster) doesn’t help much when there’s massive latency between making the change and observing the change.
Hi Chris,
Great post, thanks for this. I have a question – How is the 4k7 pull up resistor connected and used (I’m a total n00b in this…)? Thanks.
The 4k7 pull up resistor goes between Vcc (red wire) and Data (white wire). You can see it (somewhat bent over) in the photo.
Got everything connected on a breadboard, both the RF transmitter (to Maplin remote socket) and the temperature probe are working! Now I just need to hook it up to a slow cooker and tune the PID controls. Thanks a lot for your awesome guide!!
Hi Chris, I’m awaiting my sensor and SSR, then I will be building a very similar unit to your, but using an SSR, which strikes me as simpler. FWIW, I also plan on tweaking your code a bit, eliminating the os.system calls as so much is now available natively in Python. (Examples for the curious available here: http://elinux.org/RPi_Low-level_peripherals ).
A quick note: when I git-cloned your repository I picked up OpenElec, no problem, but also a 328MB file under .git/objects/pack. It caused my poor little Pi to choke a few times, but got it all in the end. Thanks very much for this, it was almost exactly what I was looking for.
Sorry about that. I’m still something of a github noob, and didn’t realise until it was too late that there’s no such thing as subprojects.
I fear that the .git/objects/pack is some residue from the ancient OpenELEC binaries (but as I can’t see them in github I’m at a loss in terms of figuring out what to do about it).
I’ve created a new project RPi_sousvide – feel free to fork to do your SSR stuff, and any pull requests for better Python will be gratefully received.
Hi Chris
I have built a system incorporating your PI code (thanks) but as I am using a deep fat fryer with water and think 100s may be too much, if I change that to something smaller do I need to change the code “power = ((P * error) + ((I * interror)/100))/100” to divide by the same amount or maybe I could just change the sleep in the iteration to half a second or some other fraction?
Thanks
You’re going to have a lot of tuning to do as the thermal performance of a deep fat fryer will be very different.
I expect that a shorter wavelength on the control loop will be a good idea, and I’d be tempted to drop down to 10s, so just move the decimal in a few places.
Thanks. I also had to change the last 100 in the formula to 1000 otherwise the power was always 210 ish when I guess it should be more like 21.