I’ve been very happy with the results from my Raspberry Pi controlled water bath for sous vide cooking, but I knew that the control loop could be improved. Past runs show fairly continued oscillation:

Roast beef run at 60C
I’ve been keeping track of the average power for my control loop, which has been coming out at 22%. So i modified the code to have a bias of 22%, and here’s the result:

Test run at 55C
Overall much more stable. The occasional hiccups are probably caused by the remote socket failing to receive off commands. There’s a 3C overshoot at the start, which I hope to have fixed by entering the control loop from initial warm up 3C earlier. Here’s the new code (also available at GitHub):
import os
from subprocess import Popen, PIPE, call
from optparse import OptionParser
from time import sleep

def tempdata():
    # Replace 28-000003ae0350 with the address of your DS18B20
    pipe = Popen(["cat","/sys/bus/w1/devices/w1_bus_master1/28-000003ea0350/w1_slave"], stdout=PIPE)
    result = pipe.communicate()[0]
    result_list = result.split("=")
    temp_mC = int(result_list[-1]) # temp in milliCelcius
    return temp_mC

def setup_1wire():
  os.system("sudo modprobe w1-gpio && sudo modprobe w1-therm")

def turn_on():
  os.system("sudo ./strogonanoff_sender.py --channel 4 --button 1 --gpio 0 on")

def turn_off():
  os.system("sudo ./strogonanoff_sender.py --channel 4 --button 1 --gpio 0 off")
#Get command line options
parser = OptionParser()
parser.add_option("-t", "--target", type = int, default = 55)
parser.add_option("-p", "--prop", type = int, default = 6)
parser.add_option("-i", "--integral", type = int, default = 2)
parser.add_option("-b", "--bias", type = int, default = 22)
(options, args) = parser.parse_args()
target = options.target * 1000
print ('Target temp is %d' % (options.target))
P = options.prop
I = options.integral
B = options.bias
# Initialise some variables for the control loop
interror = 0
pwr_cnt=1
pwr_tot=0
# Setup 1Wire for DS18B20
setup_1wire()
# Turn on for initial ramp up
state="on"
turn_on()

temperature=tempdata()
print("Initial temperature ramp up")
while (target - temperature > 6000):
    sleep(15)
    temperature=tempdata()
    print(temperature)

print("Entering control loop")
while True:
    temperature=tempdata()
    print(temperature)
    error = target - temperature
    interror = interror + error
    power = B + ((P * error) + ((I * interror)/100))/100
    print power
    # Make sure that if we should be off then we are
    if (state=="off"):
        turn_off()
    # Long duration pulse width modulation
    for x in range (1, 100):
        if (power > x):
            if (state=="off"):
                state="on"
                print("On")
                turn_on()
        else:
            if (state=="on"):
                state="off"
                print("Off")
                turn_off()
        sleep(1)
Filed under: code, cooking, Raspberry Pi | 10 Comments
Tags: 434MHz, bias, control system, DS18B20, mains, PI, PID, python, Raspberry Pi, remote control, RPi, Sous vide, water bath
Sunday Roast
After some success with low temperature cooking sous vide style with my Raspberry Pi controlled water bath I had a go today at doing slow roasted pork belly[1], which came out well. After some questions on twitter I though I’d go through the standard recipes and techniques I use for the rest of the meal.

Some of the crackling might make it to a sandwich tomorrow
My cooking style is very scientific – keep to the right weights, measures, timings and temperatures and things will come out fine every time. Here’s how I do my roasties (roast potatoes), yorkies (Yorkshire puddings), stuffing[2] and veggies:
t-70m peel and chop potatoes – I usually allow for 6 roasties per person.
pour oil into a roasting tin for potatoes, and a little into each cup of a 12 cup yorkie tray, grease a small roasting tray for the stuffing
t-60m turn fan oven onto full power (~240C[3]), put potatoes into a pan of hot tap water and place to boil on a large gas ring
prepare batter for yorkies: 125g strong white bread flour, 235g[4] milk, 3 eggs whisk until smooth
prepare stuffing – half a pack of paxo (~90g) with a bit less than the specified amount of water (~240g)
t-48m put roasting tin for potatoes into oven to warm
t-45m drain potatoes, shake together to fluff surface, put into roasting tin, make sure potatoes are covered in oil then place in oven
prepare veggies (usually carrots and broccoli) and place in pan of hot tap water
t-33m put yorkie tin into oven
t-30m pour yorkie batter into yorkie tin and place in oven, turn down to 180C
place stuffing onto small roasting tin
t-25m put stuffing into oven
t-20m turn on large ring gas under veggies
t-15m turn oven up to 200C
put plates and serving bowls into microwave to warm up (~5m)
t-2m make gravy using Bisto granules and water from veggies[5]
t-0 service!
Notes
[1] After scoring and rubbing salt into the skin I put a 1.2kg on the bone pork belly into a non fan oven at 130C starting at t-4hrs. At t-60m it went into the hot fan oven to crisp the cracking, and at t-30m it came out to rest and make space for the yorkies. I took the cracking off and put it back in the oven with everything else.
[2] Traditionally yorkies are only served with roast beef, and stuffing is only served with poultry, but I love both (and so do the rest of the family) so we have them every time. $daughter0 insists on having mint sauce every time too.
[3] If using a regular oven then add around 20C throughout
[4] I don’t bother with liquid measures in jugs or whatever, everything gets measured by mass on a set of electronic scales
[5] Or use left over (frozen) gravy from previous pot roast
Filed under: cooking | 2 Comments
Tags: crackling, pork belly, roast, roast potatoes, roasties, stuffing, Sunday, veggies, yorkies, Yorkshire pudding
Needy Jelly Babies
Two years ago I took my son along to Maker Faire UK in Newcastle (which is where I grew up). This year the whole family came along.
Whilst I queued with the kids for the ‘laser caper'[1] my wife went along to a talk by Clive from the Raspberry Pi Team. I can’t blame her for wanting to find out about stuff I’m so keen on from an independent (though not impartial) source. She came back very enthused, particularly about Rob Bishop’s singing jelly baby project.
The setup
The project looked ideal for a couple of reasons:
- It’s short and simple – something that my son could ostensibly tackle on his own
- Jelly babies – yummy
I set up my son’s Raspberry Pi so that it was working on a newly acquired Edimax EW-7811Un WiFi adaptor[2] in order to minimise clutter (no need for keyboard, screen etc.). I also made sure that his Raspbian was up to date (sudo apt-get update && sudo apt-get upgrade). Once jelly babies, paper clips and jumper wires were sourced from around the house he was almost ready to go. I opened up a PuTTY session to the Pi and left him to it.
Hacking like it’s 1983
The hardware bits were simple – as expected. The software was more troublesome.
I cut my teeth programming on the ZX81 and Dragon32, typing in games from magazines. These would invariably not run due to a multitude of typos causing BASIC syntax errors. As many others found out at the time, learning to debug programs is functionally equivalent to learning to program.
Not a lot has changed (and maybe that’s the point).
It’s possible to cut and paste from Rob’s PDF into Nano[3], but that doesn’t give you a working python program. All the indentation (which Python relies on) gets stripped out, and characters like ‘ can mysteriously change into .
Sorting out the copy/paste errors was a good refresher on Python loops and conditionals, and highlighted key aspects of the code flow.
No sound
Before getting too seriously into hammering the Python into shape I sugested a test that the ‘song’ would play.
I ran ‘mpg321 la.mp3’, but heard nothing. Aha I thought – the Pi is trying to play to HDMI rather than the 3.5mm jack (something I’d seen before with MAME). I ran:
sudo modprobe snd_bcm2835
sudo amixer cset numid=3 1
I ran ‘mpg321 la.mp3’ again, but still heard nothing. I tried ‘aplay /usr/share/sounds/alsa/Front_Center.wav’ – that worked – so the problem was with mp3 playback.
I took a hard look at the la.mp3 file. It’s file size seemed wrong. I downloaded it again – different size, but still wrong. I downloaded it with forced raw:
wget https://github.com/Rob-Bishop/RaspberryPiRecipes/blob/master/la.mp3?raw=true
I now had a file called ‘la.mp3?raw=true’, but at least it was the right size (and hence the right file). Git is an awful place to keep binaries (as I found out when trying to use it for OpenELEC builds).
mv la.mp3?raw=true la.mp3
mpg321 la.mp3
Still nothing. I conceded defeat and rebooted as suggested by Adafruit guide ‘playing sounds and using buttons with Raspberry Pi‘. It worked when the Pi came back up.
More hacking
Everything was ready now. This time ‘sudo python SingingJellyBaby.py’ would work.
It didn’t. GPIO.cleanup() was throwing errors (because it didn’t exist in earlier versions of the library).
sudo apt-get install -y python-rpi.gpio
GPIO.cleanup() still throwing errors :(
sudo apt-get install -y python-dev
wget https://pypi.python.org/packages/source/R/RPi.GPIO/RPi.GPIO-0.5.2a.tar.gz
tar -xvf RPi.GPIO-0.5.2a.tar.gz
cd RPi.GPIO-0.5.2a/
sudo python setup.py install
And now, at last, the Jelly Baby sings.
To be fair…
In the course of retracing my steps to write this up it’s looking like the latest Raspbian doesn’t suffer from the GPIO.cleanup() issue. Why an updated/upgraded Raspbian tripped on this will remain a mystery (though I’m starting to suspect that I did apt-get upgrade without an apt-get update).
Conclusions
Until people get much better at putting code into PDF (the Puppet guys seem to have this one covered) kids who cut’n’paste their Python will still have a load of debugging to do.
Github is great for source, not so good for binary objects.
Jelly Babies can be needy – they have dependencies – especially operatic ones.
Notes
[1] I ended up doing my run in 9.45s, which I was told was the fastest of the weekend (as of Sunday morning), though I did just trip the last beam and lost a ‘life’.
[2] I keep forgetting the config steps for WiFi on the Pi. So here’s what I put into /etc/network/interfaces (as I never be bothered to mess around with wpa-supplicant) – you’ll need to replace MyWiFi with your SSID and Pa55word with your WPA shared key:
auto wlan0
iface wlan0 inet dhcp
wpa-ssid “MyWiFi”
wpa-psk “Pa55word”
[3] The truly lazy can of course:
wget https://github.com/Rob-Bishop/RaspberryPiRecipes/blob/master/SingingJellyBaby.py
Filed under: Raspberry Pi | Leave a Comment
Tags: audio, dependency, github, GPIO, jelly baby, mpg321, Raspberry Pi, Raspi, Rob Bishop, RPi, wifi
An adventure with Chef
I hear a lot of people talking about automated deployment with Chef (and its competitor Puppet, which I haven’t had the chance to try yet), so I thought I’d spend some time seeing how it would fit in with our image management platform Server3.
Don’t stray from the PATH
To get familiar with Chef, I dove straight into the online quick start guide, and ended up making a couple of trying too hard errors:
- I began by installing Chef onto an Ubuntu VM, but when it came to the bits of the quick start that used Vagrant it became clear that I needed something that could poke and prod VirtualBox from its host environment (Windows). I went back to square one and installed Chef (and Vagrant) onto the base OS.
- My second mistake was installing onto non-default directories. I find it pretty offensive when stuff wants to go into c:\, and the tidy freak in me likes to put stuff that doesn’t go straight into c:\program files (or c:\program files (x86)) into subdirectories like c:\dev or c:\temp (depending on how long I expect to keep stuff). Chef did not like being in c:\dev\chef – none of the scripts worked. When I looked closely all of the scripts were hard coded to c:\chef – an automated installation system that can’t even install itself cleanly – hardly confidence inspiring. I ended up switching to a different machine, started from scratch, and accepted the defaults.
When I kept to the PATH the quick start worked. I had a VM that had been summoned up out of nowhere that would converge onto some recipes. The time had come to get under the hood, figure out how this thing really worked, and apply it to something of my own creation.
Architecture expectations – ruined
The published architecture for Chef is pretty much what I expected, and consists of three core components:

- Server – a place where configuration (expressed as recipes and roles) is stored.
- Nodes – machines that connect to a server to retrieve a configuration.
- Workstation – a machine that’s used to create and manage configurations kept of the server (using a tool called Knife)
Conceptually this is all well and good. Some configuration is created from a workstation, placed on a server, and nodes come along later and converge on their given config. Unfortunately there are a couple of holes in the story:
- Chef installation on a node. The best documented method for doing this is using the Knife tool (which essentially logs into the node via SSH and runs some install scripts), in which case we have (real time) connectivity between the workstation and node before the node ever connects to a server.
It is possible to do things differently, and there are downloadable install scripts plus descriptions of using OS packaging mechanisms and alternative approaches to getting the Chef Ruby Gem installed, but it feels like this is all off the well trodden path. - Bootstrapping a node. A node needs more than just the base Chef client install. It needs to know which Chef server to connect to, have some credentials to authenticate itself and know which role(s) and or recipe(s) to configure against.Once again the usual approach seems to be to use Knife from a workstation to create the appropriate files and SCP them into place on the Node. It is of course possible to get the files in place by other means.
The dependence on a real time relationship between the Chef workstation and a node before it even connects to a server leads me to believe that Chef is mostly being used in dev/test environments that are being driven by humans. If that’s what DevOps is then it seems like we need another name for fully automated deployment an configuration management in a production setting.
Bundling into Server3
Firstly I should explain what I was trying to achieve here… The idea was to create a VM image that would converge on a Chef role as soon as it was launched. There’s a longer term goal here of doing convergence within the Server3 image factory (but we’re not quite ready yet with the underlying metavirtualisation required for that).
I ended up creating two packages:
- An archive to go into /etc/chef containing my validation.pem, a client.rb pointing to my Chef server and a first_boot.json with a run_list pointing at a role configured on the Chef server.
- A run on first boot script with the Chef install.sh with the like chef_client –j /etc/chef/first_boot.json appended to the end so that Chef would run once installed and converge onto the defined role.
With those two packages in a bundle I was able to add that to a VM recipe and deploy straight to a cloud (AWS) for testing. It was nice to be able to connect to a VM after launch and find it converged and ready to run.
Next – Inception
Convergence on launch is nice, but it would be better still to launch a pre converged machine – after all if you’re adding machines to grow capacity then it’s probably needed now rather than in however long it takes to install Chef and converge on a role or recipes. This capability should be coming soon to Server 3, and we’re using the label ‘inception’ to define what happens inside the image factory – planting dreams inside the VM’s head.
Conclusion
Chef can be made to work like I expected it to, which makes it possible to have an image that converges when first launched without any human intervention. Going by the weight of documentation this doesn’t seem to be how most people use Chef though – DevOps appears to involve having an actual developer involved in their operations. We need another name for fully automated production operations.
This is cross posted from the original on the CohesiveFT blog.
Filed under: cloud, CohesiveFT, technology | Leave a Comment
Tags: aws, Chef, development, DevOps, image automation, image management, Inception, Puppet, Server3
A lack of discretion
There’s been a lot of Monday morning quarterbacking over last week’s shutdown of Boston during the pursuit of terror suspects. I have my own opinions about what went on, but don’t feel this is the time or place to get into that.
The point of this post is to examine whether if many (or even any) of the people involved really had that much discretion. If there was a common sense path to be taken, then was it even permissible to take that path? I’ll illustrate with a personal anecdote of a terrorist attack that never was.
My last appointment in the Royal Navy was as a section officer at HMS Collingwood, which at the time was the RN school of Communications and Weapon Engineering (it is now much more besides). My day job was to manage all of the training relating to Type 22 Frigates, but one of the delights of military service is additional ‘duties’. The main duty I was expected to perform at Collingwood was Officer of the Day (OOD) – the officer responsible for the safety and discipline of everybody at the base (in the absence of the usual chain of command when everybody else packed up for the day at 4pm and headed home).
A typical day for an OOD was mostly ceremonial – Rounds (making sure that the new trainees were keeping good order), Sunset (saluting whilst somebody pulled a flag down), and Colours (saluting some more whilst somebody pulled the flag back up). The safety and security stuff was mostly taken care of my a sizeable contingent of (armed) Ministry of Defence (MoD) guards and MoD policemen who would patrol the perimeter and interior of the base and inspect the identities and vehicles of those passing in and out.
Late one night I got a call. A routine perimeter patrol had turned up something the policemen weren’t happy with. In a field next to the base (not too far from the perimeter fence) was a large flat bed truck with a huge electrical transformer on it. My presence was demanded to evaluate what was going on.
The truck was clearly out of place, off a proper road. It also had foreign plates. Attempts were made to contact the trucker who might be sleeping inside, no answer[1]. Attempts were made to call the trucking company, no answer (though it was no surprise that nobody was answering the phone somewhere in Spain during the early hours of their morning). The civilian police were contacted to see if they could scare up any information about the truck, but that was going to take hours. It soon became clear that the truck wasn’t going anywhere quick, and we weren’t learning any more about it any time soon.
The policemen were concerned that the transformer could be a disguised mortar launcher. I was certain it wasn’t. My analysis was thus:
- As a frontline engineering officer my team was responsible for all manner of electrical conversion equipment. I knew what the real thing looked like.
- The tubes at the centre of the transformer (that the policemen were most bothered about) were pointed straight up. Mortars have to be pointed at something.
The transformer was much larger than this, but this cutaway gives a good illustration of how a big transformer might have large pipes running through the middle
I had a decision to make. I could either:
- Play it ‘safe’, treat this situation as a terrorist attack in progress, and evacuate the base[2].
or - Use judgement based on over half a decade of training (and latterly teaching) in areas of weapon system design (manufactured and improvised), explosives and (battle) damage control to determine that I wasn’t looking at a weapon system for some terrorist plot, tell everybody to stand down, and go back to bed.
I chose to stand down. The MoD policemen kept a close eye on the truck through the night.
Nothing happened.
I think the trucker might have had a talking to when he finally emerged at first light from the back of his cab and tried to figure out where he was supposed to be going[3].
I got more than a talking to when the Base Security Officer (BSO) grabbed me after the morning Colours (pulling up the flag) ceremony. The message was clear – how dare I use my discretion and professional judgement when there was an element of risk involved. I should have evacuated the base and kicked off a major police and military operation. The cost and inconvenience were as irrelevant as my opinions. I should have erred on the side of caution.
The BSO then let me into a little secret. He was privy to some intelligence reports from a few years back (which had never been used to brief front line officers like myself) relating to an IRA plot to bomb electricity substations around London in an attempt to disrupt the capital. Aha. It was all clear then – if a terror group once tried to blow up some transformers, then we should be extra scarred of transformers blowing up. How could I argue with logic like that? I thanked him for his trust and insight and returned (bewildered and late) to my desk and business as usual. A few thousand other people were already getting on with their day as usual because I’d made the wrong call.
Conclusion
I used my common sense, my judgement, my discretion and I got in trouble for it[4] – even though that type of decision was exactly why we had an Officer of the Day in the first place. I’m sure many of my colleagues would have called it differently – particularly those lacking front line experience or easily bullied by the gun toting security types. I’m also sure I made the right call based on what I saw in front of me, and what I knew. The trouble is that every incident like this becomes a lesson not just for one person on duty, but whole groups of them – discretion will get you into trouble, don’t take any risks, play it safe; and progressively we eliminate discretion – even from the hands of those that do know better.
Notes
[1] If I was a lost trucker parked in the middle of nowhere I’d probably ignore any commotion outside and hope it went away.
[2] It should be noted that this was back in the early days of the Northern Ireland peace process. After almost a decade in service I was finally allowed to wear my uniform in public without fear of being bombed or shot at, but the old habits and attitudes died hard (on both sides), and dissident terror groups were still active. Mortar launched bombs had been a frequent tool of choice for attacks against military and police bases in Northern Ireland, but had never been used on the mainland.
[3] One of my other considerations was my own recollection of my first visit to Collingwood – driving around in the dark along unlit peninsular roads with farmland on either side (in the days before mobile phones and consumer GPS) – it was all too easy to go from motorway to completely lost.
[4] I’ll never know if this episode was a ‘career limiting move’. I was already serving out my (substantial) notice period with an eye on a future life in IT management. It was therefore hard to get too bothered about a chewing out from a retired officer who chose to still wear his old uniform to work each day (even if he did happen to send his concerns up the chain of command).
Filed under: security, wibble | 2 Comments
Tags: bomb, common sense, discretion, Navy, terror, transformer
More memory, better performance
Since I was so happy with the HP 650 business laptop that I got for my wife, my father in law decided to get one too.
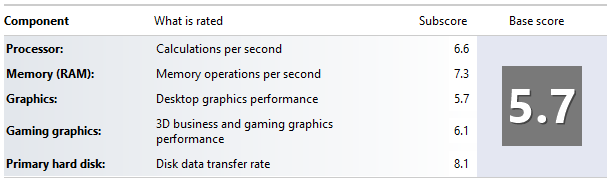
I was surprised to find that the Windows Experience Index (WEI) was so much slower than I’d seen on my wife’s machine:
 It’s no surprise that the memory benchmark is down, as I expect that a second DIMM improves overall system bandwidth, but it seems that 2D graphics are also affected. I suggested that he got another 4GB PC12800 SODIMM. It worked:
 So it looks like even if you’re not using memory intensive apps then overall system performance can be improved by adding extra RAM.
I wonder if performance would be the same with 2x2GB, and whether this applies to all systems with Intel integrated graphics?
Filed under: technology | Leave a Comment
Tags: bandwidth, benchmark, Core, DIMM, experience index, GPU, HD3000, i3, Intel, performance, RAM, SODIMM, WEI, Windows
Sous Vide Roast Beef redux
Last week I cooked tri-tip with my Raspberry Pi controlled water bath. This week I used a much more ordinary cut, some topside from my local Co-Op supermarket that had cost me just over £5 for 1.6kg. Some time ago I stopped buying this kind of meat because if you cook it per the instructions on the packet it comes out like shoe leather. I wanted to see if high end cooking could make up for low cost meat. TL;DR – it does.
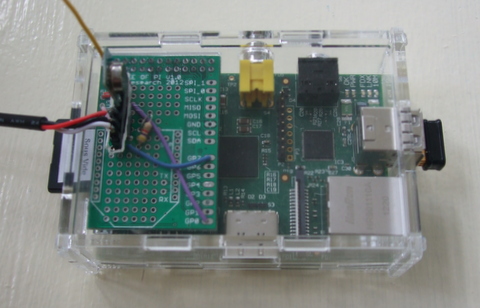
I got some Raspberry Pi boxes over the last few weeks, and cut a hole in the lid of one to allow for the 434MHz transmitter and DS18D20 connector to stick out:
I woke up early (6.30) and put the meat on then, so it got almost 7.5hrs in the water bath at 60C. There were no issues with temperature stability this time (and it looks like the catch for power off I put into my code was needed perhaps once this time). There’s still a bit of oscillation, but as things are coming out nicely I’m not inclined to spend too much time on tuning:
The beef looked great whilst in the pan searing:

and it looked great as I cut slices for serving:

and it tasted good too (with nice soft texture). Another sous vide success :)
Filed under: cooking, Raspberry Pi | Leave a Comment
Tags: beef, Raspberry Pi, Raspi, RPi, Sous vide, water bath
Best roast beef ever
I cooked tri-tip with my Raspberry Pi controlled sous vide water bath today. It came out brilliantly – on a par with the best Chateaubriand I’ve had (which for the record was at Casa Ferlin in Zurich – well worth a visit if you’re ever in that neck of the woods).

The meat
I got my tri-tip from Donald Russell, where they call it Tafelspitz (though Wikipedia tells me that Tafelspitz is actually a dish made with this cut of meat).
The cooking
The temperature control went a little awry. I’m guessing that at some stage the system sent an off signal to the remote controlled socket that wasn’t received, and so the temperature went up much higher than my 56C target. Luckily everything came out well. Here’s the temperature profile (over around 5.5hrs):

I will add a check to the code to make sure that off commands are sent every loop so this doesn’t happen again. Next time I cook tri-tip I’ll set a target temperature of 60C, so that things should come out the same.
The result
The title for this post probably gave it away, but the result was outstanding. The meat texture was like best quality fillet steak, the taste was rich and beefy; even the fat tasted great. I’m looking forward to more tri-tip in the future, and trying out some other cuts in the water bath.
Filed under: cooking, Raspberry Pi | 1 Comment
Tags: beef, Raspberry Pi, Raspi, RPi, Sous vide, tafelspitz, tri-tip, tritip, water bath
HP 650 Business Laptop – review
Since the screen failed on my wife’s Lenovo s10e netbook (and I turned it into a TV attached media player) she’s been using my old s10e, but that’s been on its last legs for a while too. The time had come for something new, with a full sized keyboard and screen.
I’ve been looking around for value laptops recently for my father in law, so I already had an idea on what would fit the bill, so I ordered an Asus X401A (in Pink) from Argos, which seemed a bargain at £259.99.
Before it could be delivered to the local store I came across what looked like a better offer. ServersPlus emailed me to say that HP was offering £100 cashback on their 650 Business Laptop – in a deal similar to their MicroServer (so it would work out at £268.28). The laptop on offer was a Core i3 processor, could take 8GB of RAM and Windows 8 Pro (the Asus was only a Pentium B970, max 4GB and Windows 7 Home Premium).

Sadly the next day delivery turned into most of a week to wait – a combination of the long Easter weekend, and DPD deciding not to bother delivering even though it arrived at the depot on time, and they had a van driving past my house that day :(
Disk dilemma
I had a Samsung 830 128GB SSD that had found its way to the s10e, so I planned on dropping that straight into the 650 and installing a fresh build of Windows 8 Pro. That plan did not work.
I’d had no trouble at all putting a clean SSD into my Lenovo X230, but the HP 650 threw a few spanners into the works. When I put the SSD into the 650 it threw up a warning screen about SMART errors (it was fine in the last PC), worse it wouldn’t boot off my Windows 8 install USB.
I checked that the UEFI stuff was in the right place – all looked well.
I disabled secure boot – it didn’t help.
I tried to copy the HDD it came with using Partition Manager – it wouldn’t do GPT partitons. I copied it with another partition tool that did do GPT, and got boot errors.
In the end I proceeded with the original HDD, made a recovery USB and then swapped in the SSD and went through recovery. It was worth the trouble – subjective performance with the spinning disk was pretty miserable (no doubt not helped by Norton AV crapware). Subjective performance with the SSD is great, and worth every penny of the £72.99 I paid for it. It’s such a shame that SSD is still sold at such a premium for original machines.
The good bits
As I already mentioned, performance is very decent – particularly for a machine at this price point. For everyday productivity tasks it doesn’t seem much different from my X230 (which has a WEI of 5.8).
 Although the battery seems small compared to the overall unit size endurance is good too, at about 5.5 hours.
The not so good bits
Perhaps I’ve been spoiled by the excellent screen and keyboard on my X230, but both of these aspects seem weak(er) on the HP. The 15.6″ screen seems like it should have a higher resolution (than 1366×768) given its size, and colours seem washed out. The HP keyboard is a good size, but somehow doesn’t seem very precise and accurate.
Windows 8 – at least it’s the Pro version, so the option is there for Hyper-V (though I’m preferring VirtualBox for its versatility). I’ve put Start8 on for a proper desktop experience, which is well worth the $4.99 (though it still stuns me that Microsoft have chosen to inflict Metro on their customers – this ‘feature’ could be free).
At 2.5kg it’s not throw in the bag light (though HP do throw in a nice enough laptop bag).
Conclusion
This is a lot of laptop for the money. There are certainly aspects that reflect the budget price, but it seems built to last, and the performance is great. Maybe not quite as much of an amazing bargain as the MicroServer was[1], but still another great deal from HP.
Notes
[1] There’s a new MicroServer out – the N54L with a 2.2GHz processor. HP are doing cashback again, but it’s only £50 this time.
Filed under: review, technology | 1 Comment
Tags: 650, business, EFI, HP, laptop, review, ssd, Start8, UEFI, WEI
Sous vide steak
After making my Raspberry Pi controlled hot water bath over the weekend I’ve been itching to try it out. I got my chance this evening when cooking some steak for dinner.
I get my steaks mail order from Donald Russell, so they come shock frozen and vacuum packed – so the ‘sous vide’ part is already taken care of:
 After getting the slow cooker and Raspberry Pi back from the kids’ play room where I’d been testing it I couldn’t connect via SSH. it turned out that the SD Card had got corrupted. After sorting out a fresh build of Raspbian I was ready to go once more:
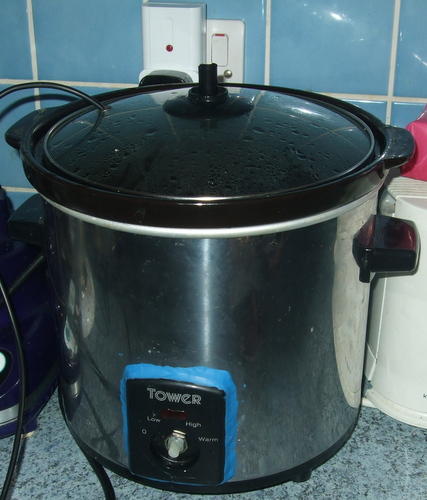 The SD card crisis meant that I only had time for 45 minutes in the water bath at 55C, but they came out looking good, and went into a hot pan for a quick sear:
 Once out of the pan I sliced with my ceramic knife. The rump steak tasted every bit as good as it looks:
 Sadly my ribeye was just a little on the chewy side. I think it could have done with a bit more time in the water bath. The verdict on the rump from my wife and son was ‘softer, but less flavour’. I tend to agree, those rumps are usually bursting with beefy flavour – though I’m prepared to treat this as a one off (and my creamy pink peppercorn sauce had flavour to spare).
So… first time out I think counts as a qualified success. I’ll give the steaks longer next time. Next up (perhaps this weekend) – tri-tip.
Filed under: cooking, making, Raspberry Pi | 3 Comments
Tags: Raspberry Pi, RPi, Sous vide, steak, water bath

