It got a bit cold
I wrote last week about re-establishing my Nanode based temperature monitoring in anticipation of some cold weather. It came, though it’s not as cold as it was last year (when I was seeing -7.5 being recorded):
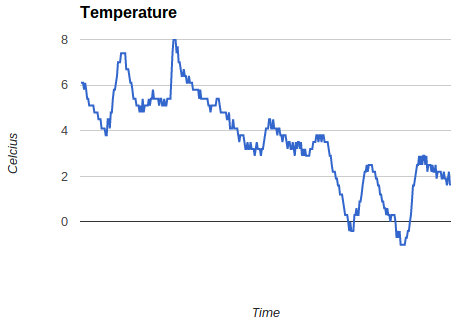
It’s clearly warmer in the garage than it is outside, where there is snow lying on the ground. That’s likely to be down to heat from the fridge, freezer and microserver out there. It’s fairly easy to see the day to night ups and downs (even without me putting on an accurate time axis or labels). I was also intrigued to see how much warmer the garage got for a little while when I put my car back in there after a trip out last week (that’s the peak up to 8C). I’m now thinking about adding another sensor outside so that I can compare the temperatures.
Filed under: Arduino | Leave a Comment
Tags: chart, Nanode, temperature
TL;DR
I haven’t got this working (yet). There may even be limitations to the hardware that mean this couldn’t work.
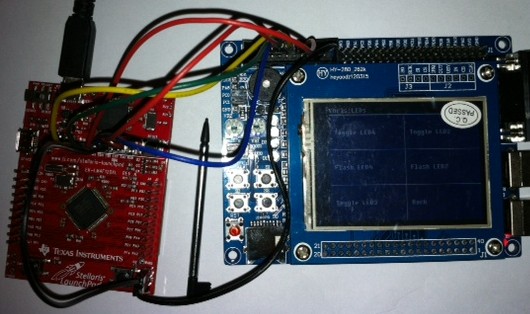
The general idea was to use a cheap ($4.99) Texas Instruments Stellaris Launchpad (LM4F120XL) board in place of a pricier ($34.95) Dangerous Prototypes Bus Blaster. All of the basic pieces seemed to be there – USB connectivity, JTAG breakout.
I’ve got as far as having OpenOCD playing along with the ICDI, but I’ve not yet been able to make it work as a JTAG programmer.
Why?
Last weekend I was following Zizzle’s excellent guide on using cheap Chinese STM32 based boards with touch screens, which I wrote about myself in ‘STM32 Dev the easy way‘. Some of the examples used Bus Blaster, and showed that it was faster, easier and more flexible than programming via the USB/serial port. I don’t have a Bus Blaster, but I do have a couple of Stellaris Launchpad boards.
How
The Stellaris Launchpad has a set of holes onboard that will take header pins to break out JTAG. TI provide a guide on their wiki, (superficially) explaining how these can be used. Sadly it’s not entirely clear whether JTAG support is generic, or limited to other TI devices. I hooked up the boards like this:
 OpenOCD
Zizzle’s examples with the Bus Blaster used Open On-Chip Debugger (OpenOCD) as the software plumbing. Support for TI’s In Circuit Debugging Interface (ICDI) wasn’t present in the version bundled in the VM I was using, but is available in more recent dev builds. I cloned the project from git and set about putting in place the dependencies that I needed to make a new version with ICDI support enabled. This blog post from Scompo traces out similar steps to the ones I took if you’re interested in the detail.
Once OpenOCD was correctly built, and I had the right udev settings to allow use of the USB device without sudo I was able to connect to the Launchpad. The next stage was to modify Zizzle’s config files to use the TI board rather than Bus Blaster:
OpenOCD config
Zizzle starts OpenOCD with the command line ‘openocd -f jtag/stm_board.cfg’, and the stm_board.cfg looks like this:
telnet_port 4444
gdb_port 3333

gdb_memory_map enable
gdb_flash_program enable

source [find jtag/busblaster.cfg]
source [find target/stm32f1x.cfg]
The busblaster.cfg looks like this:
interface ft2232
ft2232_device_desc "Dual RS232-HS"
ft2232_layout jtagkey
ft2232_vid_pid 0x0403 0x6010
and I found a corresponding file for the Launchpad that looks like this:
interface hla
hla_layout ti-icdi
hla_vid_pid 0x1cbe 0x00fd

# unused but set to disable warnings
adapter_khz 1000
So with a change to the second to last line to reference the ti-icdi.cfg rather than the busblaster.cfg I was all set. Sadly this is what I see when I try to start things up:
Open On-Chip Debugger 0.7.0-dev-00135-g76afade (2013-01-13-08:03)
Licensed under GNU GPL v2
For bug reports, read
        http://openocd.sourceforge.net/doc/doxygen/bugs.html
adapter speed: 1000 kHz
adapter speed: 1000 kHz
adapter_nsrst_delay: 100
Runtime Error: target/stm32f1x.cfg:27: invalid command name
"jtag_ntrst_delay" in procedure 'script'
at file "embedded:startup.tcl", line 58
at file "jtag/stm_board.cfg", line 8
at file "target/stm32f1x.cfg", line 27
and that’s where I’m presently stuck :(
Conclusion
It would be very nice if the Stellaris Launchpad could be used as a generic JTAG programmer, and all of the pieces seem to be available, they’re just not quite moving together for me yet. It’s quite possible that TI have locked things down so that it isn’t actually possible, which would perhaps be a bit mean of them, but might explain why I’m not just following the steps of somebody more knowledgeable’s howto. I’ll write updates if anything changes.
Filed under: making | 5 Comments
Tags: Bus Blaster, dev board, ICDI, JTAG, launchpad, LM4F120XL, OpenOCD, programmer, Stellaris, STM32, ti
Chromebook – a week on the road
I spent the past week as exec in residence for the London Fintech Innovation Lab, working with the 7 winning startups based in the shiny new Level 39 Technology Accelerator at Canary Wharf. It seemed like the perfect chance to try out my Chromebook in a more work oriented setting.
Battery life
I was brave, and decided not to take the power supply with me. I wouldn’t be using my Chromebook all the time, so I thought 6.5 hours would be enough to get me through each day. It was. I wasn’t even running for the power supply when I got home as there was always enough juice left for any sofa surfing that I wanted to do.
Google Docs Only
I encountered one hiccup where an old Word document I imported didn’t format correctly, and rather than spending ages reformatting it I waited until I was home to sort it out on my PC. At a push I could have used remote desktop, but it wasn’t that urgent.
I’ve pretty much switched over to Google Docs from MS Office anyway, so the Chromebook worked fine with all of my ongoing stuff.
OpenVPN
The launch of the iOS client for OpenVPN spurred me on to get it working with the Chromebook. It’s fine if I run it from the command line in a dev mode crosh shell e.g.:
sudo openvpn my_vps.ovpn
I have still utterly failed to get things working with the regular (non dev) approach using .onc files and importing private keys etc., but I’m not feeling too bad about that, as there’s a post in one of the support groups from a member of the OpenVPN team saying ‘the interface for OpenVPN in Chrome OS seems to be pretty much unusable for your average user‘. Basically Google need to provide a tool to parse .ovpn into .onc, and some better howto guides would be nice too.
Telephony
I’ve been using Google Voice for some time, and presently have things set up so that my mobile phone and Skype In get routed there (which would be easy if I was in the US, but takes a bit of SIP Sorcery from the UK). In the past I’ve not made much use of the gmail chat functionality for voice calls, but I gave it a try this week and it works well. I was almost tempted to buy some credit so that I can call none US numbers, and then I realised that I could use my US Skype ToGo number, which gives me free calling to the UK via a Skype subscription and Skype pay as you go rates for any other number I might call. Of course it would be great if there was a Skype app for ChromeOS, or if Google Voice was rolled out to the UK, but I won’t be holding my breath on either of those things.
ChrUbuntu
I haven’t needed it. ChromeOS has been sufficient.
Conclusion
Google Apps got me through the week pretty much fine from a software point of view, and the Chromebook stood up well from a hardware perspective. It was great to be liberated from a power cord AND have a decent keyboard. I didn’t feel like I was compromising using a cheap machine (and I’m pretty sure most of the people stopping by for a chat probably mistook it for an 11″ Macbook Air).
Filed under: review, technology | 1 Comment
Tags: battery, Chromebook, Chrubuntu, OpenVPN, telephony, Voice, voip
STM32 dev the easy way
A while ago I bought an STM32 dev board from China on eBay, as it seemed to have so much more than the official Discovery boards coming with:
- A 2.4″ LCD with touch screen input
- 4 Pushbuttons (and a Reset button)
- 4 LEDs
- 2 Variable resistors
- A Micro SD slot
- A buzzer
- RS232
- 2 USB sockets
- JTAG
- A whole bunch of GPIO pins
In sum a whole bunch of awesome stuff. Sadly sometimes when things look too good to be true they are. After waiting ages for it to arrive I discovered that most of the documentation was in Chinese. It ran a pretty little demo app, but I didn’t know where to start with programming it. I put it on the shelf in the hope that one day something would show up to help, though realistically I expect it to gather dust – maybe I’d have a go at using the LCD for another project.
Zizzle to the rescue
At the end of October I saw a piece on the Dangerous Prototypes blog ‘Tutorial: STM32 boards and TFT LCD touchscreens‘, which linked back to Zizzle’s ‘STM32 LCD touch screen demo‘. I downloaded the VirtualBox image containing the tools and sample code, but didn’t do anything with it as I didn’t feel like I had the time. I shouldn’t have worried; when I finally got around to trying it yesterday I was up and running in minutes – watching the YouTube guides and clicking along in my own virtual machine. Another few minutes and I had customised menus on the touch screen:
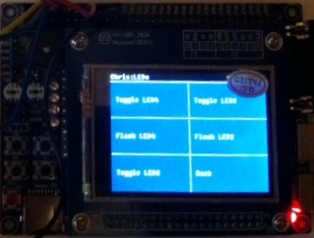
It was also pretty straightforward to get debug messages from printf into a console.
I then went on to waste hours trying to get a TI Stellaris LaunchPad to work as a JTAG programmer in place of the BusBlaster that Zizzle had used, but that’s another story.
Why this works
Setting up tool chains for embedded devlopment is fiddly, but virtual machines make a great container for all of that effort. I’m now starting to wish that I’d had a go using a Linux VM for Andrei’s ‘STM32F3 Discovery + Eclipse + OpenOCD‘, but I thought it would be much harder to get USB devices working in the VM than it turned out to be (NB Andrei has since done a Windows version of his instructions).
Conclusion
Putting a complete tool chain in a VM image makes it super easy to get going with a dev board, especially when accompanied with good quality videos explaining how things work. Thanks Zizzle :)
Filed under: making | Leave a Comment
Tags: ebay, LCD, STM32, touch screen, VirtualBox, VM
In earlier posts of this series I’ve looked at ladder board and Quick2Wire’s boards. This post is about the official expansion project board for the Raspberry Pi, named after its creator Gert van Loo, the Gertboard.
 Construction

Like the other boards I’ve looked at Gertboard comes as a kit of parts. The two things that are unlike the other boards are that there are a *lot* of parts in the kit, and some of them are surface mount components.
Soldering SMT
Surface Mount Technology is designed for machines not people, and in most cases kits aimed at hobbyists come with any SMT bits already in place. Not the Gertboard though. It is possible to solder SMT by hand, at least with simple components like resistors and capacitors, it’s just a bit tricky. If you’re thinking of building a Gertboard then I have two pieces of advice for you :
- Don’t work over a carpet.
- Clean the floor before you start, because at some stage you’ll be looking for a capacitor the size of a bread crumb, and you don’t want to be dealing with actual bread crumbs.
My daughter’s young eyes and hands turned out to be very helpful, but even with that assistance we had a few cases of hunt the component after something had pinged out of the needle nose tweezers I was using to hold things in place.
Soldering the rest
The through pin parts of the Gertboard are as easy as any of the other boards I’ve worked with. There’s just a lot of them, so reckon on an entire afternoon to put the whole thing together.
Capabilities
Gertboard does a lot of different things (and has to be configured with various jumpers and jump leads for whatever pieces of functionality you’re after). It has buttons, LEDs, ADCs, DACs, motor controllers and more. It even has its own computer – the same Microcontroller (ATmega328) as used on many Arduino boards.
There’s a lot more functionality than I can really do justice to here, so I’d suggest a read of TechFruits’ ‘Getting to Know Your Gertboard’.
In use
I’ve not really done much with my Gertboard yet past running some rudimentary GPIO examples that use the push buttons and LEDs – stuff that would work just as well on the ladder board. So far its enormous potential has exceeded my ability to think up any cool projects for it. As the motor controller is something that I don’t have with other Raspberry Pi boards (or any of the other dev boards I use) then that’s the most likely area I’ll exploit.
Conclusion
Gertboard is the mother of all project boards for the Raspberry Pi. Just putting it together feels like a major accomplishment. I look forward to having the time and a bright idea for doing something really cool with it.
Filed under: Raspberry Pi, review | Leave a Comment
Tags: ADC, DAC, dev board, Gertboard, GPIO, Raspberry Pi, Raspi, RPi, SMT, soldering, surface mount
End of support, end of the line
I’ve written before about the myth of software support. Software mostly doesn’t work, vendors mostly don’t fix stuff, and the world keeps turning anyway. Everything’s broken and nobody’s upset.
So why do companies stop using perfectly good stuff (hardware and software) simply because they can’t buy support from the original vendor? This position seems nonsensical to me, but I’ve come across two examples in the past week:
IRIS
The Iris Recognition Immigration System (IRIS) was a perfect example of trading privacy for convenience. I let the UK government take pictures of my eyes, and in return they let me get out of passport control quicker by going through an automated gate rather than standing in line. You didn’t have to be a UK Citizen to use it, so it was particularly beneficial to frequent travellers from outside of the EU who might otherwise face a long line at passport control.
One of my friends complained the other day about IRIS not being available, and quickly got an answer from another friend about the reason:

The machines are still there. I’d bet that the machines still work. But somebody is too scared to turn them on in case they break because Microsoft won’t any longer be on the hook to ‘support’ them. I can make two obvious points at this stage:
- The appropriate time to stop using the machines is when they actually stop working.
- If they had stopped working when the ‘support’ was still in place then it would still have taken days (at least) to get a fix.
What is it about software support that causes such insane risk/benefit trade offs?
Part of the problem is of course ‘security’. Microsoft ending support for XP means no more patches for vulnerabilties. This is a problem if you’re an Internet connected PC surfing the web. This shouldn’t be an issue for an applicance with some embedded software.
I’m left wondering how much the UK Borders Agency paid MS for support for IRIS, and how much utility they ever got out of that contract? I expect the answer is something along the lines of too much and not enough.
Before moving on it’s worth noting that IRIS has been partially replaced by new automated gates for those with EU issued RFID enabled passports. This is no good to Kirk, because he has a US passport, and it’s turning out to be no good to me because the regular travelling public has a much higher moron that can’t work things ratio than those that opted into IRIS.
Update (26 Jan 2013) – Kirk tweeted yesterday evening that the IRIS machines are back in action (at least at Heathrow T5). Perhaps somebody saw sense.

Pano Logic
The next example I’ve come across is Pano Logic, who made a thin client device (which they branded ‘Zero Client’). It seems that at least one of their customers has decided to trash over a hundred of the devices as their IT support guy is now looking for creative ways to hack the hardware.
Presumably the day before support ended the devices were working fine, and the day after they were still working fine. The lack of support shouldn’t be an issue until something actually goes wrong. The main causes of going wrong are installation issues (which had already been passed) and age issues (when component failure comes along) – hence the bathtub curve. The age end of the bathtub isn’t all that often an issue in IT because we tend to replace stuff long before it falls apart, though the Pano Logic device might have been an exception – I’d expect that obsolesence would catch up with them due to changes in monitor technology or something like that.
Conclusion
The ability of IT vendors to support things is poor at the best of times. Withdrawal of support shouldn’t be an immidiate trigger to get rid of something – it’s just one of the indicators that it’s time to draw up plan B for when failure actually does occur.
Filed under: could_do_better, technology, travel | 2 Comments
Tags: end of life, IRIS, Pano Logic, support
Return of the Nanode thermometer
It’s almost a year since I built my Nanode thermometer, and it looks like another really cold snap is headed towards the UK – perhaps snow over the weekend.

I’ve not had it set up for a little while, as the TMP36 sensor was reclaimed for a project that put Scratch and an Arduino together to create an on screen fire breathing dragon when hot breath hit the sensor. I’ve also more recently used the sensor with the Quick2Wire Analogue board.
This time I wanted to record data from the Nanode so that I could do some charts later on. I could have done this by modifying the sketch to use MQTT or post data to Pachube Cosm or similar, but I took the path of least resistance and wrote a couple of scripts to scrape from the existing app:
get_temp.sh uses lynx and some sed to strip the temperature reading from the cruft around it:
lynx -nonumbers -dump http://nanode.swos.local | grep Temperature | sed s/'Temperature: '// | sed -e 's/^[ \t]*//'
loop.sh prints a formatted date and time to a (CSV) text file followed by the temperature from get_temp.sh:
#!/bin/bash
while :
do
 printf %s "$(date '+%Y%m%d%H%M')" >> temp && echo -n ',' >> temp && ./get_temp.sh >> temp
 sleep 1800
done
I’m running loop.sh in a screen so that I don’t need a persistent connection to the VM. I’ll update with charts if any of them turn out to be interesting (e.g. a steep overnight drop or something like that).
Filed under: Arduino, code | Leave a Comment
Tags: arduino, bash, csv, date, lynx, Nanode, network, printf, script, sed, sensor, temperature, thermometer
In part 1 of this series I looked at ladder board, and in the next part I plan to review the Gertboard. This post is about Quick2Wire‘s boards, where I’ve been fortunate enough to try out some alpha and beta samples.
Quick2Wire concept
There’s an interface board that connects to the general purpose input output (GPIO) headers on the Raspberry Pi, which can be used on its own as a safer way to break out the GPIO pins (versus something like a Pi Cobbler).
There are also extension boards that plug into the I2C bus (and more planned that will harness SPI). I tried out two of the I2C boards, which can be daisy chained together.
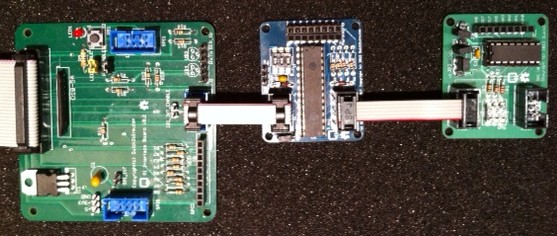
Interface board connected to I2C expander and analogue board
Interface Board
It took my son around an hour to turn this from a kit into a working board, and I didn’t have any faults to resolve. It offers a bunch of different functionality:
- 8 diode protected GPIO ports
- a push button and LED that can optionally be connected to two of the GPIO ports
- a voltage regulator for extra 3.3v
- an FTDI header for serial I/O
- I2C connection
- 2x SPI connectors
My first test for the board was to try out the push button and LED using Gordon Henderson’s Wiring Pi from the command line, and I was quickly able to read whether the switch was pushed and turn the LED on and off.
I returned to the LED later when using Quick2Wire’s Python API. Firstly I installed their GPIO admin command which lets an ordinary user do stuff with GPIO without using sudo. There are a few steps to getting this going:
- Add Quick2Wire as a Raspbian Software Source
- Install with:
sudo apt-get install quick2wire-gpio-admin
- Add your user to the gpio group
sudo adduser $USER gpio
- Log out and back in again so that the group change can take effect
- The gpio-admin command is now ready to use e.g. to allow the LED to flash:
gpio-admin export 12
The Python API is installed from github (I put it into my home directory):
git clone http://github.com/quick2wire/quick2wire-python-api
I created a little environment script (env.sh) to set up PYTHONPATH in accordance with the installation instructions:
export QUICK2WIRE_API_HOME=/home/pi/quick2wire-python-api
export PYTHONPATH=$PYTHONPATH:$QUICK2WIRE_API_HOME/src
Then when I wanted to use the Python API I could simply:
. ./env.sh
I then modified one of the Quick2Wire examples a tiny bit to give me an executable script:
#!/usr/bin/env python3

from time import sleep
from quick2wire.gpio import Pin, exported

with exported(Pin(12, Pin.Out)) as pin:
    while True:
        pin.value = 1 - pin.value
        sleep(1)
I2C Extender
The I2C extender board offers a further 16 digitial GPIO pins, and took my daughter about an hour to put together[1]. To use the board requires I2C support to be enabled on the Raspberry Pi (and as previously noted this can interfere with other GPIO stuff that uses the pins that are shared with I2C).
/etc/modprobe.d/raspi-blacklist.conf needs to look like this:
# blacklist spi-bcm2708
# blacklist i2c-bcm2708
and i2c-dev needs to be added to /etc/modules:
# /etc/modules: kernel modules to load at boot time.

snd-bcm2835
i2c-dev
If there are other modules there too (such as 8192cu for WiFi) then that’s not a problem.
Just like with GPIO it’s necessary to add the user to the appropriate security group:
sudo adduser $USER i2c
At this stage a reboot is needed (rather than just log off and back on again) so that the kernel module changes can take effect.
Once the RPi is back up and running it’s possible to see the i2c devices with i2cdetect:
i2cdetect 0
WARNING! This program can confuse your I2C bus,
cause data loss and worse!
I will probe file /dev/i2c-0.
I will probe address range 0x03-0x77.
Continue? [Y/n]
     0  1  2  3  4  5  6  7  8  9  a  b  c  d  e  f
00:          -- -- -- -- -- -- -- -- -- -- -- -- --
10: -- -- -- -- -- -- -- -- -- -- -- -- -- -- -- --
20: -- -- 22 -- -- -- -- -- -- -- -- -- -- -- -- --
30: -- -- -- -- -- -- -- -- -- -- -- -- -- -- -- --
40: -- -- -- -- -- -- -- -- 48 -- -- -- -- -- -- --
50: -- -- -- -- -- -- -- -- -- -- -- -- -- -- -- --
60: -- -- -- -- -- -- -- -- -- -- -- -- -- -- -- --
70: -- -- -- -- -- -- -- --
The example above shows that the expander board is connected at address 22 (because I fiddled with the address dip switches) and the analogue board is at 48.
I didn’t really do much with the expander board yet, but I did modify one of the Python examples to prove to myself that it would work:
#!/usr/bin/env python3

import quick2wire.i2c as i2c

address = 0x22
iodir_register = 0x00
gpio_register = 0x09

with i2c.I2CMaster() as bus:
    bus.transaction(
        i2c.writing_bytes(address, iodir_register, 0xFF))

    read_results = bus.transaction(
        i2c.writing_bytes(address, gpio_register),
        i2c.reading(address, 1))

    gpio_state = read_results[0][0]

    print("%02x" % gpio_state)
Analogue board
The analogue board is based on the PCF8591 IC, which offers 4 8bit analogue to digital inputs and a single 8bit digital to analogue output. Once again it took about an hour for my daughter to put it together[2].
I tried it out with a TMP36 temperature sensor connected to AIN0 and the following code to read out the temperature in celcius every second:
#!/usr/bin/env python3

from time import sleep
from contextlib import closing
import quick2wire.i2c as i2c
from quick2wire.parts.pcf8591 import PCF8591

with closing(i2c.I2CMaster()) as master:
    pcf = PCF8591(master)
    pin = pcf.begin_analogue_read(0)
    while(True):
        print(int(((330*pin.read())/256)-50))
        sleep(1)
Conclusion
The Quick2Wire boards bring together a modular and extensible hardware platform with a rich and easy to access software platform. I’m looking forward to getting a better understanding of the Python API so that I can do more with the boards I do have, and there’s plenty of scope for adding more boards later. It will be interesting to see what comes along to use the SPI interfaces.
Notes
1. I had some trouble initially with the expander board not showing up on i2cdetect, which came down to a very hard to spot dry joint on the board.
2. Somehow my daughter managed to get a solder splash on the component side of the board that shorted AGND and VREF. This was a total pain to diagnose and fix as I had to remove the chip holder to resolve the issue.
Filed under: code, howto, Raspberry Pi, review | 2 Comments
Tags: ADC, API, DAC, dev board, github, GPIO, I2C, PCF8591, python, Quick2Wire, Raspberry Pi, Raspi, RPi, soldering, Wiring Pi
One of the things that attracted me to buying a Chromebook was reports I’d read that it would run Ubuntu (and run it fast).
Today my 32GB Transcend Class 10 SDHD card arrived, so I set to work installing ChrUbuntu – Ubuntu 12.04 packaged up for the Chromebook[1]. Like some others I hit an issue with the download of the 11th archive file (ubuntu-1204-arm.binak.bz2), and I needed to repartition the SD card using parted[2]. Once I got past that issue it took a while to install due to my slowish broadband, but it was all very straightforward.
In Use
When I startup my Chromebook I can now choose between booting ChromeOS (in dev mode) by hitting Ctrl-D or Ubuntu by hitting Ctrl-U. Both start up really quickly (around 10s), so there’s no massive penalty to be paid when switching between one and another.
I’m not a great fan of Unity, and I’ve not invested the time yet to find my way around it well, but all of the basic stuff I need is there. My main reason for wanting Ubuntu is to get a full featured set of tools, and I can get that with a terminal window. Having FireFox a click away if I need to look stuff up is also very handy (and it’s working fine now for writing this blog post).
Subjectively things feel fast – particularly on the command line – my comparison point being various VMs and VPSes (and of course my Raspberry Pis). Ubuntu feels a little clunky compared to ChromeOS, but it doesn’t feel slower.
There are still issues with trackpad support and keyboard maps (which may not be helped by the fact I have a UK keyboard), but nothing yet that’s turned into a major trip hazard.
It’s slightly annoying that the SD card pokes out of the machine so far. Hopefully somebody will make a Micro SD to RS-MMC size adaptor (something like the Adafruit Low-profile microSD card adapter for Raspberry Pi, but without the Micro SD bit poking out of the top).
ChromeOS Dev mode
It would be remiss of me not to mention ChromeOS Dev mode, as this is needed for the ChrUbuntu install process.
Firstly going into dev mode wipes locally stored files (such as the SSH keys I’d installed), which is a perfectly sensible security precaution. I’d known this when I got the Chromebook, and considered going straight into dev mode to avoid any wasted effort, but in the end I left things be in order to get a feel for the vanilla experience.
Now that I’ve enabled dev mode I’ll probably not go back, as it provides a much more capable crosh, which has proper shell capabilities. In fact many of the things that I thought I wanted Ubuntu for may turn out to be possible from dev mode.
Conclusion
It was cheap and straightforward to add Ubuntu capabilities to my Chromebook, and I’m sure it’s going to come in handy. Ubuntu works well on the machine, and I probably need to spend more time getting familiar with Unity. Hopefully the hardware support will improve with time (or better still Canonical might do something official). I’m also impressed with the enhanced abilities of crosh when in dev mode.
Notes
1. Be careful to install the ARM version (34v87) rather than the x86 version (tnyga)
2. I had a go first at just reformatting it on a Windows machine, but that didn’t help
Filed under: technology | 4 Comments
Tags: ARM, Chromebook, ChromeOS, Chrubuntu, crosh, dev mode, Linux, parted, SD card, SSH, Ubuntu
The Quick version
- Get OpenELEC Download an SD Card image file from resources.pichimney.com (latest version at the time of writing is RC1 – 2.99.1).
- Install OpenELEC Unzip the image file and burn it onto a (1GB or bigger) SD card using Win32DiskImager (for Windows) or dd (for Mac or Linux).
- Plug Everything in Plug the SD card into the RPi. Plug the RPi into your TV (or AV amp/receiver) using HDMI. (Optionally[1]) plug in a remote control (e.g. a cheap Win MCE remote from eBay or a nice Kogan keymote). Attach the RPi to your network. Finally plug in a suitable 700mA power supply.
- Switch On.
- Enable AirPlay in System > Settings > Services > AirPlay
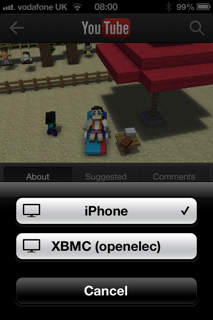
- Enjoy The OpenELEC device should now show up on the AirPlay menu on any iOS device connected to the same network allowing music, videos, YouTube etc. to be streamed.
A more longwinded explanation
I’ve had a number of people ask me recently whether they could possibly get AirPlay working on the Raspberry Pi, and I’ve even seen some much more involved HowTo type articles. All that effort isn’t really necessary, as XBMC has had AirPlay support for some time, OpenELEC packages XBMC in an easy to use and lightweight container, and OpenELEC is a doddle to install from an SD card image file.
If you don’t have a wired network
Then there’s a bit more setup involved to get things working over WiFi with a suitable USB dongle, but not very much. Go to System > OpenELEC and fill out the Network (or Network 2) section:
Network Technology – WLAN
Network Interface – wlan0
Static IP settings – ignore this unless you’re sure about what you’re doing
WLAN SSID – whatever your WiFi network is called
WLAN Security – select whatever type you use (if any) and fill out the password
I’ve tested this myself with an Edimax EW-7811UN, which is one of the adaptors known to work reliably with the RPi.
Limitations
The only digital audio output from the Raspberry Pi is HDMI. This is fine if you’re AirPlaying video/YouTube, but not so great for music (unless you have an HDMI capable AV amp/receiver or an HDMI/SPDIF splitter). You can of course get audio out of the 3.5mm jack, but whilst AirPlay isn’t audiophile quality anyway the RPi analogue output is likely to disappoint.
Notes
[1] A USB remote isn’t essential, as there are XBMC remote apps for iOS and Android. It’s also possible (but not very living room friendly) to use a regular keyboard and mouse.
Filed under: howto, Raspberry Pi | 2 Comments
Tags: AirPlay, image, iOS, iPad, iphone, ipod, openelec, Raspberry Pi, Raspi, RPi, SD card, wifi, XBMC

