November 2024
Pupdate
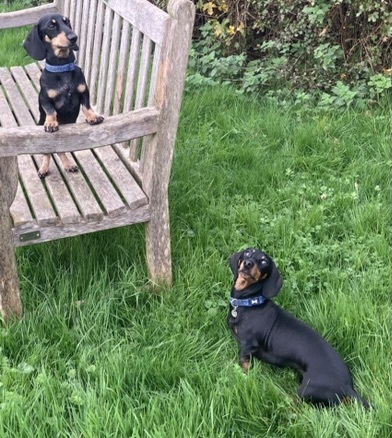
The weather has been pretty miserable, so long walks at the weekend have been into town rather than out on the fields, and coats have been needed for the latter weeks.
Milo’s chemo has continued with a few little hiccups caused by low neutrophils, so even more trips to the vets :( But he’s otherwise happy and energetic, which is great.
iPad 7 Mini – one month on
I’ve had my new iPad for a little over a month now. The main positive is 5G cellular connectivity, which seems to make a positive difference on train rides into London and back.
The main disappointment is battery life. I bought a new Mini because my Mini 5’s battery is a bit tired after 5y, and I’m not sure that the new one is actually much better :( It feels like Apple have made the wrong trade off in terms of performance versus endurance, and I’m quite tempted to get a new battery for my Mini 5 whilst they’re still available.
Having two iPad Minis around the house has made a difference though… The older one now has permanent residence in the lounge, so I have an iPad to hand more readily now, which is usually better than using my phone.
New router
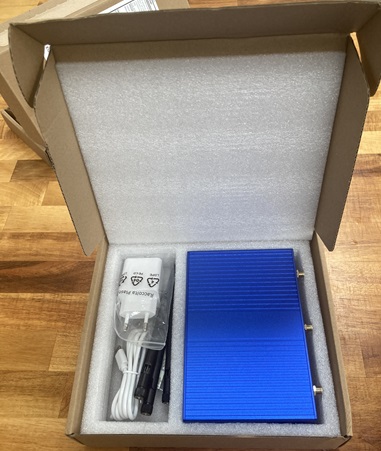
I got a GL.iNet Flint2 to upgrade my home network, and that’s gone in alongside some other tweaks and refinements. I’m pretty happy with the improved performance and stability. More in my review post.
New glasses
After spending most of my adult life with a stable prescription I’ve hit that awkward stage where my distance vision is improving, but my near vision is getting worse. So each time I go for an eye test it’s a new prescription, and I need new glasses[1]. Since switching to varifocals it’s harder to notice the change, but it’s still happening.
This time around I couldn’t get the Kodak Easy2 lenses I chose last time, so I opted instead for the ‘Varifocal Supreme HD’. They’re taking some getting used to, but if anything they’re better for intermediate use than my last pair. My only complaint is some distortion when using my phone/tablet up close.
Solar Diary
November was pretty bleak :( Almost 20% down on last year.

Note
[1] I’d generally choose a re-glaze over buying new, but I’ve been finding that new glasses from Glasses Direct are (substantially) cheaper than getting a re-glaze :/ Also all roads in that industry seem to lead back to Luxottica, so it’s not like there’s much actual choice.
Filed under: monthly_update | Leave a Comment
Tags: dachshund, glasses, iPad, Miniature Dachshund, pupdate, solar, varifocals
GL.iNet MT-6000 Flint2 Review
TL;DR
The Flint 2 seems to be a pretty awesome router. It was a little fiddly to set up my (quite complex) existing VLANs and wireless networks onto it, but it’s been working without a hitch since then :)
Why?
I’ve had a Draytek 2866ax router paired with an AP960C access point for about 18m[1]. I had big expectations for this setup, and it’s frankly been pretty disappointing. Especially considering how expensive it was for ‘SoHo’ gear rather than regular consumer stuff. My iPad would seem to hop around between access points, sometimes losing connectivity altogether. The _most_ annoying thing was a WiFi camera, which would disconnect and need a router reboot to re-establish its connection.
Why OpenWrt?
I’ve been using OpenWrt for over a decade now, and I’ve recently got more involved with the project.
Why GL.iNet?
I’ve bought a bunch of their travel routers over the years, which have all been faithful companions.
Some care is needed to pick models that are properly supported by stock OpenWrt, rather than the GL.iNet forks. But that’s a simple lookup of the table of hardware.
Why the Flint2?
I’d originally bought the OpenWrt One intending to use it as my new main router. But…
- It’s less powerful than the Flint2
- It doesn’t have enough switch ports[2]
- It has less capable WiFi
Put another way… the Flint2 has outrageously good specs, and solid OpenWrt support.
In almost every respect the Flint2 is the better device, with the exception of the One having space for an NVMe SSD. I liked the idea of my router having plenty of fast local storage (even if I don’t particularly have an application for it yet).
In the end I fell in love with the One as a development device, and that’s what I’ll keep using it for. After all I shouldn’t be tinkering with my main router.
Also a colleague got a Flint2, and so it had his seal of approval. After seeing them at a price I liked, only to see it hiked up, I set an alert on CamelCamelCamel and waited…
I didn’t have to wait long, less than a month later it was back at my desired price (for the Black Friday sale).

Physical setup
There was a disappointment on unboxing – the antennae aren’t removable. This meant that I had to wall mount the router to achieve optimal antenna positioning. But that in turn meant that the switch ports weren’t where I wanted them to be. I ended up using the 8 port managed switch I’d bought to go with the One.
In the picture above there’s one LAN cable running up to the NAS, which sits on a shelf at the top of the coat cupboard. The WAN cable to my fibre ONT and a LAN cable to the switch run down (along with the power cable).
The Flint2 has a couple of 2.5Gb ports. One is for WAN, which for now is hopelessly optimistic given the present services available in the UK. The other is for LAN, which just might offer improved throughput if a bunch of disparate links are busy at the same time, but isn’t an upgrade I’m in any hurry to do. 2.5Gb managed switches are beginning to come down in price, but so far only unrecognisable Chinese brands that come with mixed reviews.
Flash!
The first thing I did on powering up the router was reflash the firmware with stock stable OpenWrt (23.5.05). That went without a hitch, and I was straight into the familiar LuCI web interface.
I did an AI
The most complex config on the old router was all the DHCP reservations – dozens of them. Thankfully they could be saved out as a space separated file of MAC IP and Name. But I needed to translate that into OpenWrt config. A simple script would do it, but I don’t do that stuff every day, so I reckon it would take hours for me to actually write it and debug it. So instead I got Gemini to write a script for me. I’ve put the prompts and the output in this gist.
I generally don’t find coding assistants useful. But in this case, doing something that’s obvious, but doesn’t just flow from the fingers, it saved a whole lot of time.
Multiple VLANs, Multiple SSIDs
I run 3 WiFi networks:
- The family network that has the NAS and printers on it.
- A guest network, which mostly gets used by the kids’ friends.
- A things network for stuff that I don’t trust (and that anyway doesn’t need access to the NAS etc.)
Each of those has it’s own WiFi SSID, and under the hood they’re on separate VLANs. In recent times I’ve even bought some managed switches so that some ‘things’ can be hard wired, but not on the main LAN.
This was the fiddly bit to set up. Partly because I’d just not used that set of OpenWrt features before, and partly because this is an area where the OpenWrt documentation would benefit from a little more love. In the end the videos from OneMarcFifty starting with VLANs in OpenWrt 21 showed the way.
My final (redacted) configs are in this gist, which I might use as the basis for an improved written guide on the topic.
Conclusion
It’s been a week, and I’ve been very happy with the stability, performance and reliability of the Flint2. It’s certainly an improvement on the previous setup.
I had a complex network config to replicate, which involved a learning journey for how that stuff works in OpenWrt. But everything I needed to do wasn’t just feasible, but reasonably sensible and intuitive once I’d got my head around the abstractions.
The WiFi camera has stayed online :)
Coda
I flashed OpenWrt onto my old UniFi AC Lite access point and installed it in the garage. It has 802.11r fast roaming enabled, which seems to work well. Hopefully it will be useful for when I need to look up documentation when doing repairs out there, and it might also provide coverage to the back garden for when the weather is warmer again.
I’m now inclined towards replacing the Draytek AP960C with something running OpenWrt so I can have a consistent fast roaming setup through the house.
Notes
[1] I previously had an earlier Draytek router paired up with a Ubiquiti UniFi AC Lite access point.
[2] I still ended up using the 8 port switch I’d bought to go with the One in order to get the cabling right for the Flint2 :/
Filed under: networking, review, technology, Uncategorized | 1 Comment
Tags: Access Point, AI, Flint 2, Flint2, GL.iNet, MT-6000, OpenWRT, review, SSID, VLAN, wifi
October 2024
Pupdate
Autumn is definitely here, and it’s been wet enough that the boys have needed their coats some days.

The good news at the start of the month is that Milo’s treatment is working, and he’s back in remission :)
Travel
The end of the month has been quite busy for travel.
NYC
One of my shortest trips to New York, with just a couple of days in the city to attend ONUG Fall. Thankfully the weather was beautiful for my walks over the 11th Ave for the event.
I got to do a pilgrimage to Barcade Chelsea :)

Not my best game of Mr. Do! ever – I’ll blame the tired joystick and fire button on the 80s vintage cabinet (and not the IPAs); though it’s always nice to play on the original kit rather than MAME.
Rathfinny
My son’s been working at Rathfinny vineyard/winery for the last couple of summers helping out with bottling, but I’d never tasted their product myself. Their ‘Harvest Escape’ package seemed like a good way to get a full immersion experience, with tour, tasting, dinner and a stay in the Flint Barn.
I think I’m now a fan of zero dosage wine, which might be a shame for Rathfinny for converting me, as they don’t sell any; but some other local producers do…
Bath
It’s weird to be in Bath and not visiting my daughter (who’s been at University here for the last couple of years). But my wife got back in touch with an old friend, and she wanted to meet in Bath, so here we are. It seems quieter than usual, which is nice, and also the sun is shining :)
Dinner at Raphael might not be very Halloween, but as it’s one of my all time favourite restaurants…
Flash frustrations
The month has brought a couple of frustrating experiences with flash memory:
Lenovo M920q
A colleague showed me VergeOS, which seemed cool enough for me to reconfigure some home lab gear around it. So I bought another Lenovo M920q, as I like the remote keyboard, video, mouse (KVM) capability that comes with it as part of Intel vPro. Except when I went to enable Advanced Management Technology (AMT) I couldn’t. It was stubbornly fixed on Intel Standard Management (ISM), which lacks the KVM capability.
The rabbit hole this took me down led to ‘the only way to reflash the BIOS is to remove the chips’, and that’s where I gave up.
OpenWrt One
The OpenWrt One is the first router to be developed in partnership with the OpenWrt project, and I was super pleased to get one of the first ones off the production line.
Unfortunately the documentation wasn’t quite where it needed to be (which is fixed now), so I ended up bricking it within a day of unboxing. Thankfully the community leaders stepped up, and quickly had me running again using the UART recovery mechanism. So I was able to take it to ONUG with me to show off our latest LuCI interface for NoPorts on OpenWrt.
Apple Stuff
It’s been a busy month in Apple land for me
Watch
I noticed my Apple Watch (an 18m old SE 2) was giving more haptic feedback when tapping it than usual – because the screen was coming away from the frame :0
I was able to fix it with some T-7000 glue (affiliate link), though not before I’d bought another to ensure fitness tracking continuity.
I’m starting to suspect that this is what led to my Series 5 drowning at Discovery Cove :( I’ll also note that there was no sign of battery swelling (apparently a common cause for screen separation).
iPad Mini 7
My iPad Mini 5 has been serving me fantastically for over 5y, and it’s probably the device I use most. It’s the first thing I reach for in the morning, the last thing I look at before switching out the lights at night, and my constant companion on trains, planes and automobiles (when someone else is driving).
5y on, and I have no complains about performance, storage space, or anything else. But… battery life is far from what it used to be, and it doesn’t last through a long haul flight any more, and sometimes struggles to get through a long day up in London.
So… I now have an iPad Mini 7.
I’m delighted that it still has touch login, and I’m quickly getting used to life without a home button.
Geekbench tells me that it’s twice as fast as the Mini 5, though that’s not noticeable in the way the performance was when I got the Mini 5. I guess (like big engines in cars) you reach a point where there’s diminishing returns on incremental gains.
There’s just one problem – it doesn’t have a SIM card slot, so I couldn’t just move over the Three SIM from my Mini 5 (on a contract that still has the glorious ‘feel at home’ international roaming).
In the depths of Three’s website I found a way to request the conversion of my SIM to an eSIM, which was partially successful – in that the old SIM got shut off. But I had to visit a Three store to get the QR code for the new eSIM.
Solar Diary
A LOT less sunny than last October, with 21% less generation.

Filed under: monthly_update, technology, travel | Leave a Comment
Tags: AMT, apple, Bath, eSIM, Intel, iPad, ipad-mini, ISM, lenovo, M920q, Mini 7, NY, NYC, OpenWRT, pupdate, Rathfinny, solar, travel, vineyard, watch, wine, winery
Python script dependencies
TL;DR
‘–break-system-packages’ sounds scary, but (after some careful evaluation) is likely to be the right way to go for infrastructure automation, at least until uv is ready for production. Python venvs seem to be what we’re expected to use, but introduce additional complexity and associated fragility, which seems to make them a poor choice for system scripts.
Background
At Atsign we use a fair few Python scripts for infrastructure automation, and they’re built on top of dependencies that don’t come installed by default. This wasn’t previously a problem. We could ‘pip install’ what we needed (or in reality ‘pip install -r requirements.txt’ as we’re not savages, and actually keep track of dependencies).
But… things aren’t so simple in a post Debian 12 world, which includes Ubuntu 24.04 and Raspberry Pi OS ‘Bookworm’. The operating system itself uses Python, and to protect those scripts from being broken that’s now part of an ‘externally-managed-environment’. Some additional packages can be installed using ‘apt install python3-whatever’, but that’s a (very) limited subset. We use a couple of the google-cloud packages, and they’re not available that way. Attempting to install a package with ‘pip’ results in a dire warning:
error: externally-managed-environment

× This environment is externally managed
╰─> To install Python packages system-wide, try apt install
    python3-xyz, where xyz is the package you are trying to
    install.

    If you wish to install a non-Debian-packaged Python package,
    create a virtual environment using python3 -m venv path/to/venv.
    Then use path/to/venv/bin/python and path/to/venv/bin/pip. Make
    sure you have python3-full installed.

    If you wish to install a non-Debian packaged Python application,
    it may be easiest to use pipx install xyz, which will manage a
    virtual environment for you. Make sure you have pipx installed.

    See /usr/share/doc/python3.12/README.venv for more information.

note: If you believe this is a mistake, please contact your Python
installation or OS distribution provider. You can override this, at
the risk of breaking your Python installation or OS, by passing
--break-system-packages.
hint: See PEP 668 for the detailed specification.
What should we do?
I’m writing this post because even though Debian 12 has been out for over a year, I’ve not been able to find any expert guidance on the topic. It feels like the elephant in the room is being studiously ignored.
Just use a venv – right?
I must confess that I was a virtual environment (venv) Luddite until the Debian 12 change, and that change has pushed me into wholesale adoption of venvs. But there’s a huge difference between stuff we do in dev, and what a prod environment should look like.
There’s also a difference between Python apps and Python scripts (for infrastructure).
As I see it there are two problems in using venvs for production scripts:
- The venv needs to be created and populated (on every machine where the scripts will run). Yeah, this is just a bunch more scripting, but that’s more toil, more tech debt, more stuff that can go wrong.
- Every script needs to be modified to call the venv rather than the usual ‘#!/bin/env python3’.
There’s a part of me that thinks if venvs are so damn good why didn’t the systems people build one for themselves, and leave the rest of us to muck up our default namespace like before?
uv to the rescue?
I asked about this problem on Mastodon, and Python Software Foundation (PSF) board member Simon Willison was kind enough to reply and point out that uv has some handy features that might be relevant.
Firstly I should say that uv has already become an integral part of how I use venvs – it’s speed, flexibility and simplicity are delightful (and so much better than the stock Python tools).
I really like what uv are doing with scripts and dependencies. Dependencies are explicitly declared in a chunk of metadata (inside a /// script tag) at the top of a script, and then ‘uv run’ takes care of making sure stuff is in place. I’ve made a habit of dropping a comment into scripts with any ‘pip install’ lines that are needed, but this takes it to the next level. Of course it’s still necessary to change the shebang to use ‘uv run’ (specifically #!/bin/env uv run -q), but I think that’s a fair trade for explicit dependency management in situ.
The only thing stopping me switching to this approach is that uv is presently at version 0.4.18 and that 0 at the start says “don’t use this in production (yet)”.
Just –break-system-packages then?
First, I should say that wherever possible system Python packages should be installed with ‘apt install python3-whatever’ and that works for things like dnspython and dotenv that we use a fair bit.
But I’m writing this because that isn’t always an option.
But also ‘–break-system-packages’ doesn’t actually do what it says. It’s more of a warning of potential breakage than a certainty that breakage will occur. The key consideration is whether a package installed that way causes any actual changes to system dependencies, and if so are they going to cause actual breakage.
For the packages I’ve looked at: google-cloud-compute and google-cloud-pubsub it seems that they’re pretty well behaved. If I create a venv that inherits system packages, and then install those packages on top they happily work with what’s already there rather than stomping on it. Here’s a diff of ‘pip list’ afterwards:
8a9
> cachetools                         5.5.0
18a20
> Deprecated                         1.2.14
21a24,31
> google-api-core                    2.20.0
> google-auth                        2.35.0
> google-cloud-compute               1.19.2
> google-cloud-pubsub                2.25.2
> googleapis-common-protos           1.65.0
> grpc-google-iam-v1                 0.13.1
> grpcio                             1.66.2
> grpcio-status                      1.66.2
24a35
> importlib_metadata                 8.4.0
38a50,52
> opentelemetry-api                  1.27.0
> opentelemetry-sdk                  1.27.0
> opentelemetry-semantic-conventions 0.48b0
40a55,56
> proto-plus                         1.24.0
> protobuf                           5.28.2
59a76
> rsa                                4.9
72a90,91
> wrapt                              1.16.0
> zipp                               3.20.2
There’s probably one or two things (e.g. rsa) that I could have got from apt. But as they’re not there already the core OS clearly isn’t using them (and so won’t break because of getting them with pip rather than apt).
So… we decided to go with installing what we can’t get from apt with pip and ‘–break-system-packages’ – at least for now, until uv matures to 1.0.0.
Filed under: code | Leave a Comment
Tags: --break-system-packages, APT, automation, deb, Debian, dependencies, externally-managed-environment, infrastructure, package, PyPI, python, Raspberry Pi, script, system, Ubuntu, uv, venv, virtual environment
Yesterday Milo was back at North Downs Specialist Referrals (NDSR) for a scan and the Epirubicin chemotherapy that comes at the end of this cycle of the CEOP protocol.
The scan was very encouraging, showing that his lymph nodes were back to their usual size, so once again the oncologist thinks he’s in remission. His cancer has responded to treatment again, which is good. Also good was that with a slightly reduced dose of Vincristine last week his neutrophils were at an OK level for us to proceed with chemo.
Insurance
Milo’s premium has gone up a fair bit, but maybe that’s the normal course of things as he gets older. ManyPets have been turning claims around pretty quickly, with 60% being settled in a day or two, and the remainder coming through in 2-3 weeks. I’ve been adding the most recent NDSR report into the (newly added) history section each time, which hopefully is making things easier at their end (though why that’s necessary when they have all the history in their system can remain one of those mysteries of modern business processes).
Past parts:
Filed under: MiloCancerDiary | Leave a Comment
Tags: cancer, chemo, chemotherapy, Epirubicin, insurance, lymphoma, ManyPets, scan, Vincristine
September 2024
Pupdate
The bad/sad news at the start of the month is that Milo’s back on chemotherapy; though it seems to be going well, and we’re already almost at the end of the first cycle.

Apart from that the boys enjoyed some long walks before the weather turned.
Navy Reunion
It’s been 35 years since a bunch of us walked through the gates of Britannia Royal Naval College (BRNC) in Dartmouth. This is also likely to be the last time that some of us are still serving – those who’ve done well are now Admirals, and everybody’s on the cusp of hitting retirement age.
We were able to do things in a certain amount of style in the historic dockyard at Portsmouth – I guess those Admirals have some pull when they ask for things, and the weather was kind, allowing for a BBQ.
It was fantastic to catch up with old friends, some of whom I’ve stayed in touch with over the years, and others who I haven’t seen since our passing out ball at Dartmouth.
Vienna
I’ve been doing a lot of stuff with projects run by the Open Source Security Foundation (OpenSSF) over the past couple of years (e.g. Supply Chain Security Trifecta[1]), so when their SOSS Community Day Europe was announced it seemed like a good opportunity to meet folk in person who I’ve been collaborating with online. Sadly the industry wide turbulence of layoffs put a dent in that plan, but I went anyway and got to meet a bunch of interesting folk (and do a lightning talk on ‘Rules of Engagement for Forking a Dependency‘)
I’ve been to Vienna a couple of time in my time at DXC, which took me into the centre of the city for customer meetings, and the industrial park where the DXC offices are; so this trip took me to a new bit I’d not seen before, and the trains were thankfully very quick and efficient in getting me there and back.
Dillions
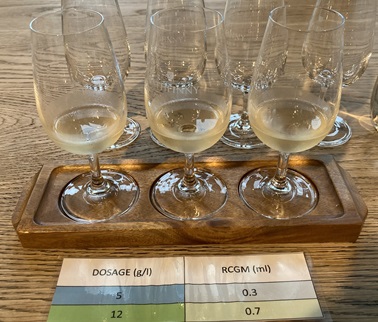
One of the treats I had planned for Rachel’s 50th last month was a trip to Dillions, a local vineyard that we first came across when their Bacchus appeared at one of our favourite restaurants. We also ended up getting their ’22 Bacchus as the white wine choice for our party last month (which went down very well). Sadly the tour had to be cancelled so that the vines could be sprayed, but thankfully they were able to re-arrange it for what turned out to be a beautiful day in the middle of the month.

David the owner was a wonderful host, though ’24 hasn’t been a good year for growing grapes; so our tour of the vines was something of a tale of woe – mildew, ‘hens and chicks‘ and just generally poor yield. After the vines we got to the fun bit – tasting (almost) all the wines he’s released commercially. We came away with a case of the ’22 Rosé, as it’s lovely (even though I’m not usually a Rosé fan).
If you want to hear about winemaking from a passionate expert (who’s making some of the best wine in the country) I can highly recommend a tour once they restart next year.
The Langham Eastbourne
We’d have very happily returned to Horsted Place after such a nice anniversary trip last year, but they were booked solid :( So… The Langham was what eventually got pulled out of the sorting hat, partly because of their dinner inclusive rate, but mostly because of so many positive reviews.
I’m not sure exactly what I expected, but it managed to exceed in many ways. The room was lovely, with a nice sea view. Dinner was delightful, and right up there quality wise with some of the top restaurants we’ve visited. The Sussex cheese selection was one highlight, but the star of the show was the royale cut smoked salmon in Rachel’s starter – I almost regretted my choice of beef tartare. Breakfast was delicious, and it was nice to sit in the seaside conservatory in daylight. Yes, it’s Eastbourne, so we were the youngest guests by about two decades; but that didn’t make any difference.
I was particularly impressed by their online check-in/check-out process, which meant we were swiftly on our way after breakfast for a meandering drive home along the coast.
Computer Sheds
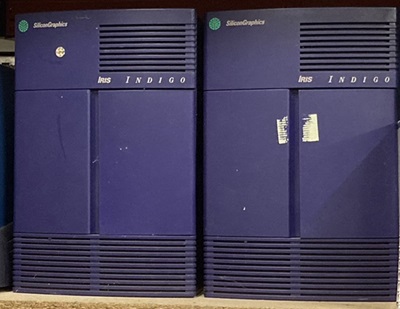
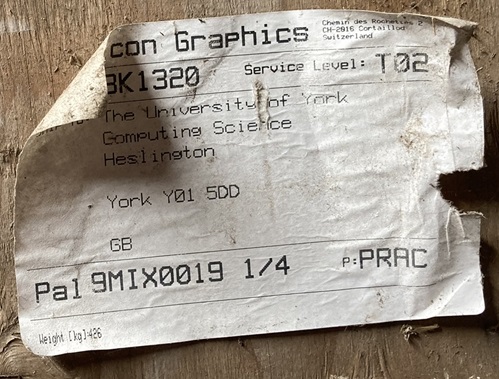
The Retro Computer Meetup had a jaunt to York to visit Jim Austin’s Computer Collection aka ‘The Computer Sheds‘. Jim and his merry band of volunteers have amassed an impressive hoard of kit and ephemera in the former pig farm ‘sheds’. They’re open for pre booked tours every other Saturday, with Jim providing an intro, and volunteers on hand to give guided tours. We were shown around by Pete, who’d worked with Jim at the University of York. It was particularly poignant for me to see examples of Silicon Graphics Indigo machines (and Cobalt ‘servers’) that I’d been telling a colleague about just days earlier. It’s possible that some of the machines in the sheds are the ones I actually used during my time at York.
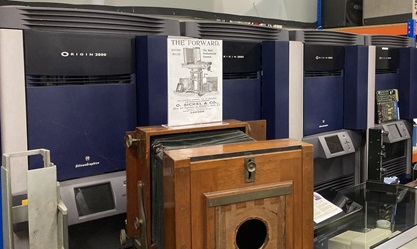
One of the most memorable exhibits is thought to be the first prototype of the Sun 1 Workstation:
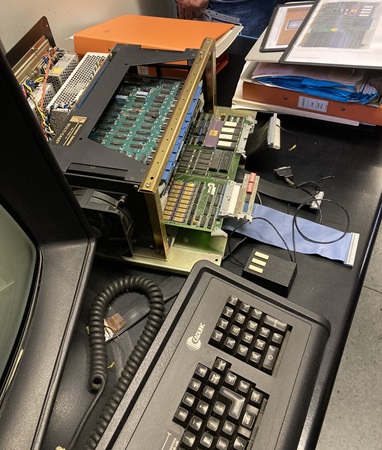
I chatted a little to Jim about Transputer stuff, whilst my meetup friends explored various artifacts connected to their earlier days of computing. It was a lot of time on trains to get there and back, but totally worth it.
HP Laptop Repairs
I got my son a Victus gaming laptop back in June, and he’s generally been very happy with it. Until the day it suddenly powered down.
Since I’d had a snag with the keyboard on my HP Omen laptop I knew the drill for getting it returned for repair, and it was soon on its way.
A few days later it was back, with a new motherboard (and trackpad). It lasted 7h before failing again.
Another repair, another new motherboard, and this time it lasted 45m. At this stage I’m pretty dubious about their testing, as it booted up into a CMOS parity error :/
Organising the next return was more of a palaver, and took three calls, which just seemed to be delaying the inevitable. We’re still waiting for it to get back, but neither of us is particularly optimistic.
Solar Diary
There were some nice days in the middle of the month, but generation was well down on last year.

Note
[1] Of you’re interested in more on this I’m doing a talk at AllDayDevOps.
Filed under: monthly_update | Leave a Comment
Tags: Austria, BRNC, chemotherapy, Computer Sheds, Dartmouth, Dillions, Eastbourne, HP, Indigo, Jim Austin, Langham, laptop, Miniature Dachshund, OpenSSF, Origin, pupdate, repair, retro, reunion, Royal Navy, Silicon Graphics, solar, SOSS, travel, Victus, Vienna, vineyard, wine, wine-tasting
Grace Hopper
It’s wonderful that this lecture by Grace Hopper at the NSA in 1982 has made its way out into the world.
It’s SO prescient on a variety of topics like distributed computing, language standards, service ownership and the leadership vacuum. She could see it all – 42 years ago.
If you work in IT today, in any capacity, it’s worth 1h30 of your time (and maybe set aside a little more to reflect on what she had to say).
Filed under: retro, technology | Leave a Comment
Tags: COBOL, distributed, Grace Hopper, history, leadership, SOA
HelixML have announced their Helix platform for Generative AI is production ready at version 1.0. Described as a ‘Private GenAI Stack’ the platform provides an interface layer and applications that can be connected to a variety of large language models (LLMs). It can be used to prototype applications, starting with just a laptop; with all components version controlled to ease subsequent deployment and scaling of apps that prove useful. There’s also heavy emphasis on evaluations (evals) as the substitute for tests in the non deterministic domain of LLMs.
Filed under: InfoQ news | Leave a Comment
Tags: AI, GenAI, Helix, HelixML, InfoQ, LLM
Two more months have rolled by since the last scan and Milo has enjoyed a nice summer of long walks and no vet visits (apart from his routine vaccinations).
Sadly the most recent scan picked up some inflammation of the lymph nodes, which suggests that the cancer is back. But once again we’ve caught it early, so there’s no sign of alimentary issues and any corresponding illness. It’s weird having a dog who’s ill but not unwell.

So… back to chemo, and a slightly different protocol this time as he can’t have any more Doxorubicin (the H in CHOP). This time it’s going to be CEOP, which uses Epirubicin rather than Doxorubicin; but that comes at the end of the cycle, so we start off as before.
Past parts:
Filed under: MiloCancerDiary | Leave a Comment
Tags: cancer, CEOP, chemo, chemotherapy, CHOP, dachshund, doxorubicin, Epirubicin, lymphoma, Miniature Dachshund, oncology, scan, Vincristine
August 2024
Pupdate
The holidays brought the chance for longer lunchtime walks :)

Zig
A bunch of smart (network) engineers kept mentioning Zig to me, so I took the opportunity to try it out. It’s supposed to be a replacement for C, and I was impressed by the bitwise switch statements in the fizz-buzz sample. If I was writing a device driver this feels like the language I’d want to use.
Even better, the Zig tool chain can cross compile C code. This seemed like the answer to my prayers for easily creating a range of binaries for the C implementation of NoPorts – until I discovered the binaries only worked superficially. I guess I’m now waiting for Zig 1.0.0 and a complete implementation of compiler-rt.
Warship
There’s a reunion planned in mid September to mark 35 years since a bunch of us joined Britannia Royal Naval College (BRNC) in Dartmouth. It’s sent me on a bit of a Navy nostalgia trip, which has got me watching episodes of Warship during my morning workouts. As it was made from 1973-77 I was far too young for an adult themed show, and I don’t even recall ever seeing any repeats of it back in the day. It holds up really well though. There are some scenes and episodes where it seems like my former colleagues were cosplaying what they’d seen on TV. And numerous comments (sometimes dismissed with ‘maybe before your time’) now suddenly make sense. Perhaps most (sadly) striking is that the challenges faced in the 70s that set the frame for some episodes are still relevant today.
Birthdays
The big event of the summer was Rachel’s 50th birthday, which we marked with a variety of activities culminating in a big party for friends at a local restaurant. Everything was great fun, and I’m particularly glad we got to see ABBA Revival at Trading Boundaries, which was an excellent evening out (and worth the early start and late arrival for OSHcamp…)

Weirdly, my car was registered on Rachel’s 25th birthday, meaning it hit its quarter century at the same time as her half.
OSHcamp
It was great to return to the Open Source Hardware camp (OSHcamp) as part of Wuthering Bytes in Hebden Bridge. Even better to see one of my favourite communities thriving and growing, with a bigger venue allowing for more attendees with a good bunch of new younger faces :)
I enjoyed the talks on Saturday, and had the chance to present myself on ‘Showing that you care about security for your open source (hardware) project‘.

Whilst Sunday brought the much greater challenge of assembling Ken Boak’s ‘TICK‘ bit serial computer.
New things
Windows
When we moved into our new build house in 2002 it was frustrating that the windows were so bad – poorly fitting wood framed units. We were told that wood was mandatory because of building in a conservation area, which was madness – chopping down more trees, and with gales blowing into some rooms that obviously impacted our energy use for heating. Thankfully there’s no such silliness for replacement windows, and we are perhaps in the late majority on the street to get uPVC units.
At this stage it’s hard to notice any difference (other than the lack of rotten window sills outside), but hopefully they’ll make a real difference once winter comes. I’ll be keeping a close eye on our gas usage.
Hot tub
I wasn’t a fan of getting an inflatable hot tub – mainly due to the energy use. But when an mSpa Alpine D-AL04 showed up in the summer of 2020 I grudgingly got into enjoying it whenever the weather allowed. Things changed once the solar was installed, as the tub could be run from a timer that would use electricity that would otherwise be exported, which really changed the effective cost.
Each year as it’s gone away I’ve wondered if it would survive for another season, and it lasted longer than I expected. But after some time off during our Lakes Trip the pump wouldn’t run for more than about 15m without stopping with an E1 error. I tried stripping it down and cleaning it out, but actually everything was pretty clean.

Deciding that it wasn’t worth buying a new pump that might fix a now somewhat shabby old tub I thought the money would be better spent on a new one, so I grabbed a Lay-Z-Spa Barbados (which was half price in their summer sale). In many ways it’s a much better tub than the old mSpa. Energy efficiency is hugely improved by better insulation, the base is much more comfortable, and the chemical dispenser makes keeping the right chlorine level easy. My one niggle is that the lid fills up with rain water, though it’s much easier to clear than the old one. Also the WiFi/App is utter garbage – I can’t even get through the setup process.
Solar Diary

It’s been another year since getting the panels installed, with a total of 8665 kWh generated (4271 this year, a little down on the previous year).
Ethernet data logger
I was never happy that the WiFi data logger couldn’t connect to my devices SSID, so I got a ShineLan-X ethernet data logger, and a managed switch to run a VLAN to it (because there’s no way I’m putting something that connects back to China onto my regular LAN). It’s great when it works, but there seems to be a race condition where sometimes the logger comes online before the inverter is ready.
Filed under: monthly_update | Leave a Comment
Tags: ABBA Revival, birthdays, data logger, hot tub, lay-z-spa, OSHcamp, pupdate, ShineLan-X, solar, Warship, zig

